Publishing to learning platform
The learning materials targeted for consumption by the learners/trainees are usually deposited in on the learning platforms, usually as parts of larger learning units such as courses.
Learning Objectives
- Describe the procedure for publishing learning materials to the learning platform
- Explain the basic elements of the course in Moodle
- Configure Moodle course parameters
- Add different elements to the course
Target Audience
- Attendees of the FAIR-by-Design ToT live webinar
Duration
35 mins
Prerequisites
Learning Tools
- Training BBB room
- Moodle learning platform
Description of the procedure for publishing to the learning platform
To make available the learning materials for learners and trainees we will be using the Skills4EOSC learning platform, available at learning.skills4eosc.eu. The learning platform is based on the popular and widely used open source learning management system (LMS) called Moodle.
The initial step needed to publish a course at the learning platform is to request one from the platform's administrators.
NOTE: Before asking for the course creation, please create an account on the platform, using the "Log in" link at the upper right corner of the welcome page.
To do so, write an email to learning-support@skills4eosc.eu requesting the creation of the new course and stating the names/emails of the people that will be assigned Trainer (Teacher) role for the course.
NOTE: At least one person should be assigned the role Manager, allowing her/him to add more teachers to the course later.
Once the course has been created, you can start customizing it and publishing the learning materials.
Configuring course parameters
The first action usually taken to a new course is to customize its settings. To customize settings, one must have the Teacher (Trainer) role assigned.
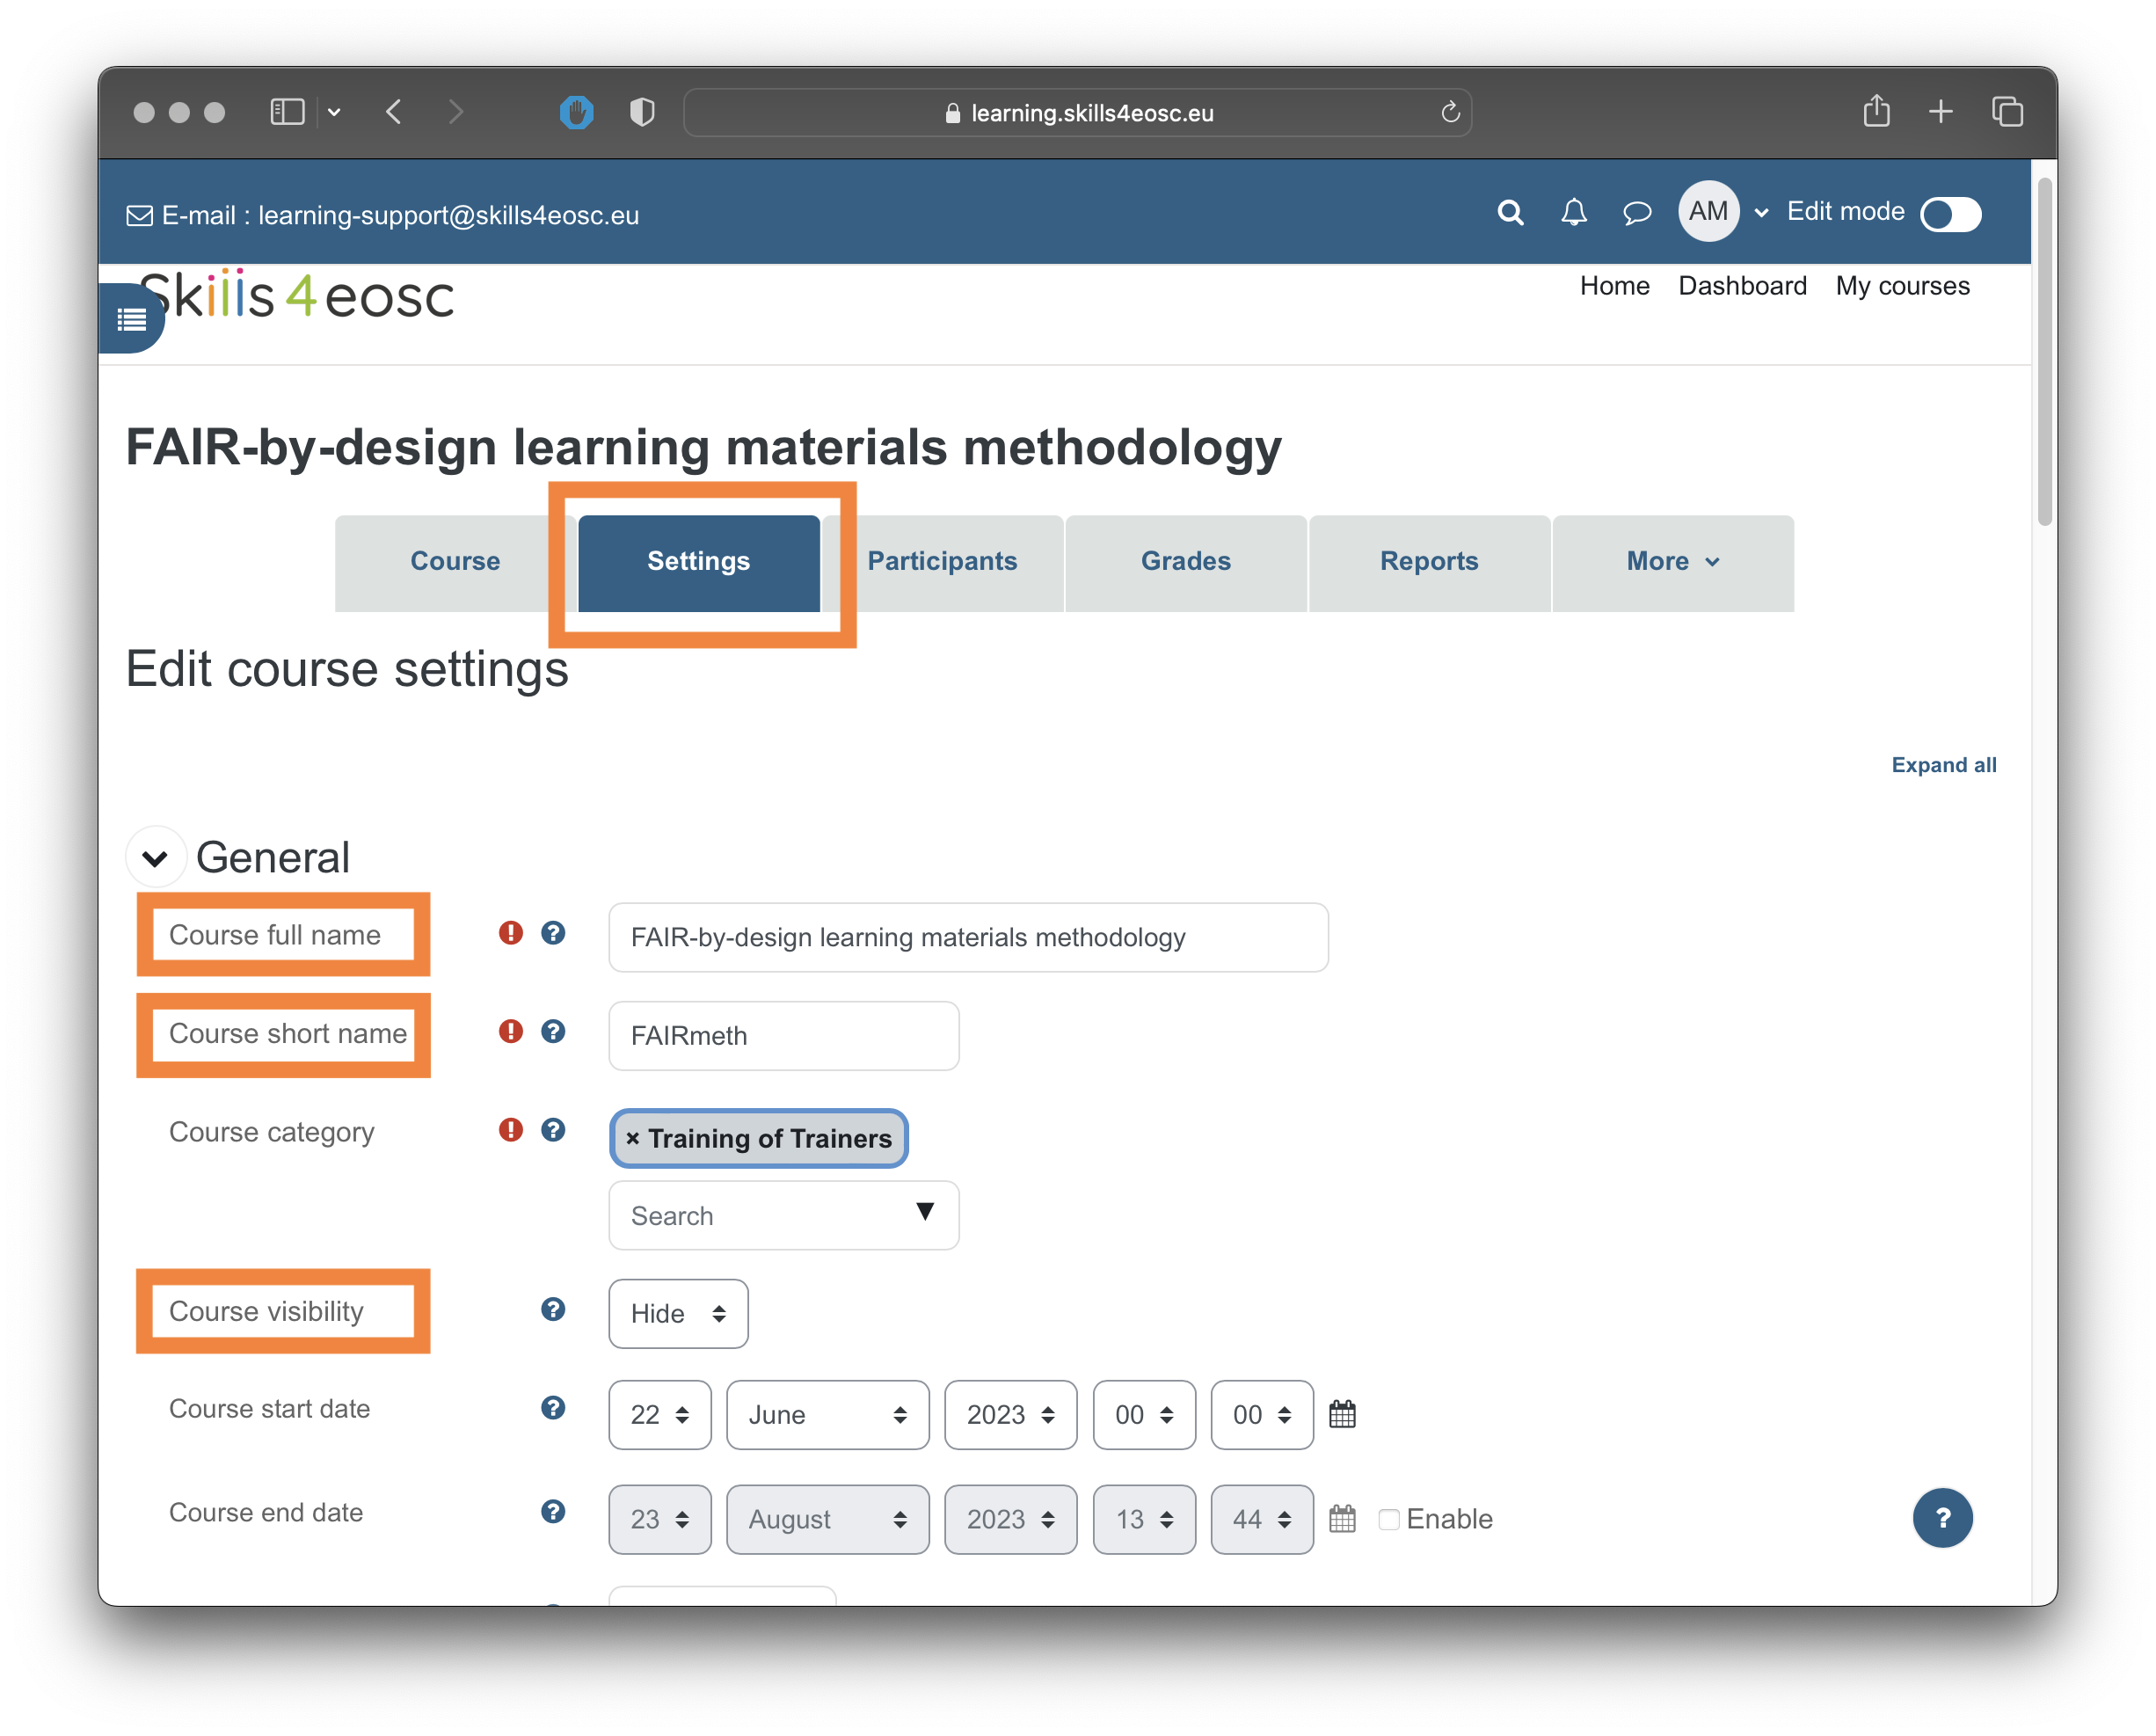
The main parameters that can be set are: Course full name, Course short name, Course visibility, Course start and end date etc.
NOTE: Initially, Course visibility is set to Hide during the preparation of the course. This means that the Learners/Trainees can not see or access the course.
Other parameters that could be set for a course include Course summary and image in the Course description section, that are displayed in the course list or dashboard.
To customize the way the course material is presented to the trainees, use the settings under the Course format section. The Format parameter lets you choose between several format, including Weekly format (suitable for courses that are offered at the specific time, where material is grouped by weeks) or Topics format (where each section of the course is one topic). For courses that are offered as self-paced learning courses, the Topic format is preferable.
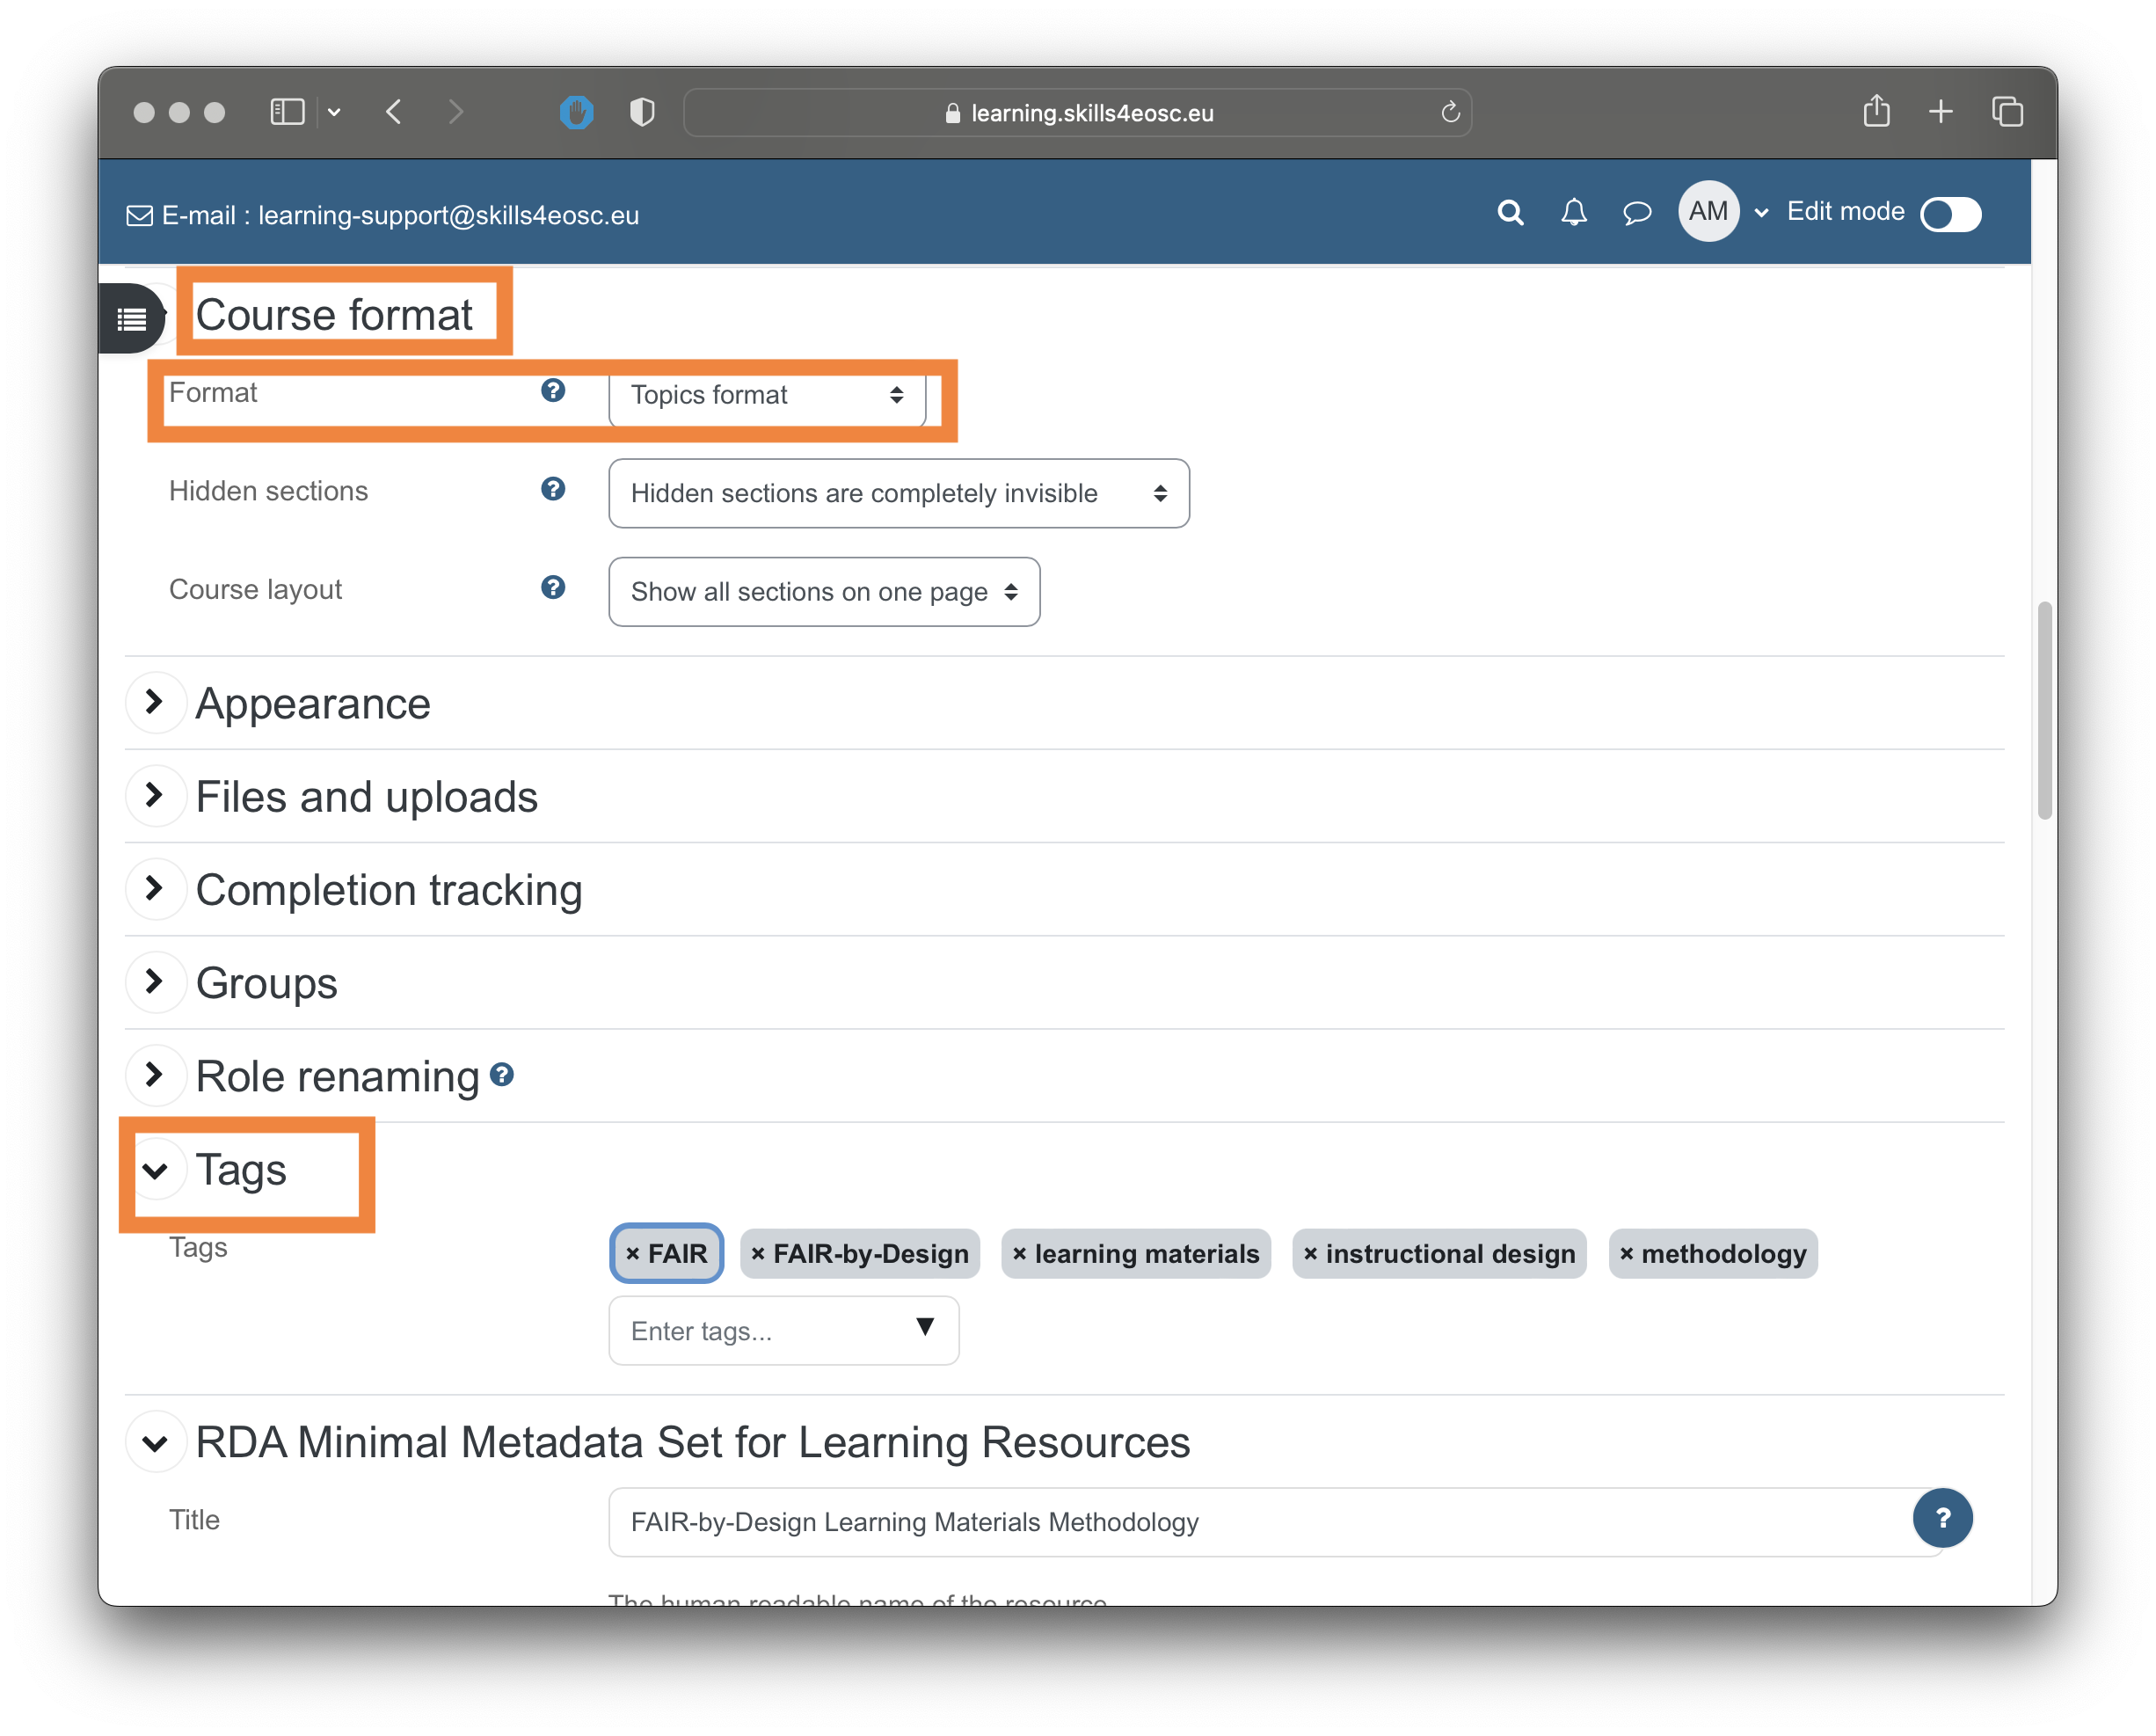 Defining tags for the courses helps the users discover the course when searching through the courses offering on the learning platform.
RDA metadata fields
In the RDA Minimal Metadata Set for Learning Resources you should enter the information for the metadata fields discussed in the Design stage. For these purposes you can simply copy/paste the information from the Syllabus.
Creating the course structure
When the course has been configured to be in the Topic format, the structure of the course consists of one General topic (created by default when creating the course) and number of Topics. Each topic is a container that will have different learning objects within.
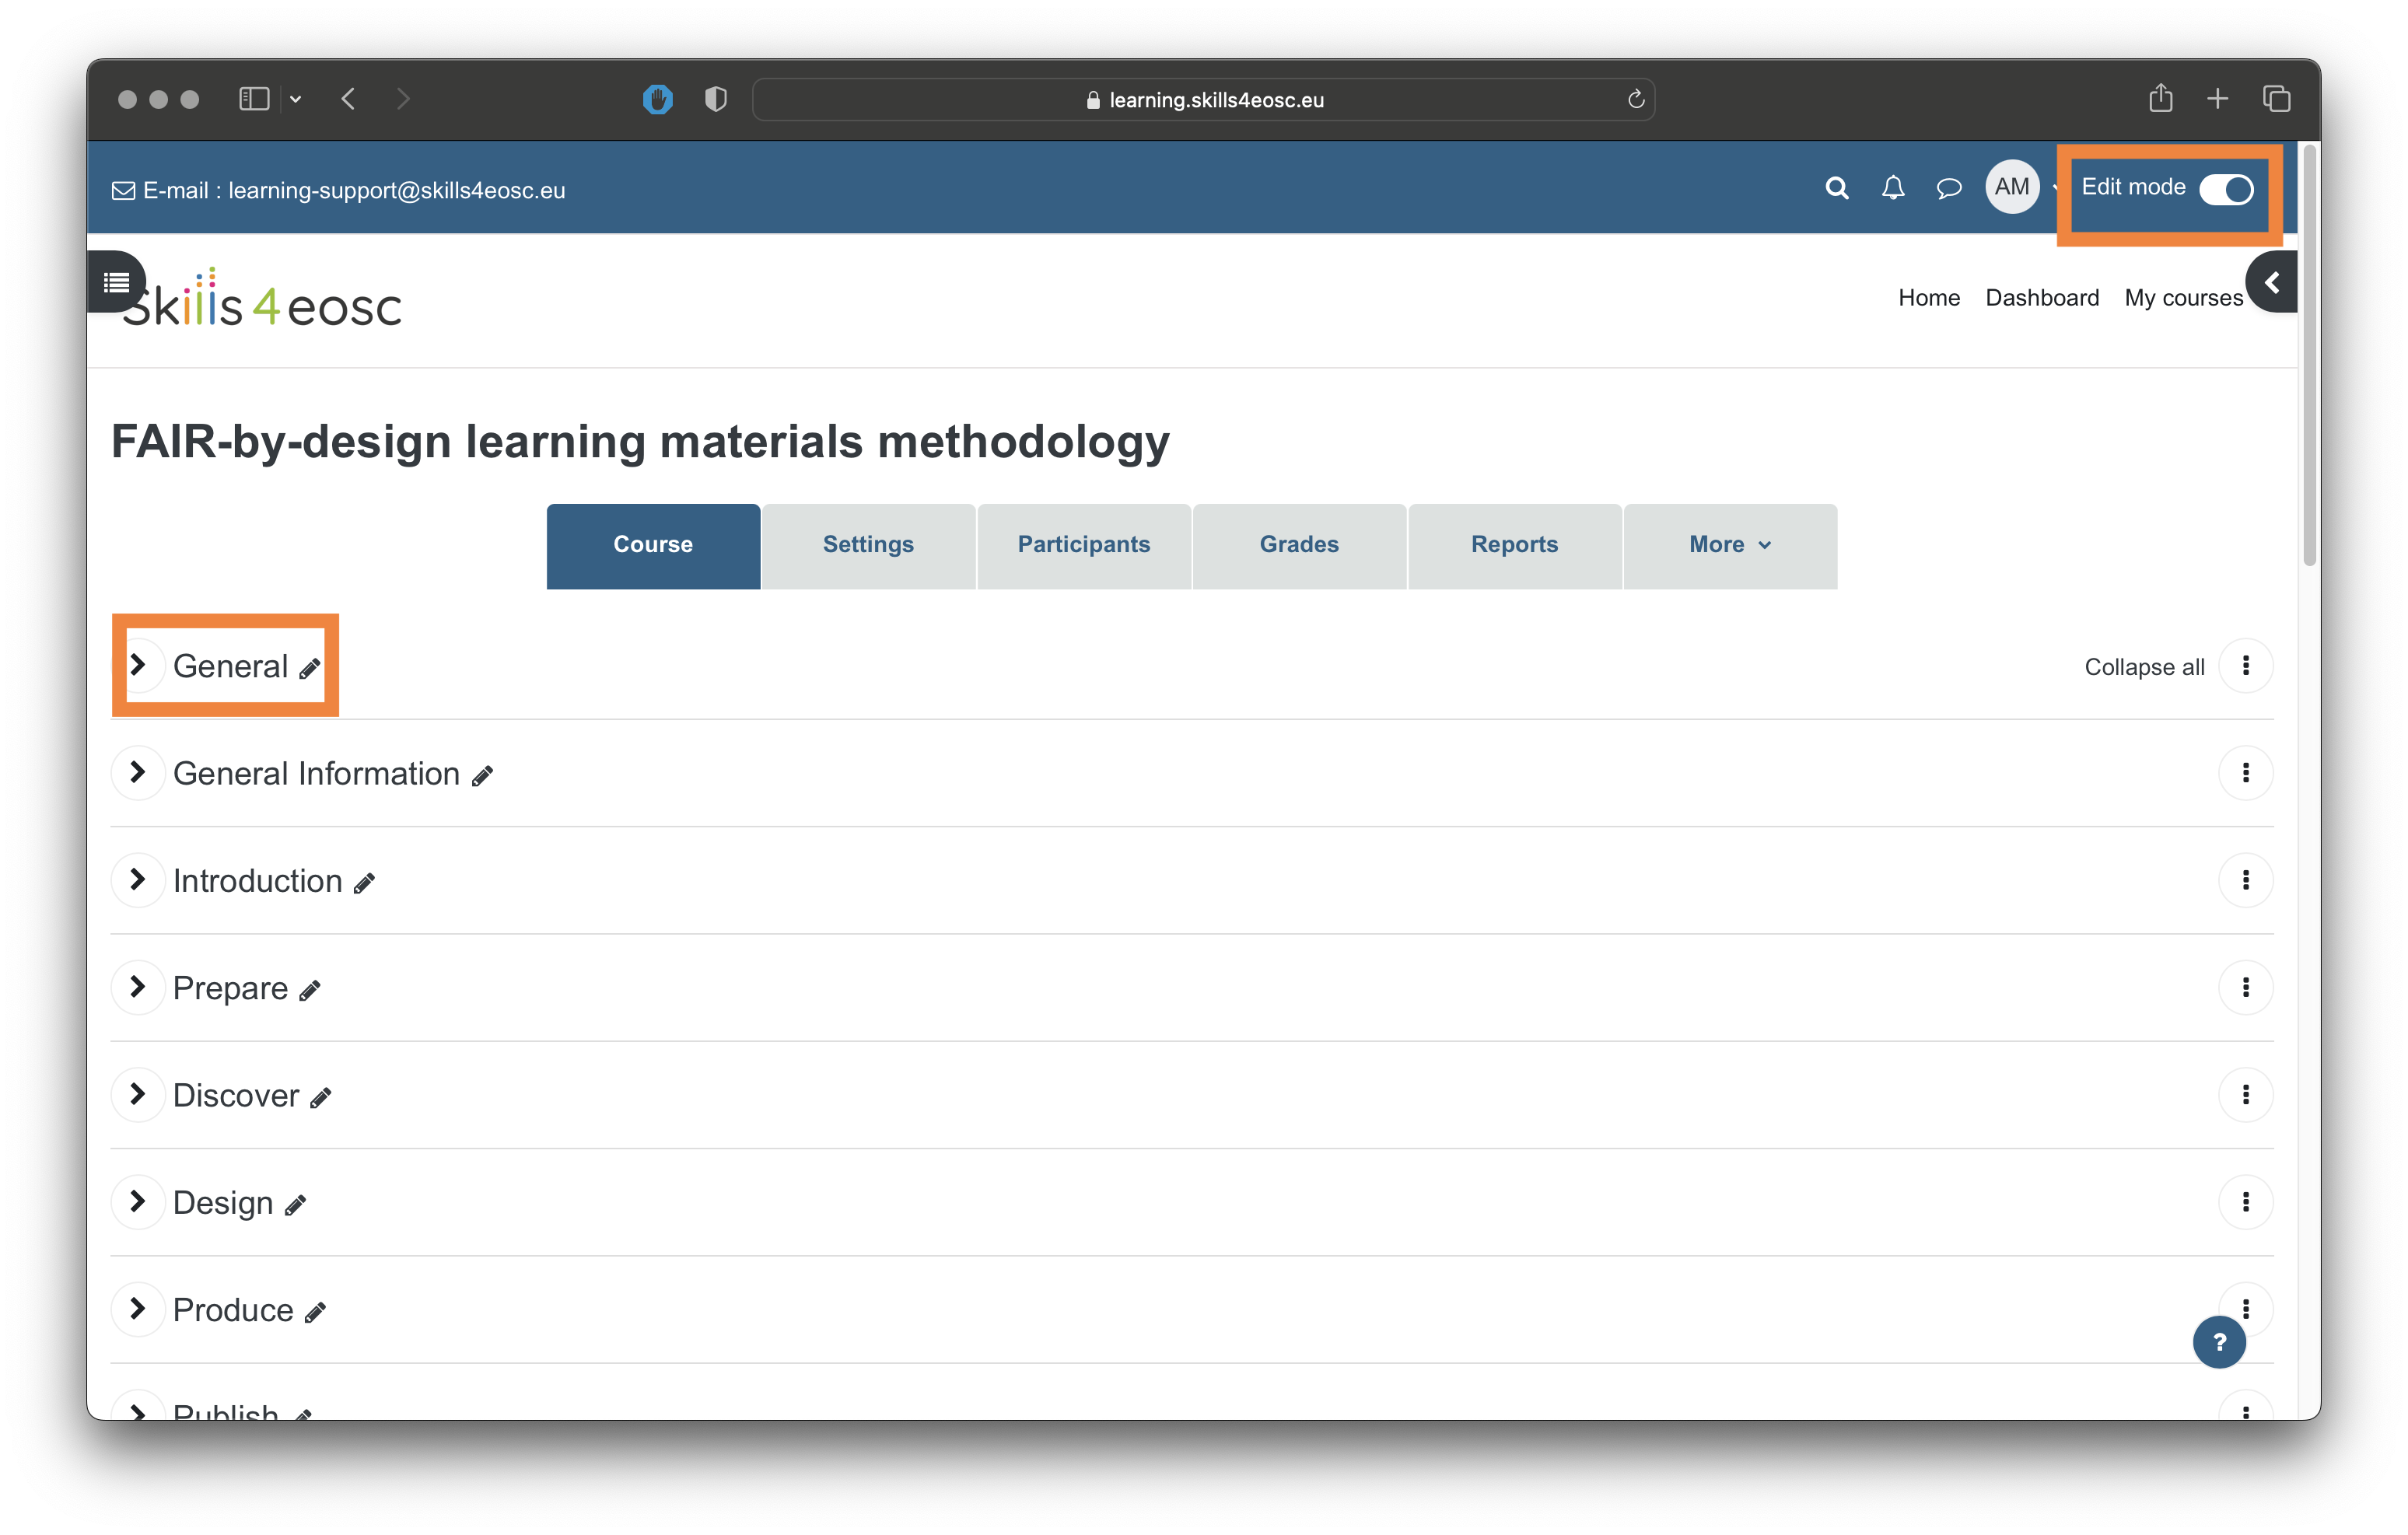
To make any changes to the courses, the editing mode has to be turned on, by clicking the switch in the upper right corner.
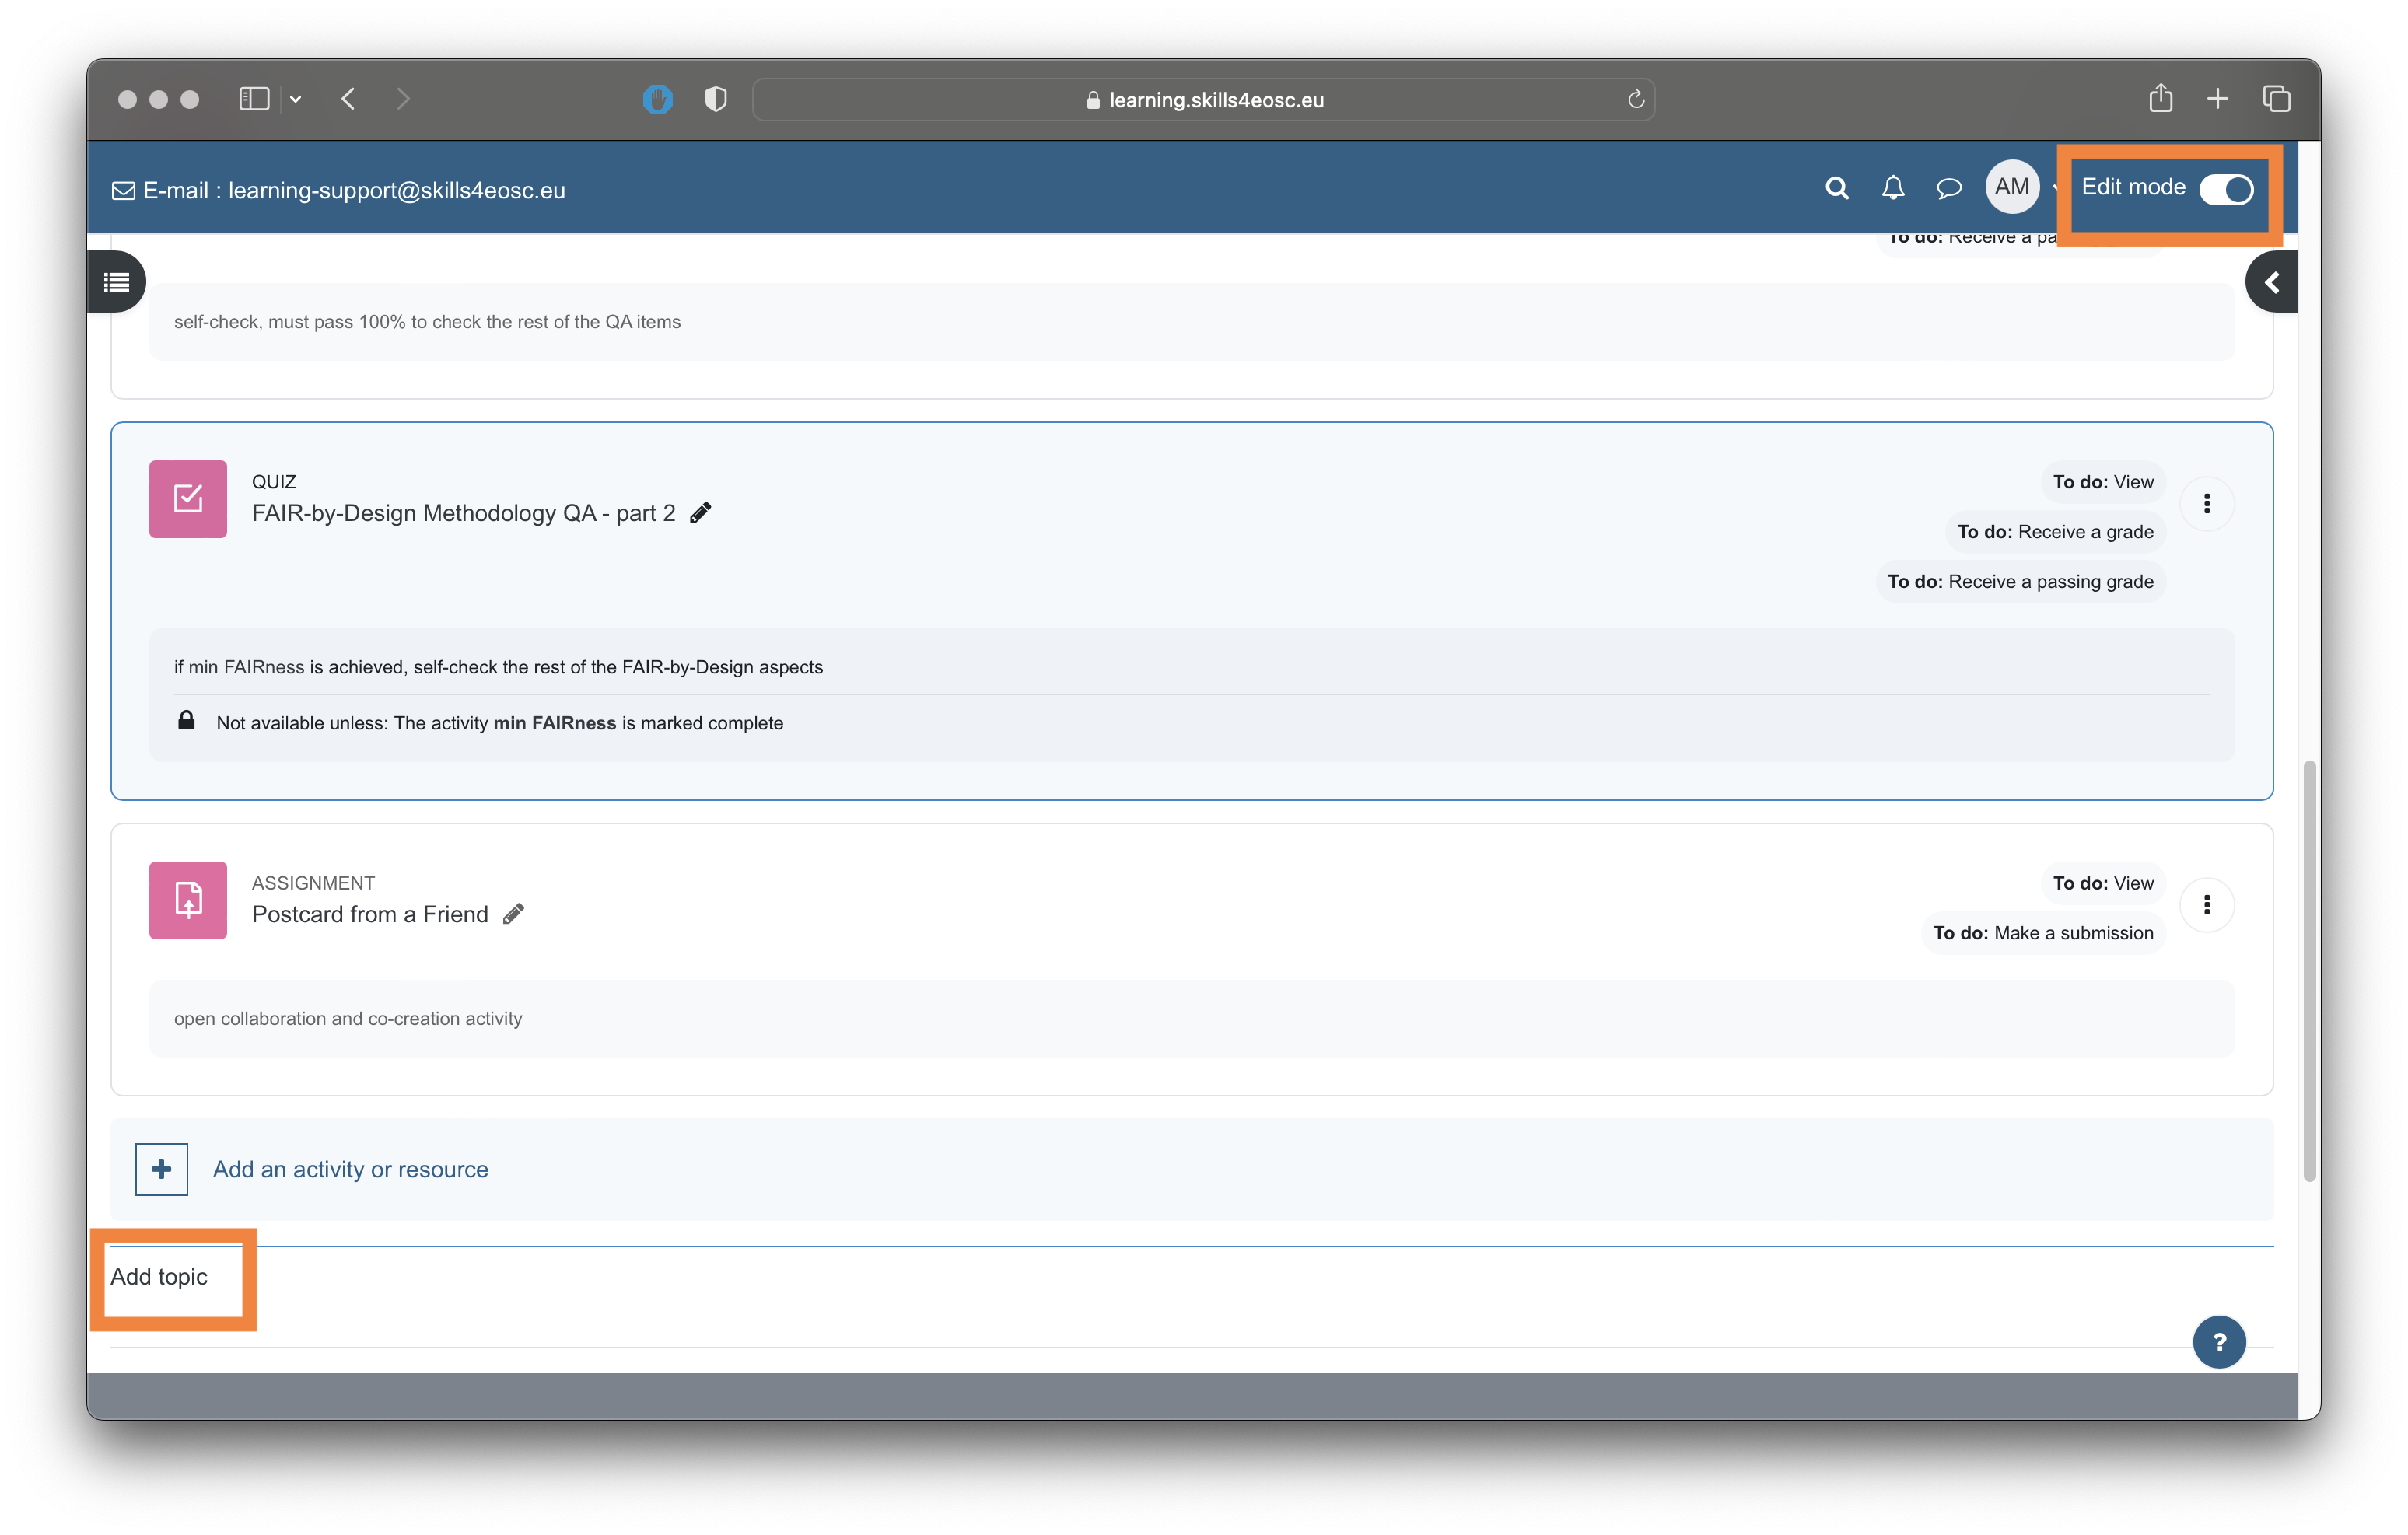
To add a new topic, use the "Add topic" link at the bottom left. Each topic will need to have a title as a minimum.
One topic can correspond to one or more learning objects. The minimum resources per topic are thus:
- PDF version of the slide deck (if available)
- link to the topic content on the generated GitBook
- assessment quiz for the given topic
Adding PDF documents
One common type of material that will be added to the courses on the learning platform will be PDF documents, whether they will be pdf versions of the presentations or other materials.
As mentioned previously, to make any changes to the course, the editing mode needs to be turned on, by clicking the switch in the upper right corner.
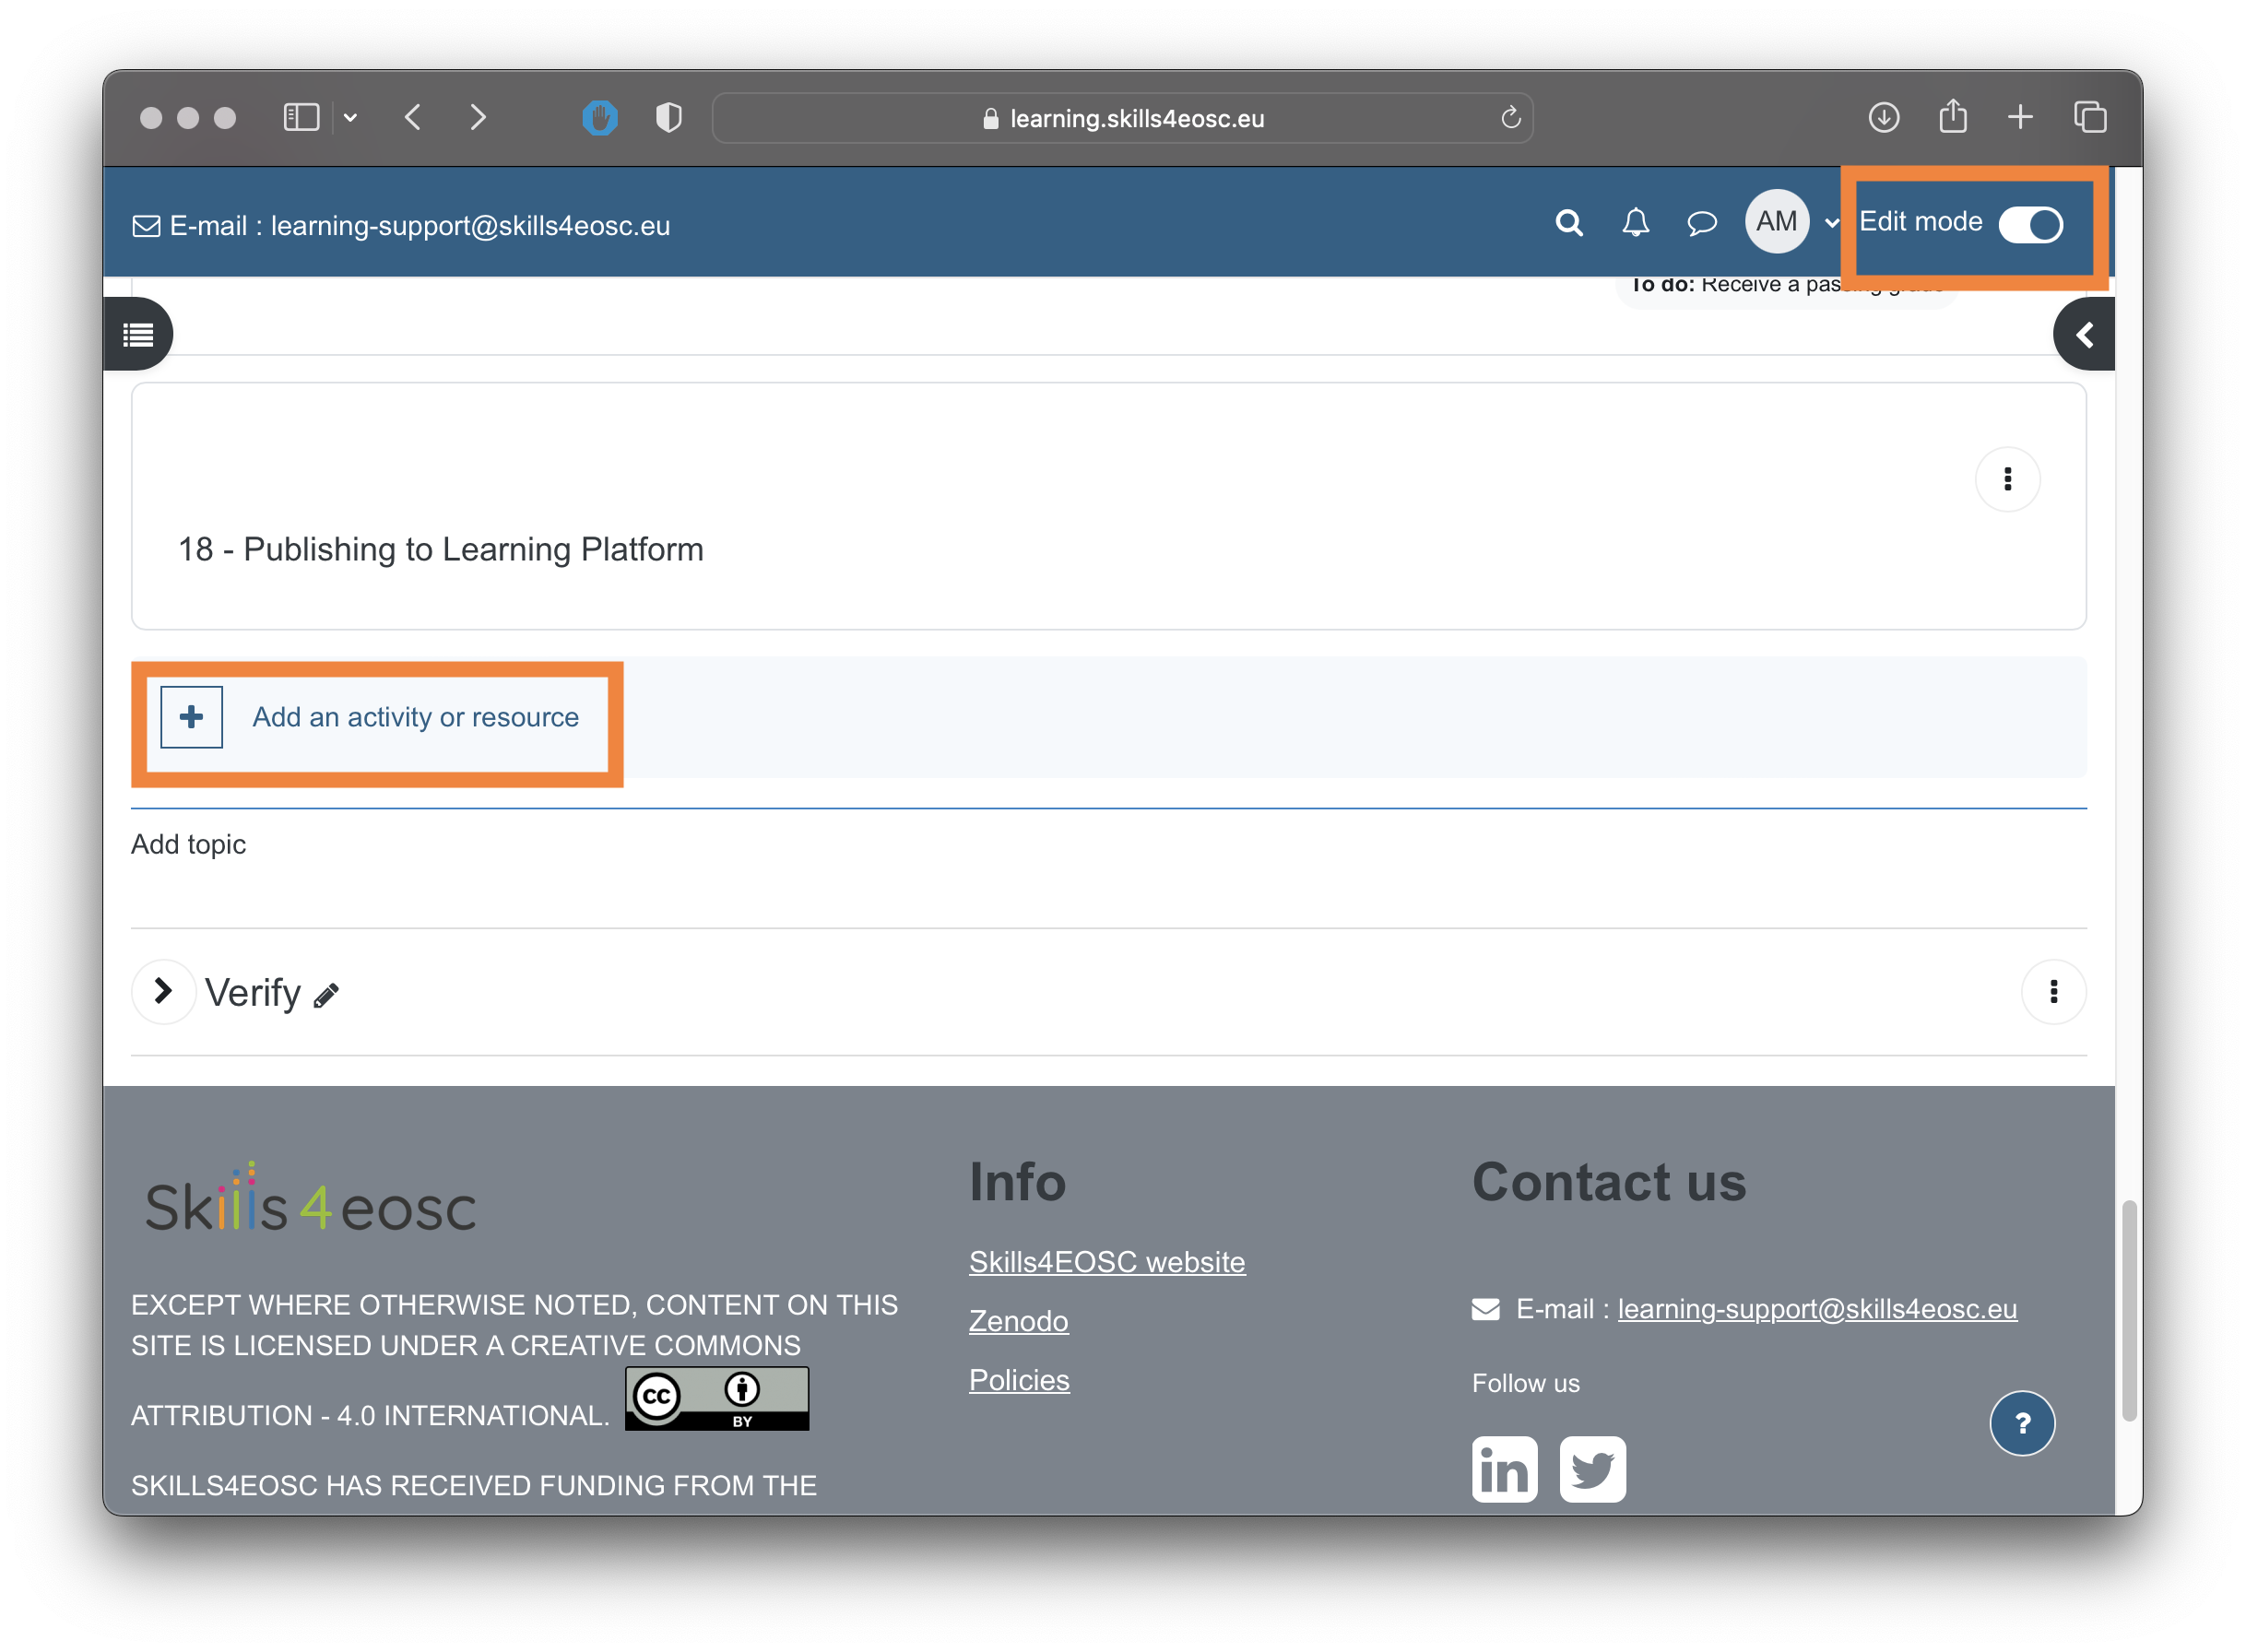
The next step is to expand the topic that will contain the pdf file. Once expanded, the topic will contain a link titled "Add an activity or resource". By clicking this link, the selection of available activities and resources is displayed.
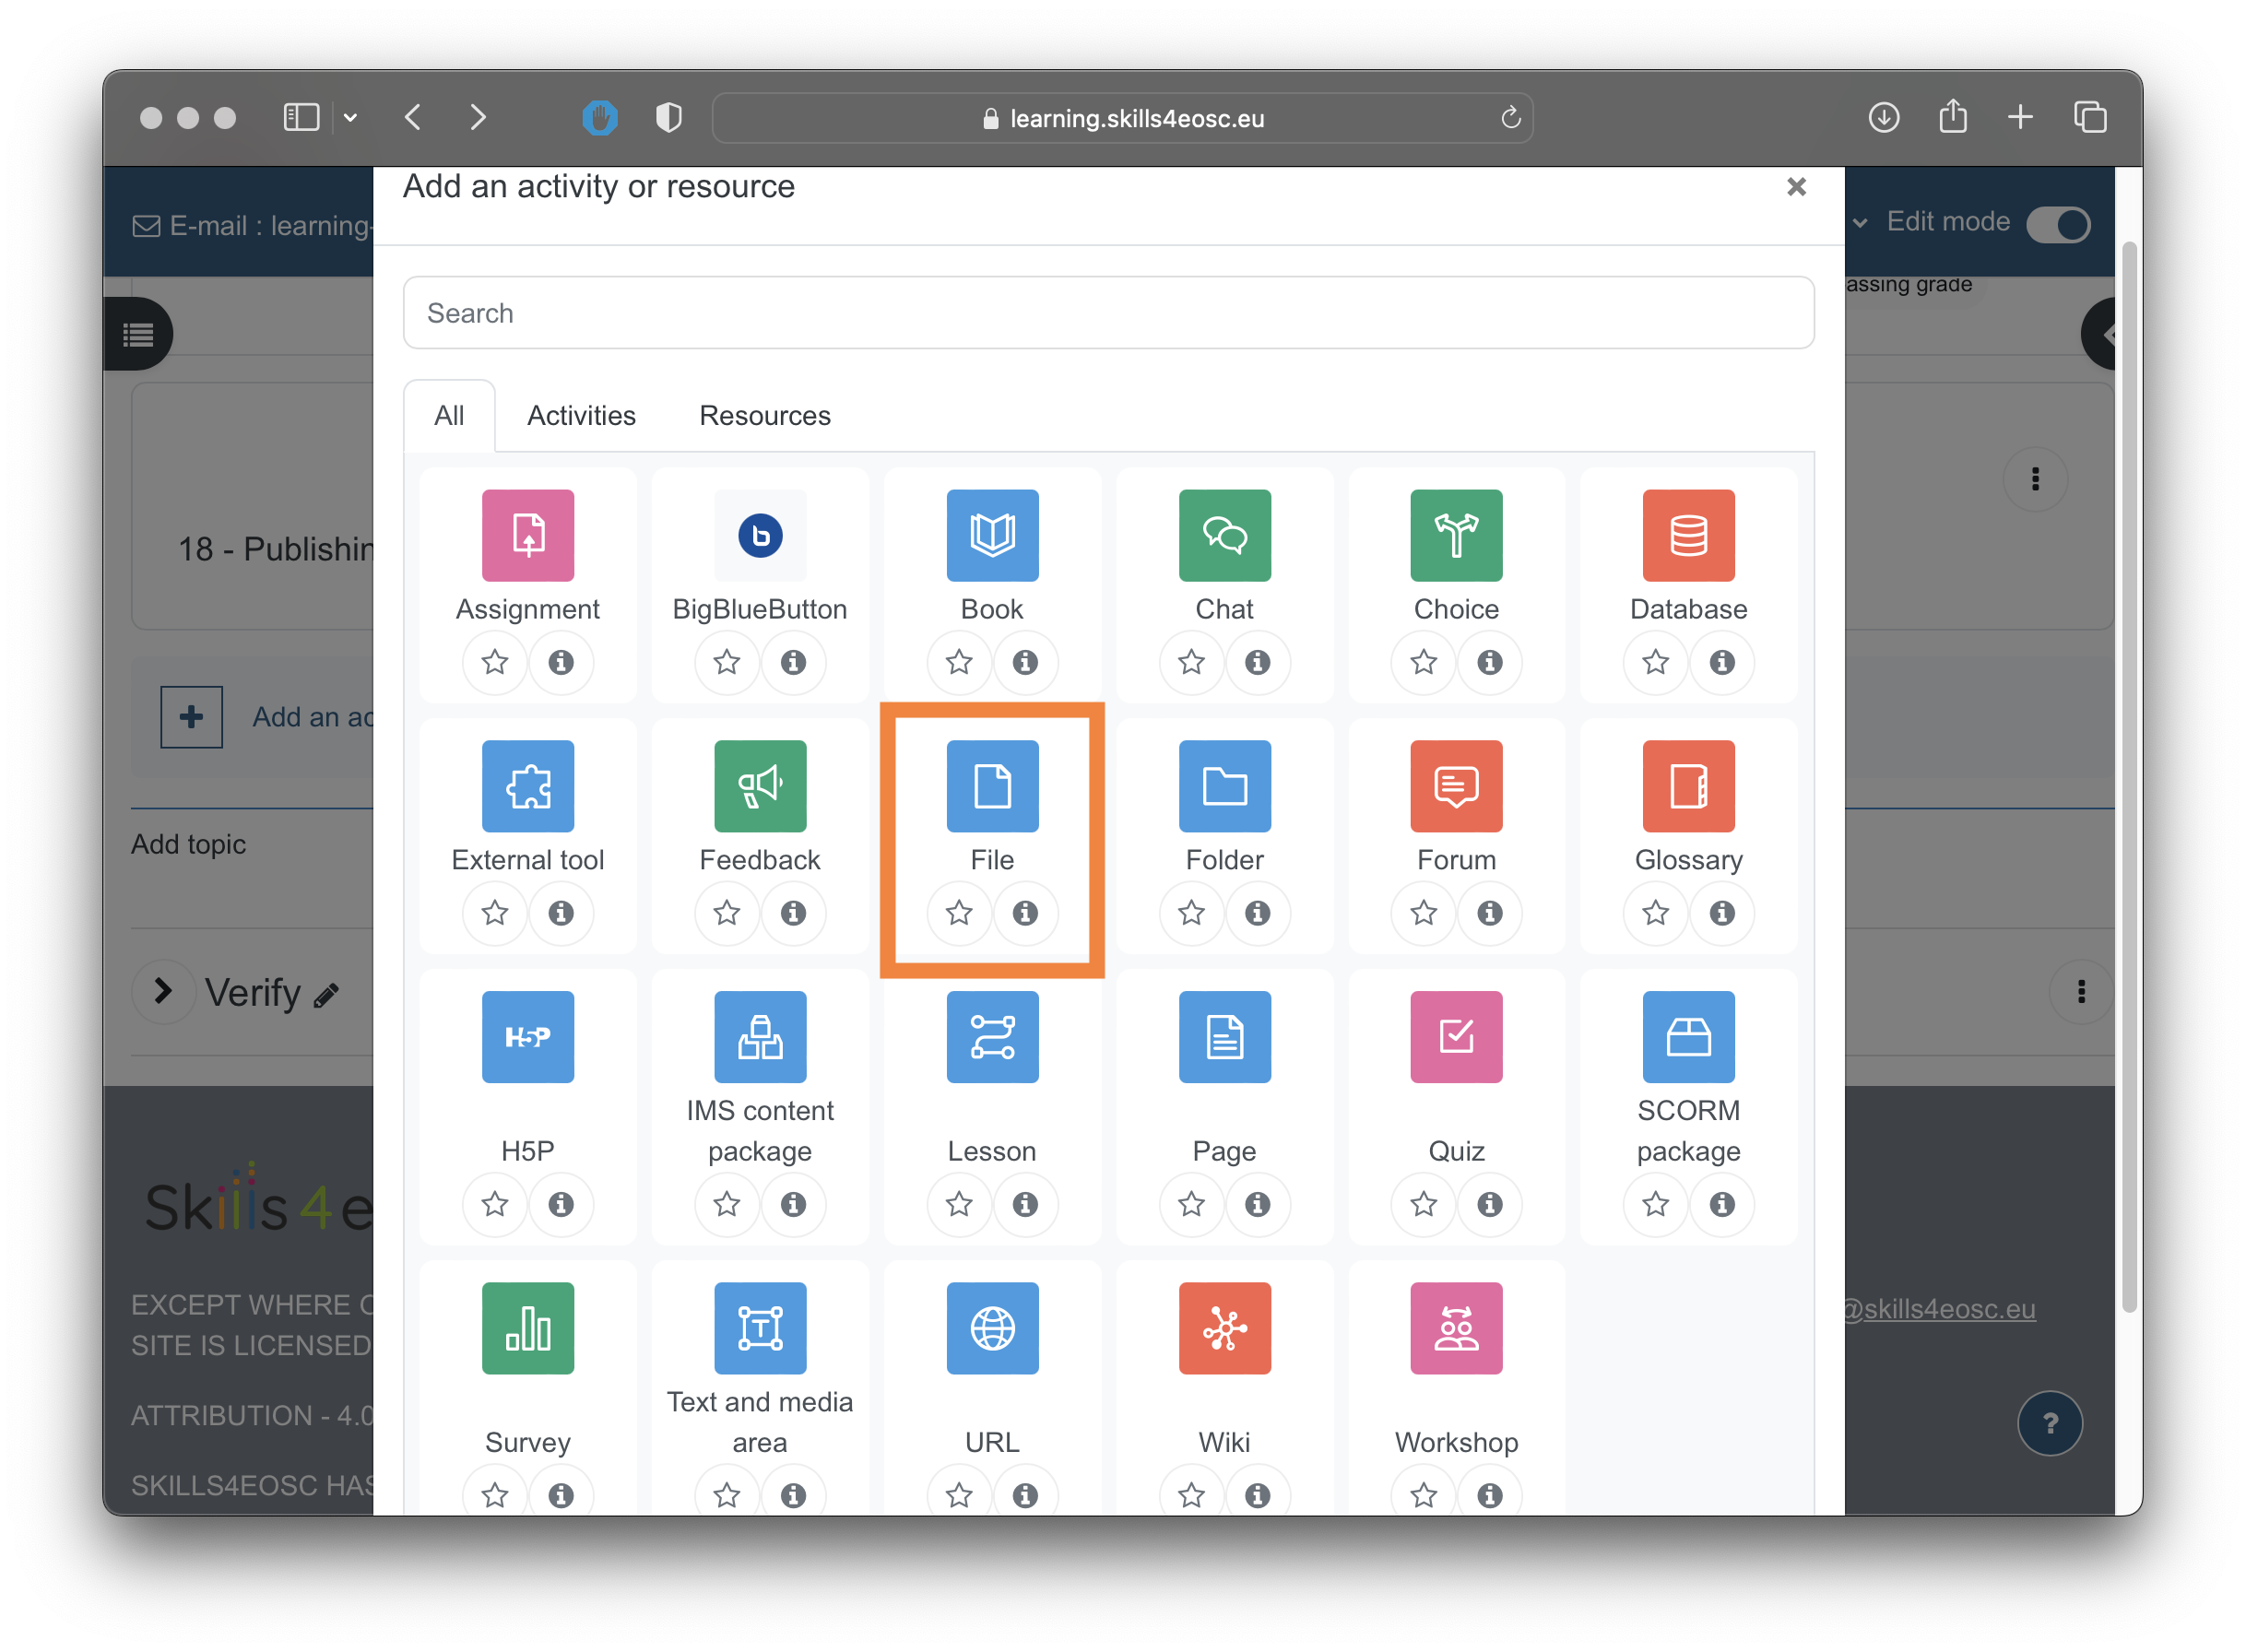
Select the "File" resource to proceed to the form for describing and uploading the pdf file.
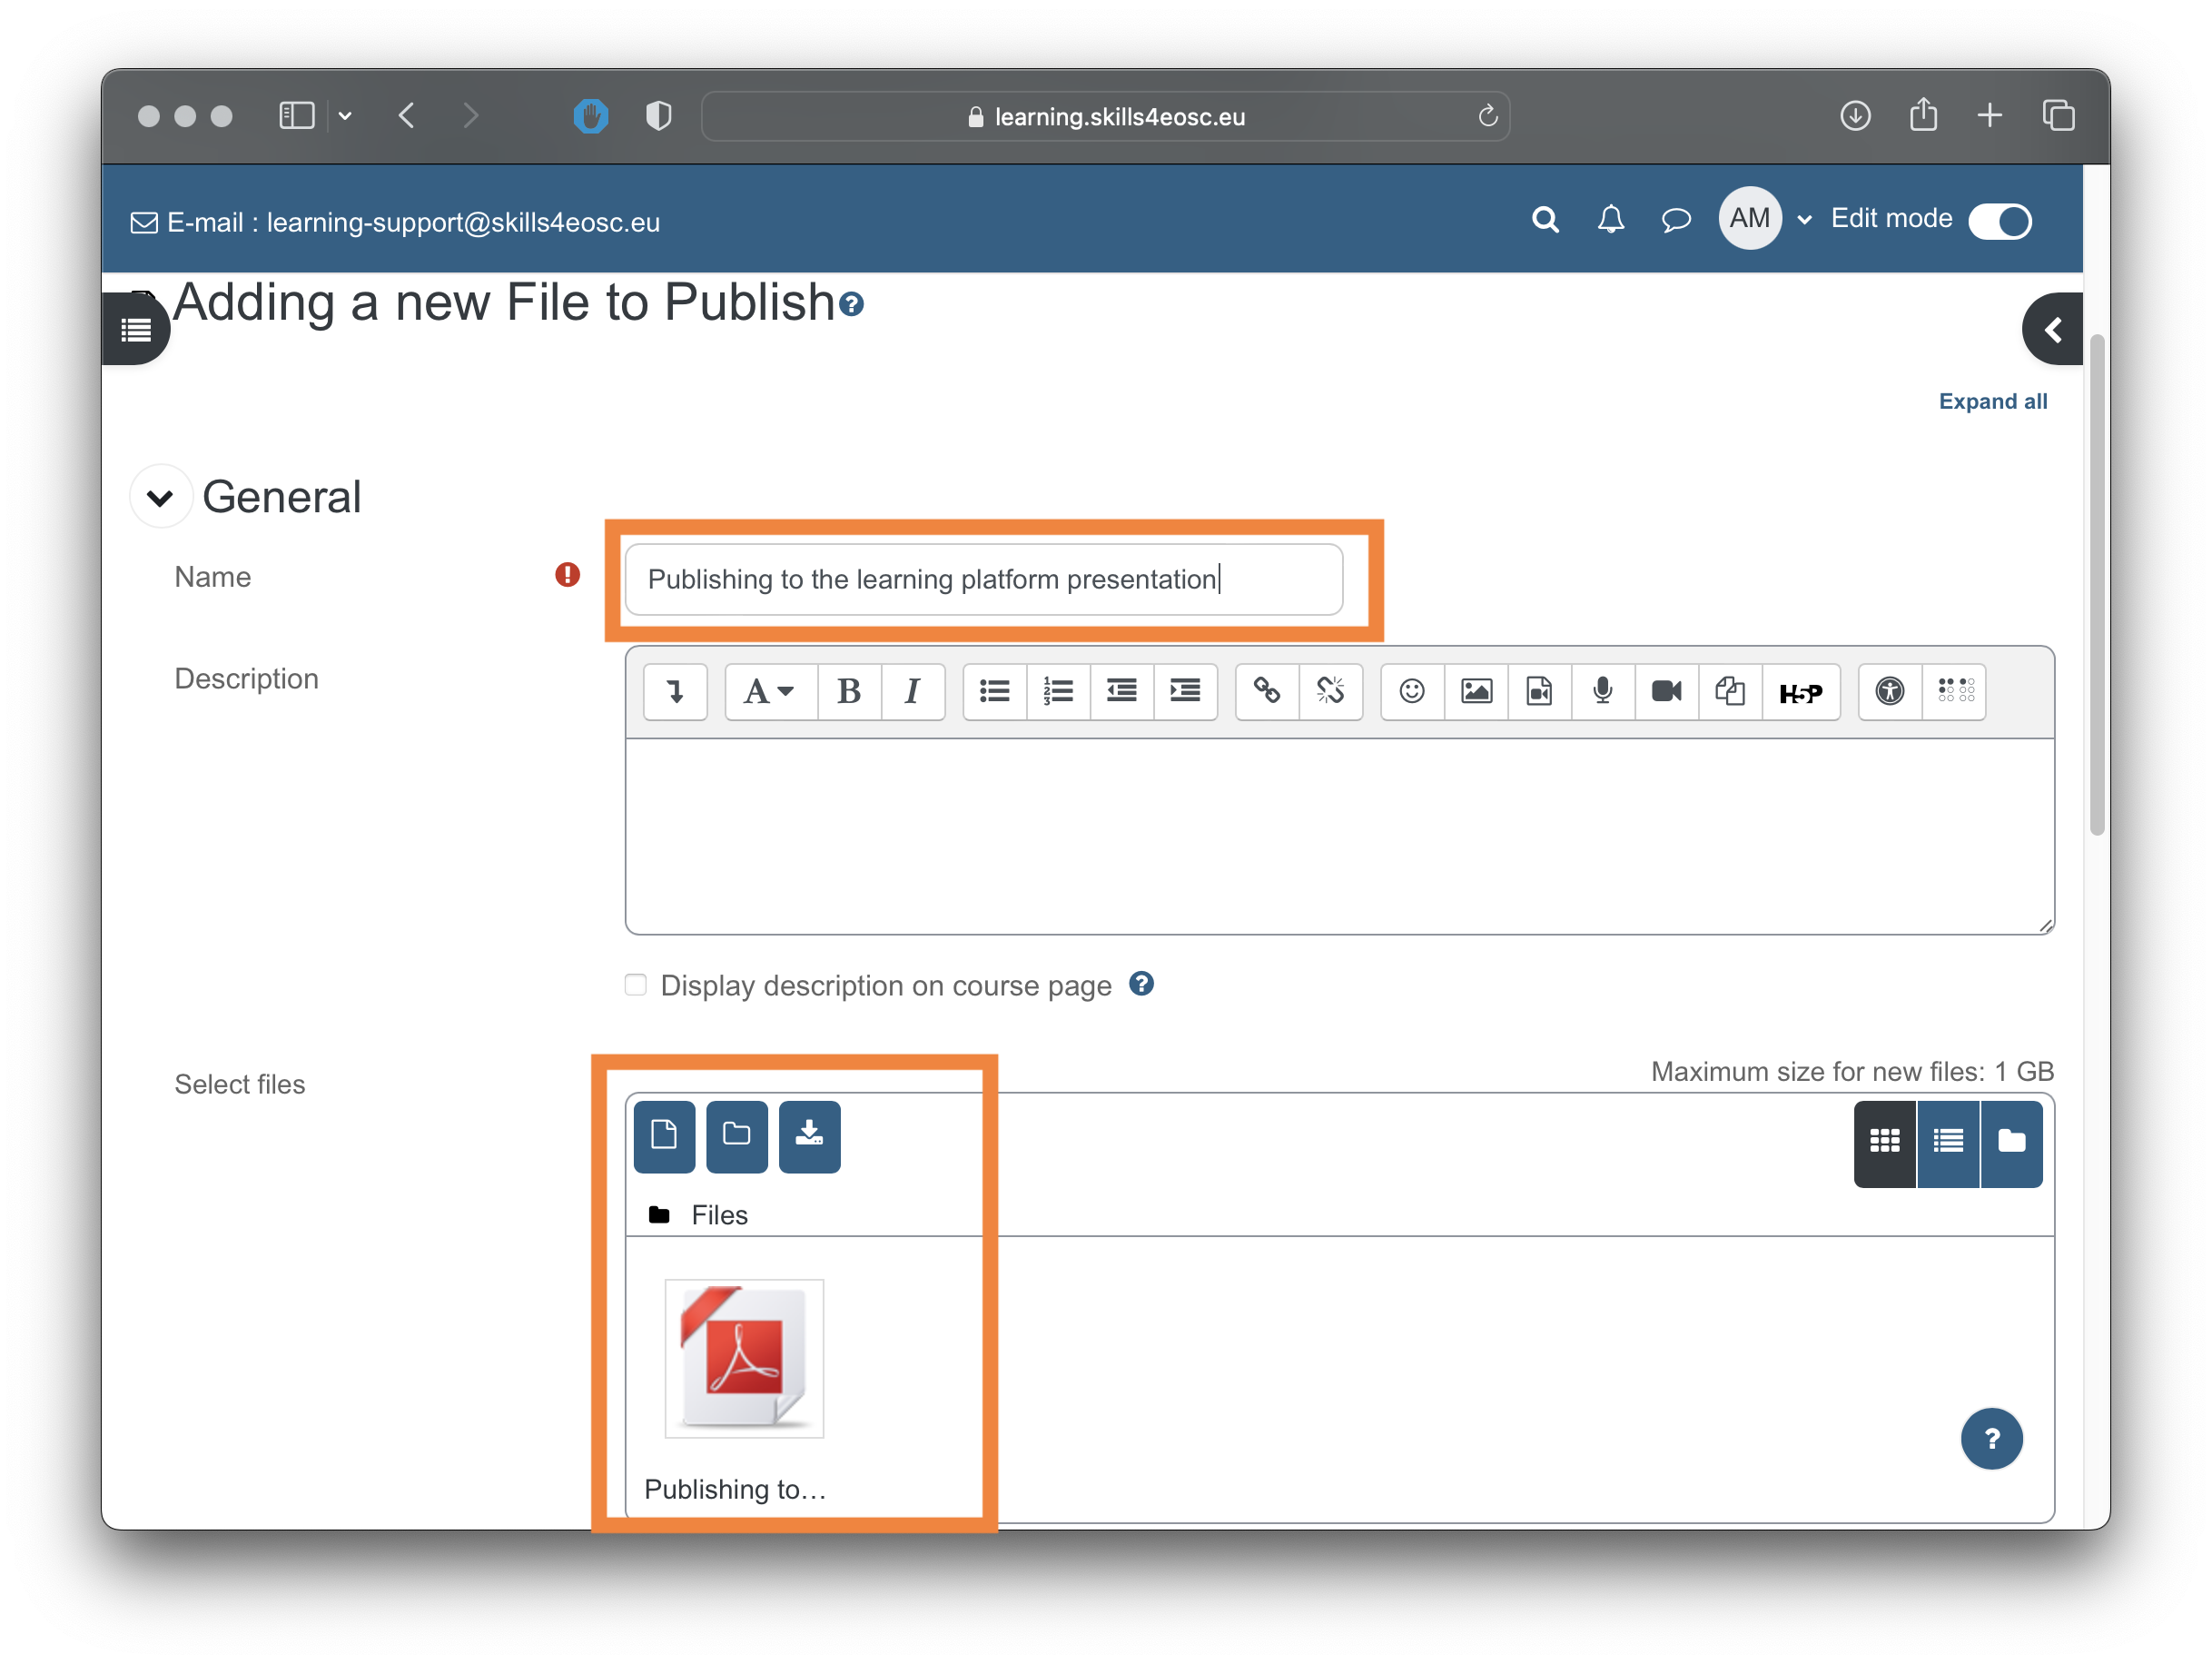
The required attribute of the pfd file is the Name.
To upload the file, you can drop the pfd file to the marked space, or use the upload dialog.
To finalise the publishing of the pdf file, at the bottom of the page, use one of the Save buttons
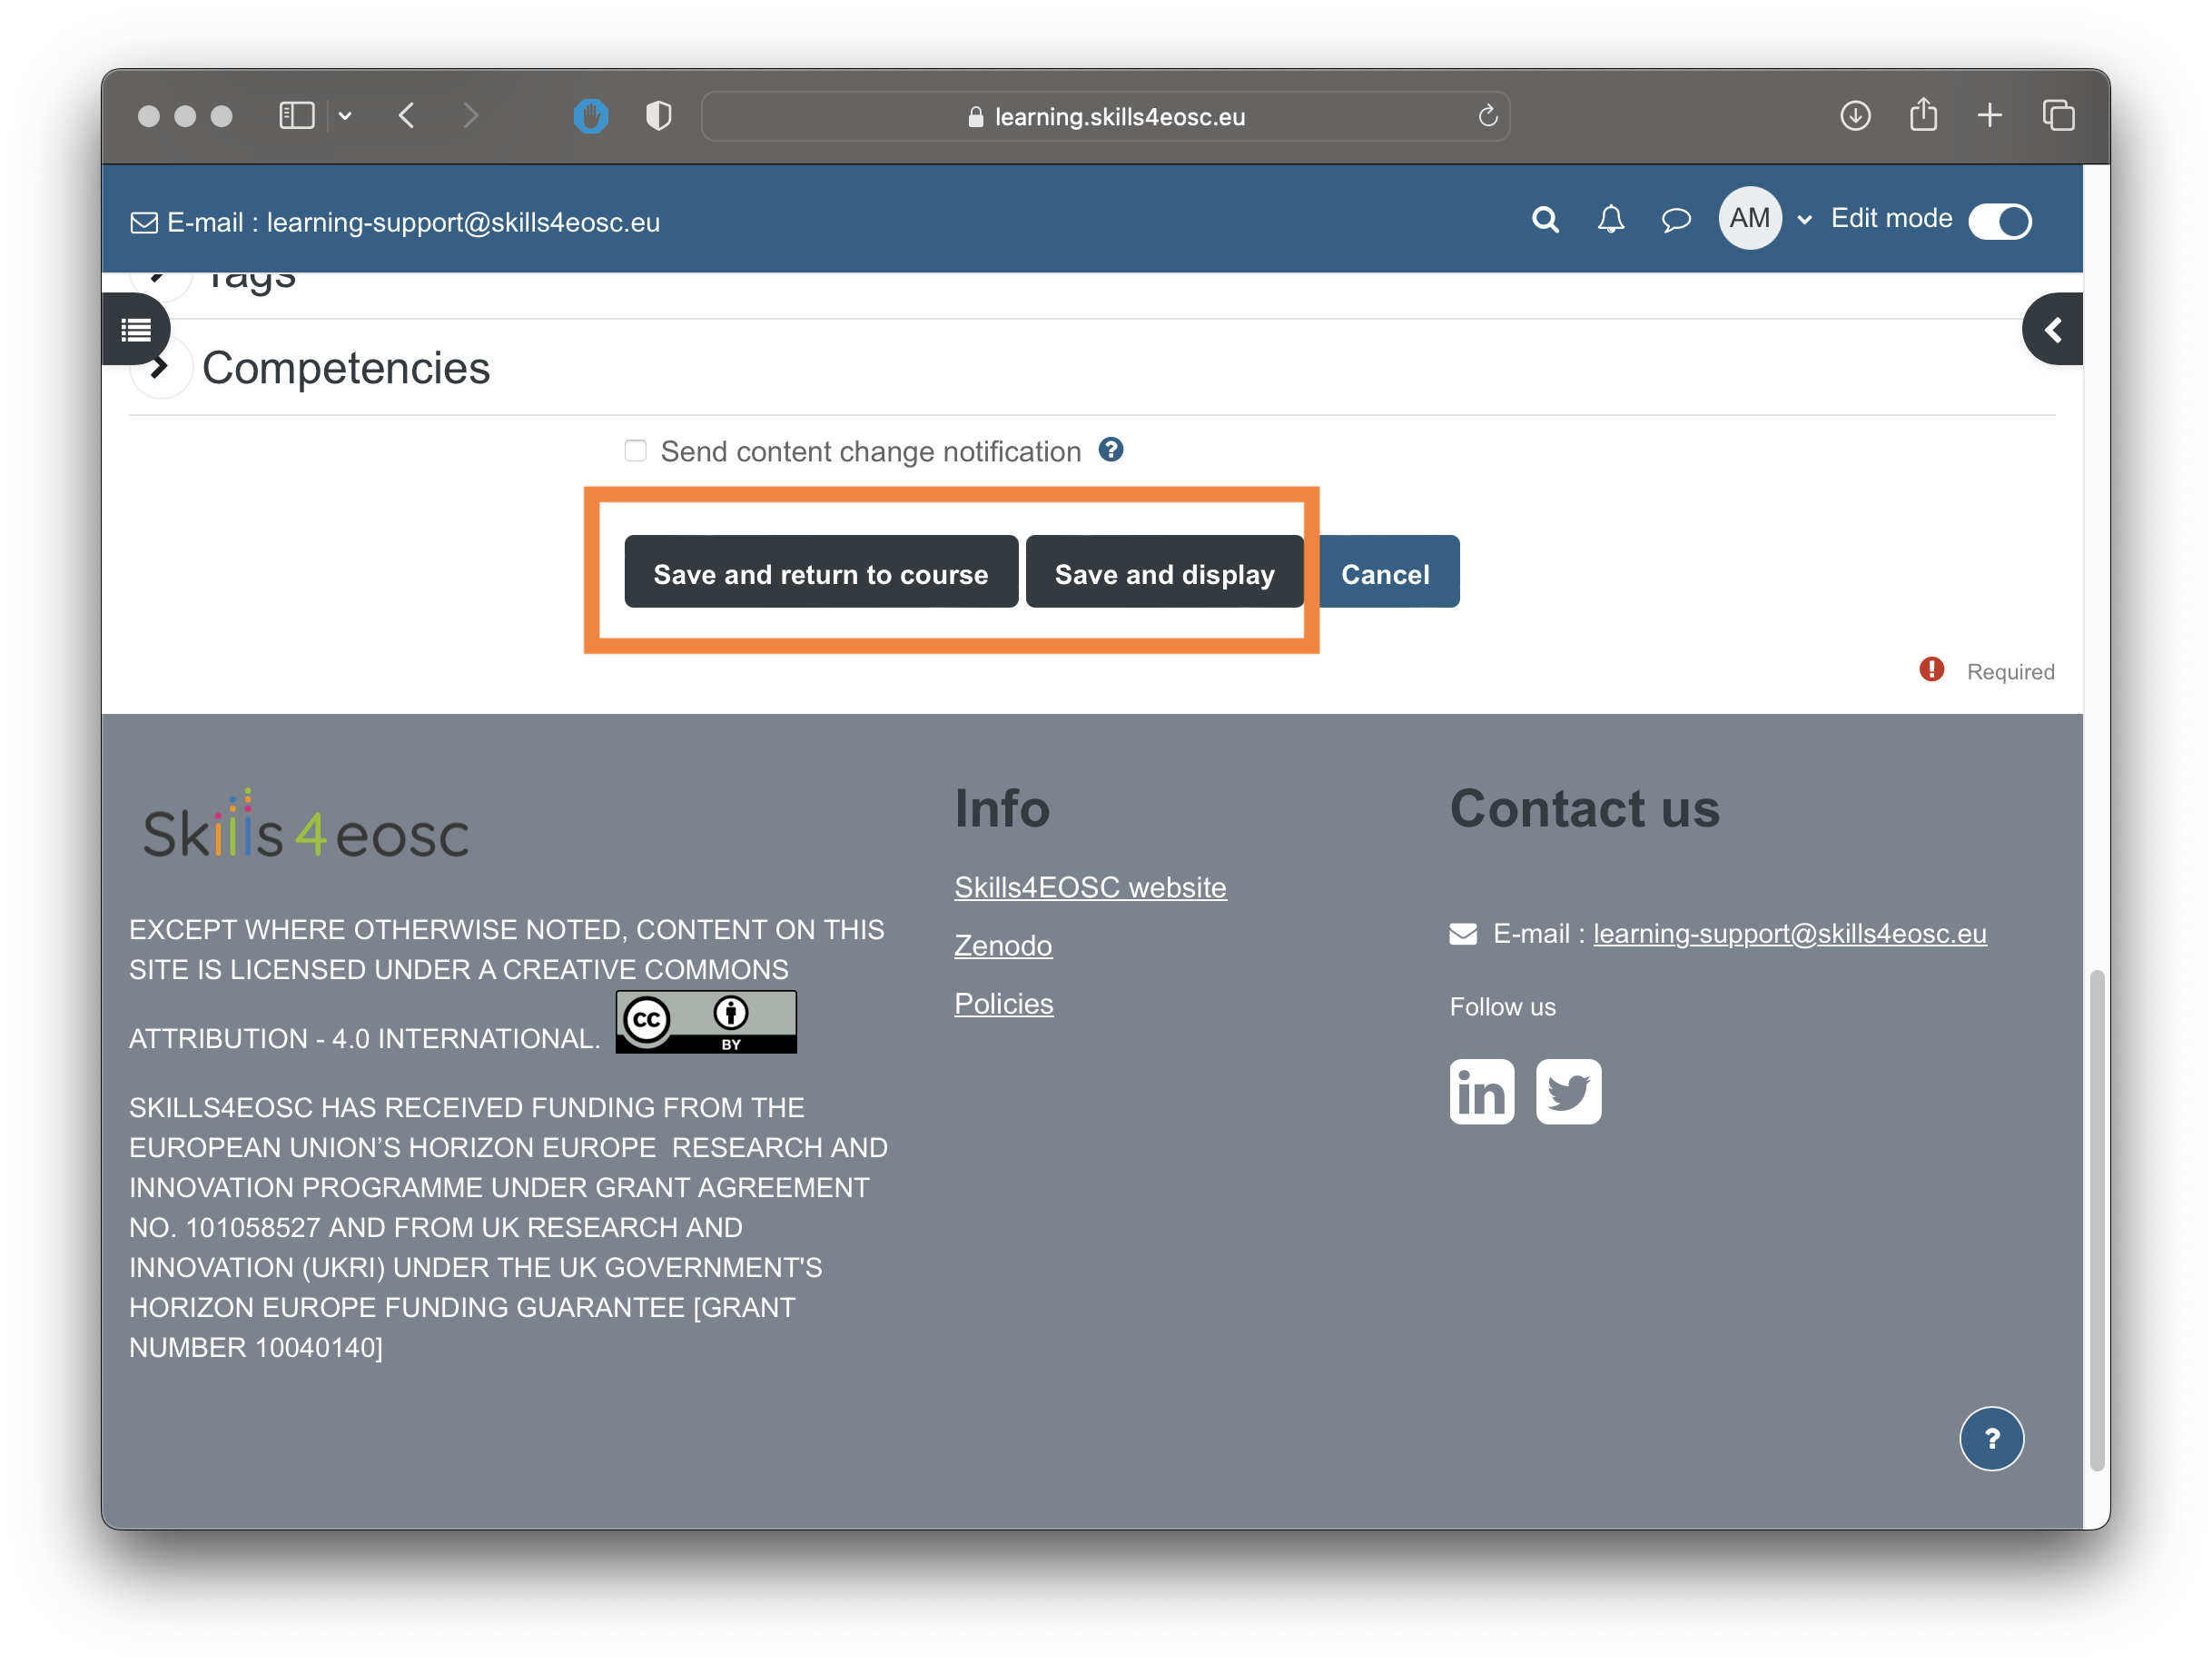
The "Save and return to course" will save the changes and return to the home page of the course, displaying the topics. The "Save and display" button will save the changes and display the newly uploaded pdf file.
Adding links
The procedure for adding links to external resources is similar to the procedure for adding pdf documents. Course needs to be in the editing mode, the required topic should be expanded, and the link "Add an activity or resource" should be selected.
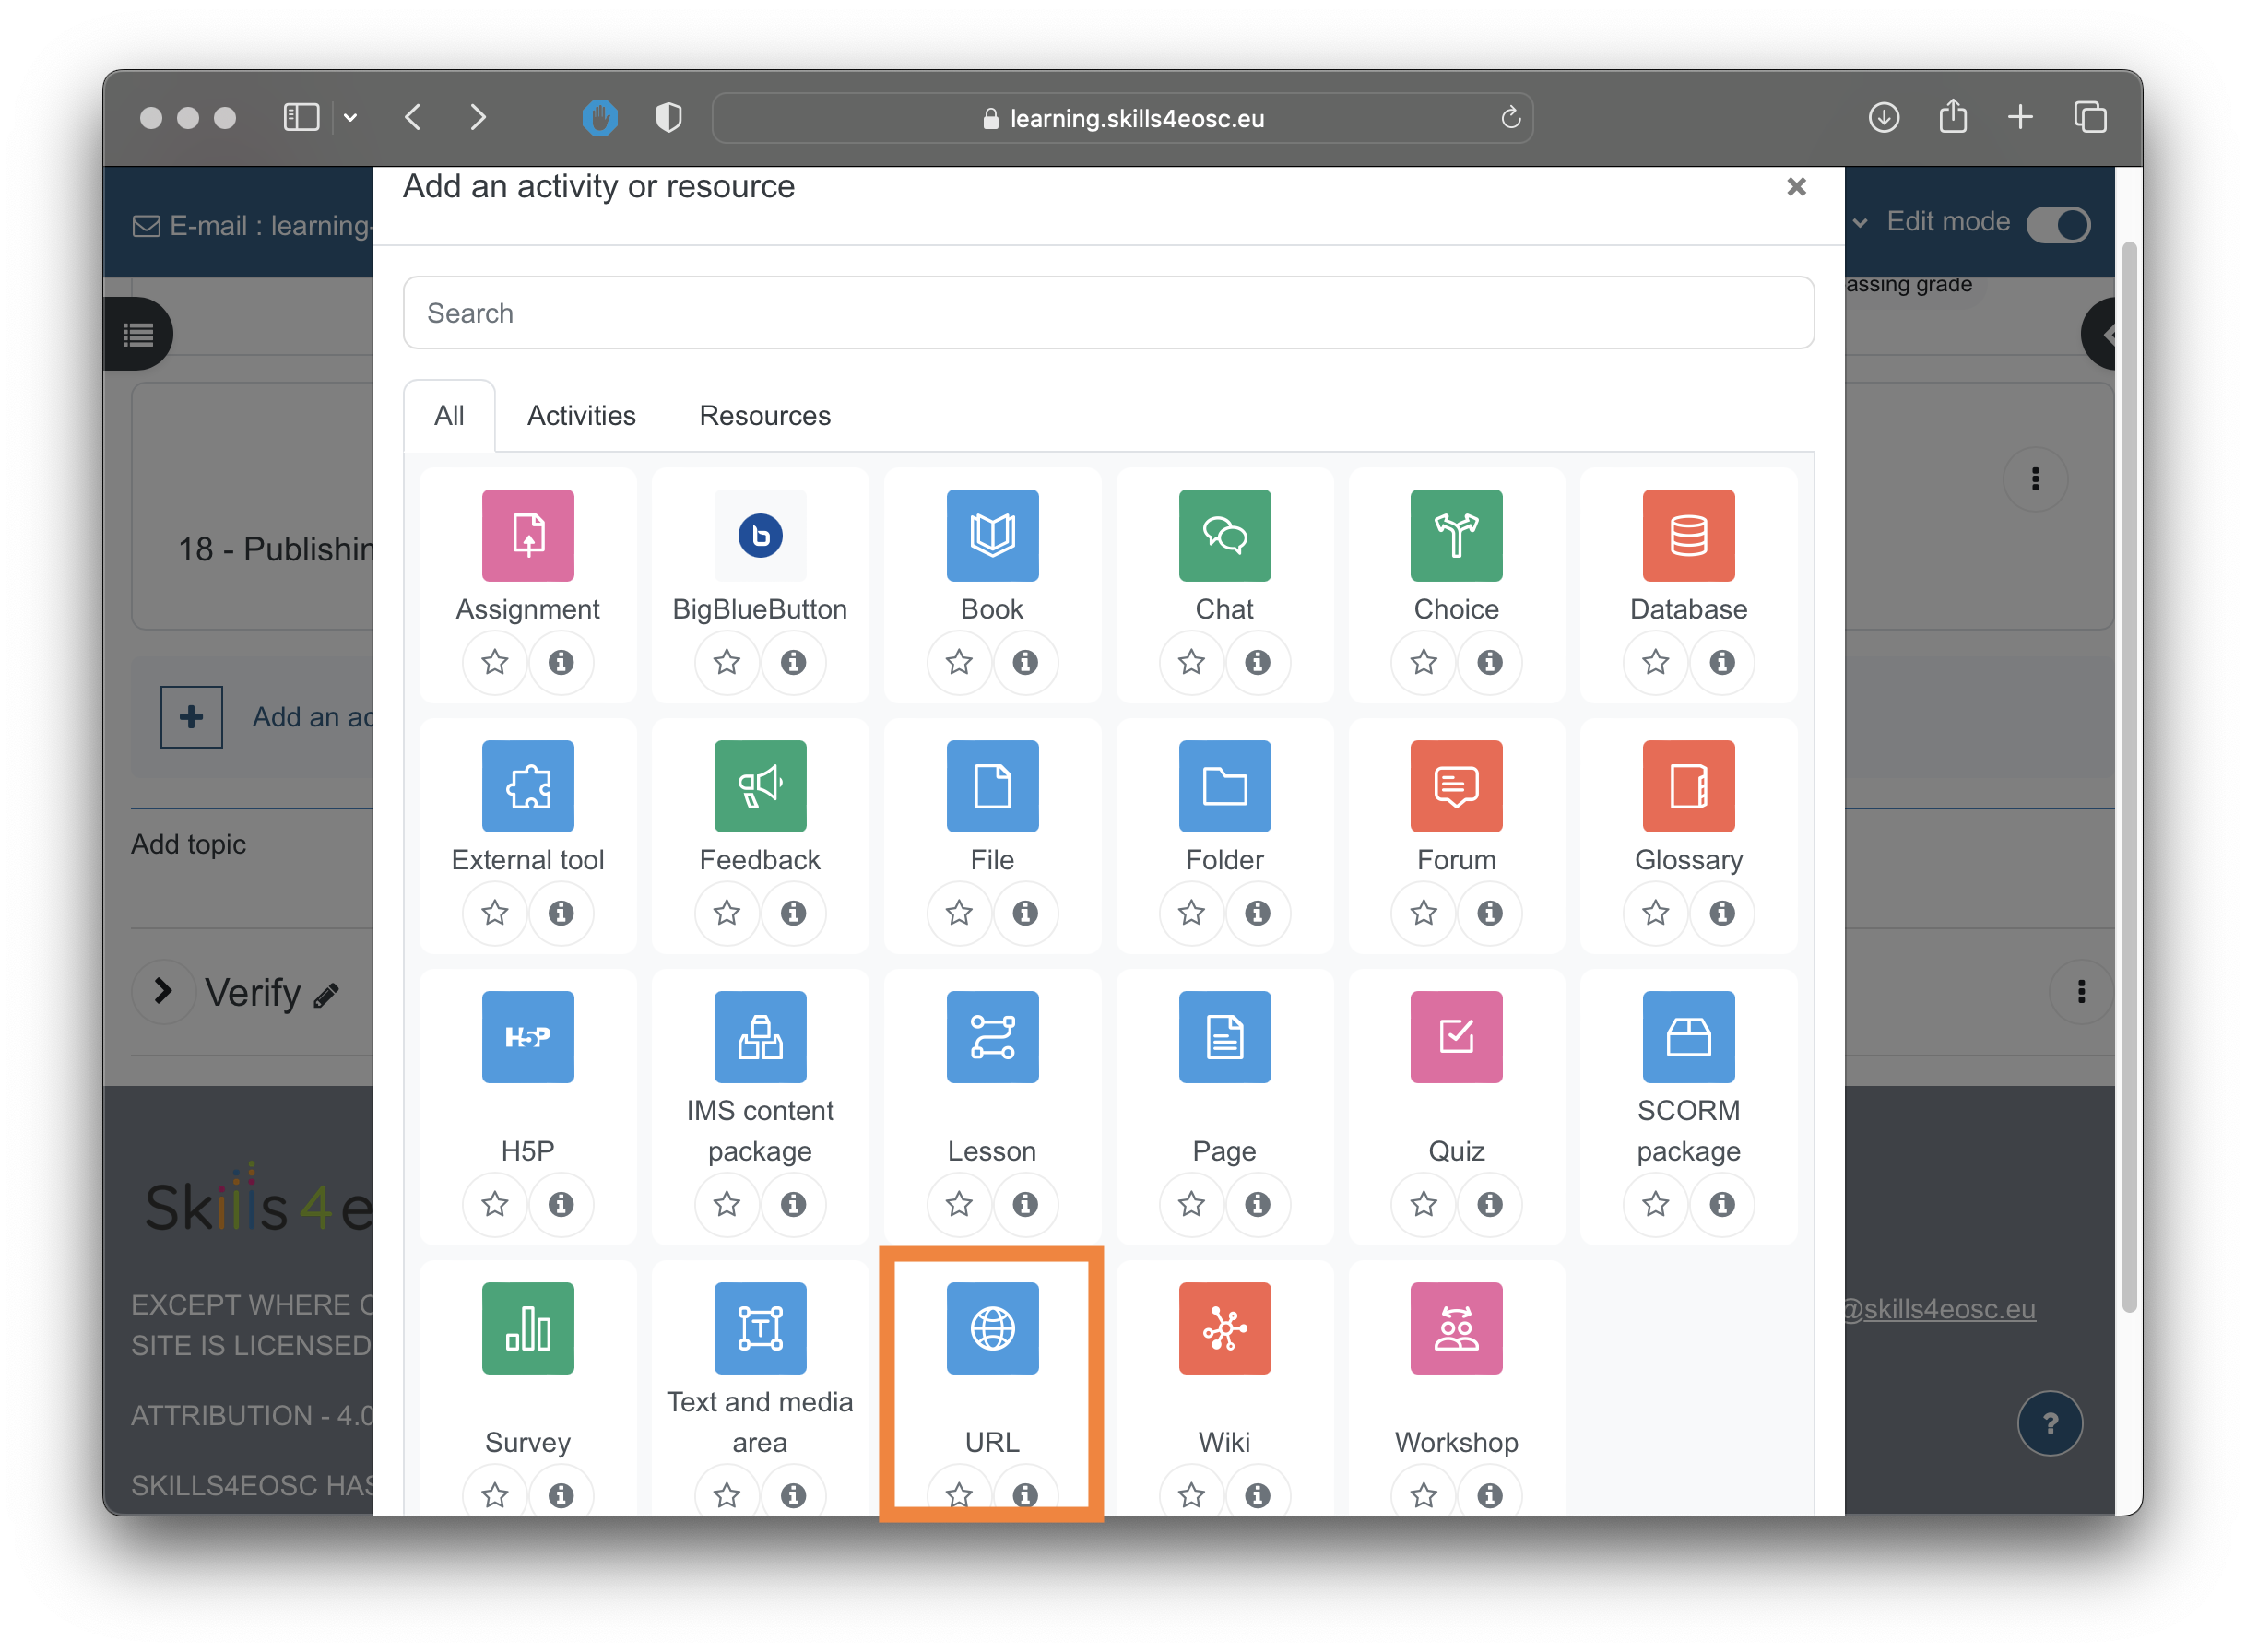
From the list of activities and resources, select the "URL" option.
The required attributes are the Name and the External URL.
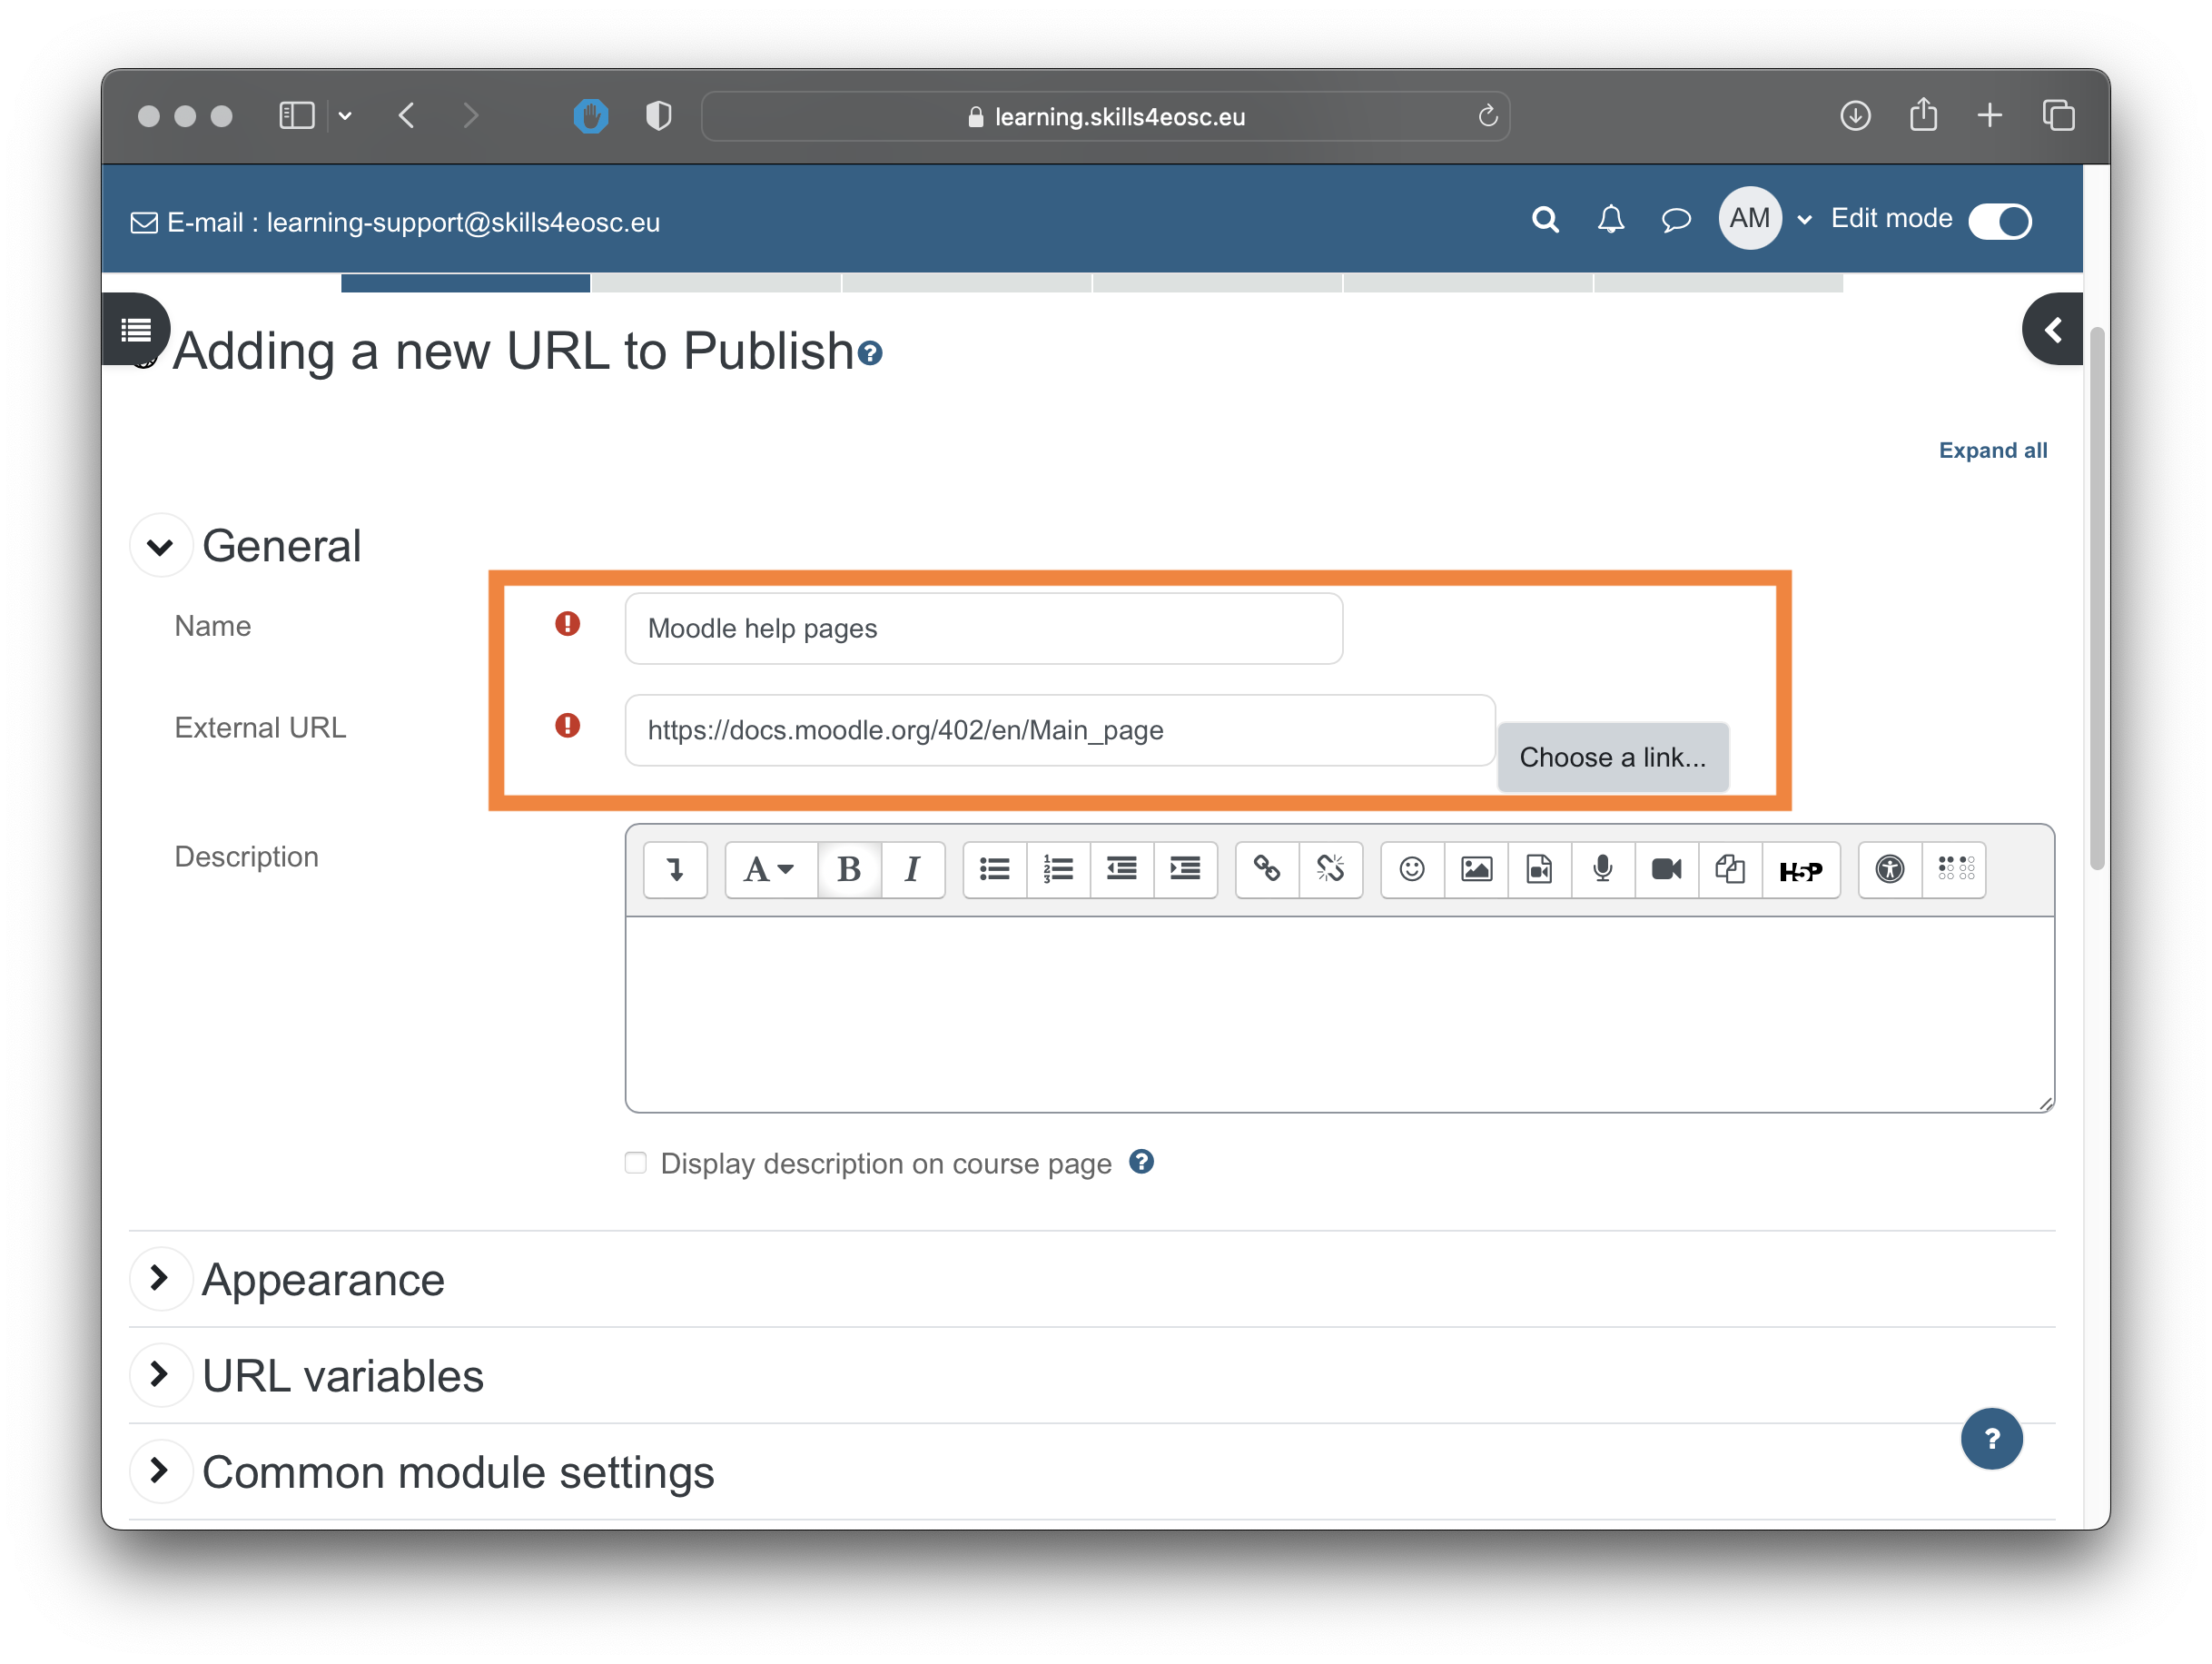
Once the attributes are filled in, the saving options at the bottom of the page are the same as when adding files ("Save and return to course" and "Save and display").
Working with quizzes
Moodle provides rich options for knowledge assessment in the form of Quizzes. Quizzes can contain different types of questions, from simple single or multiple choice, to more advanced types such as matching, drag-and-drop, calculated answers etc. Most of the questions types can be graded automatically, with the exception of the "Essay" type, that needs manual grading.
The questions used in the quizzes are organized in a question bank, offering a hierarchical structure for questions grouping. The grouping of questions in categories and sub-categories provides better support for automatization of the quiz creating process, offering random choice of questions from the same category, making the assessment more diverse.
New questions to the question bank can be added either manually or by import. As the quiz questions have already been developed in the GIFT format, it is recommended that the Import option is used. In addition, it is recommended that each learning unit has its own category in the question bank.
Access to the question bank can be done through the link "More" and then "Question bank"
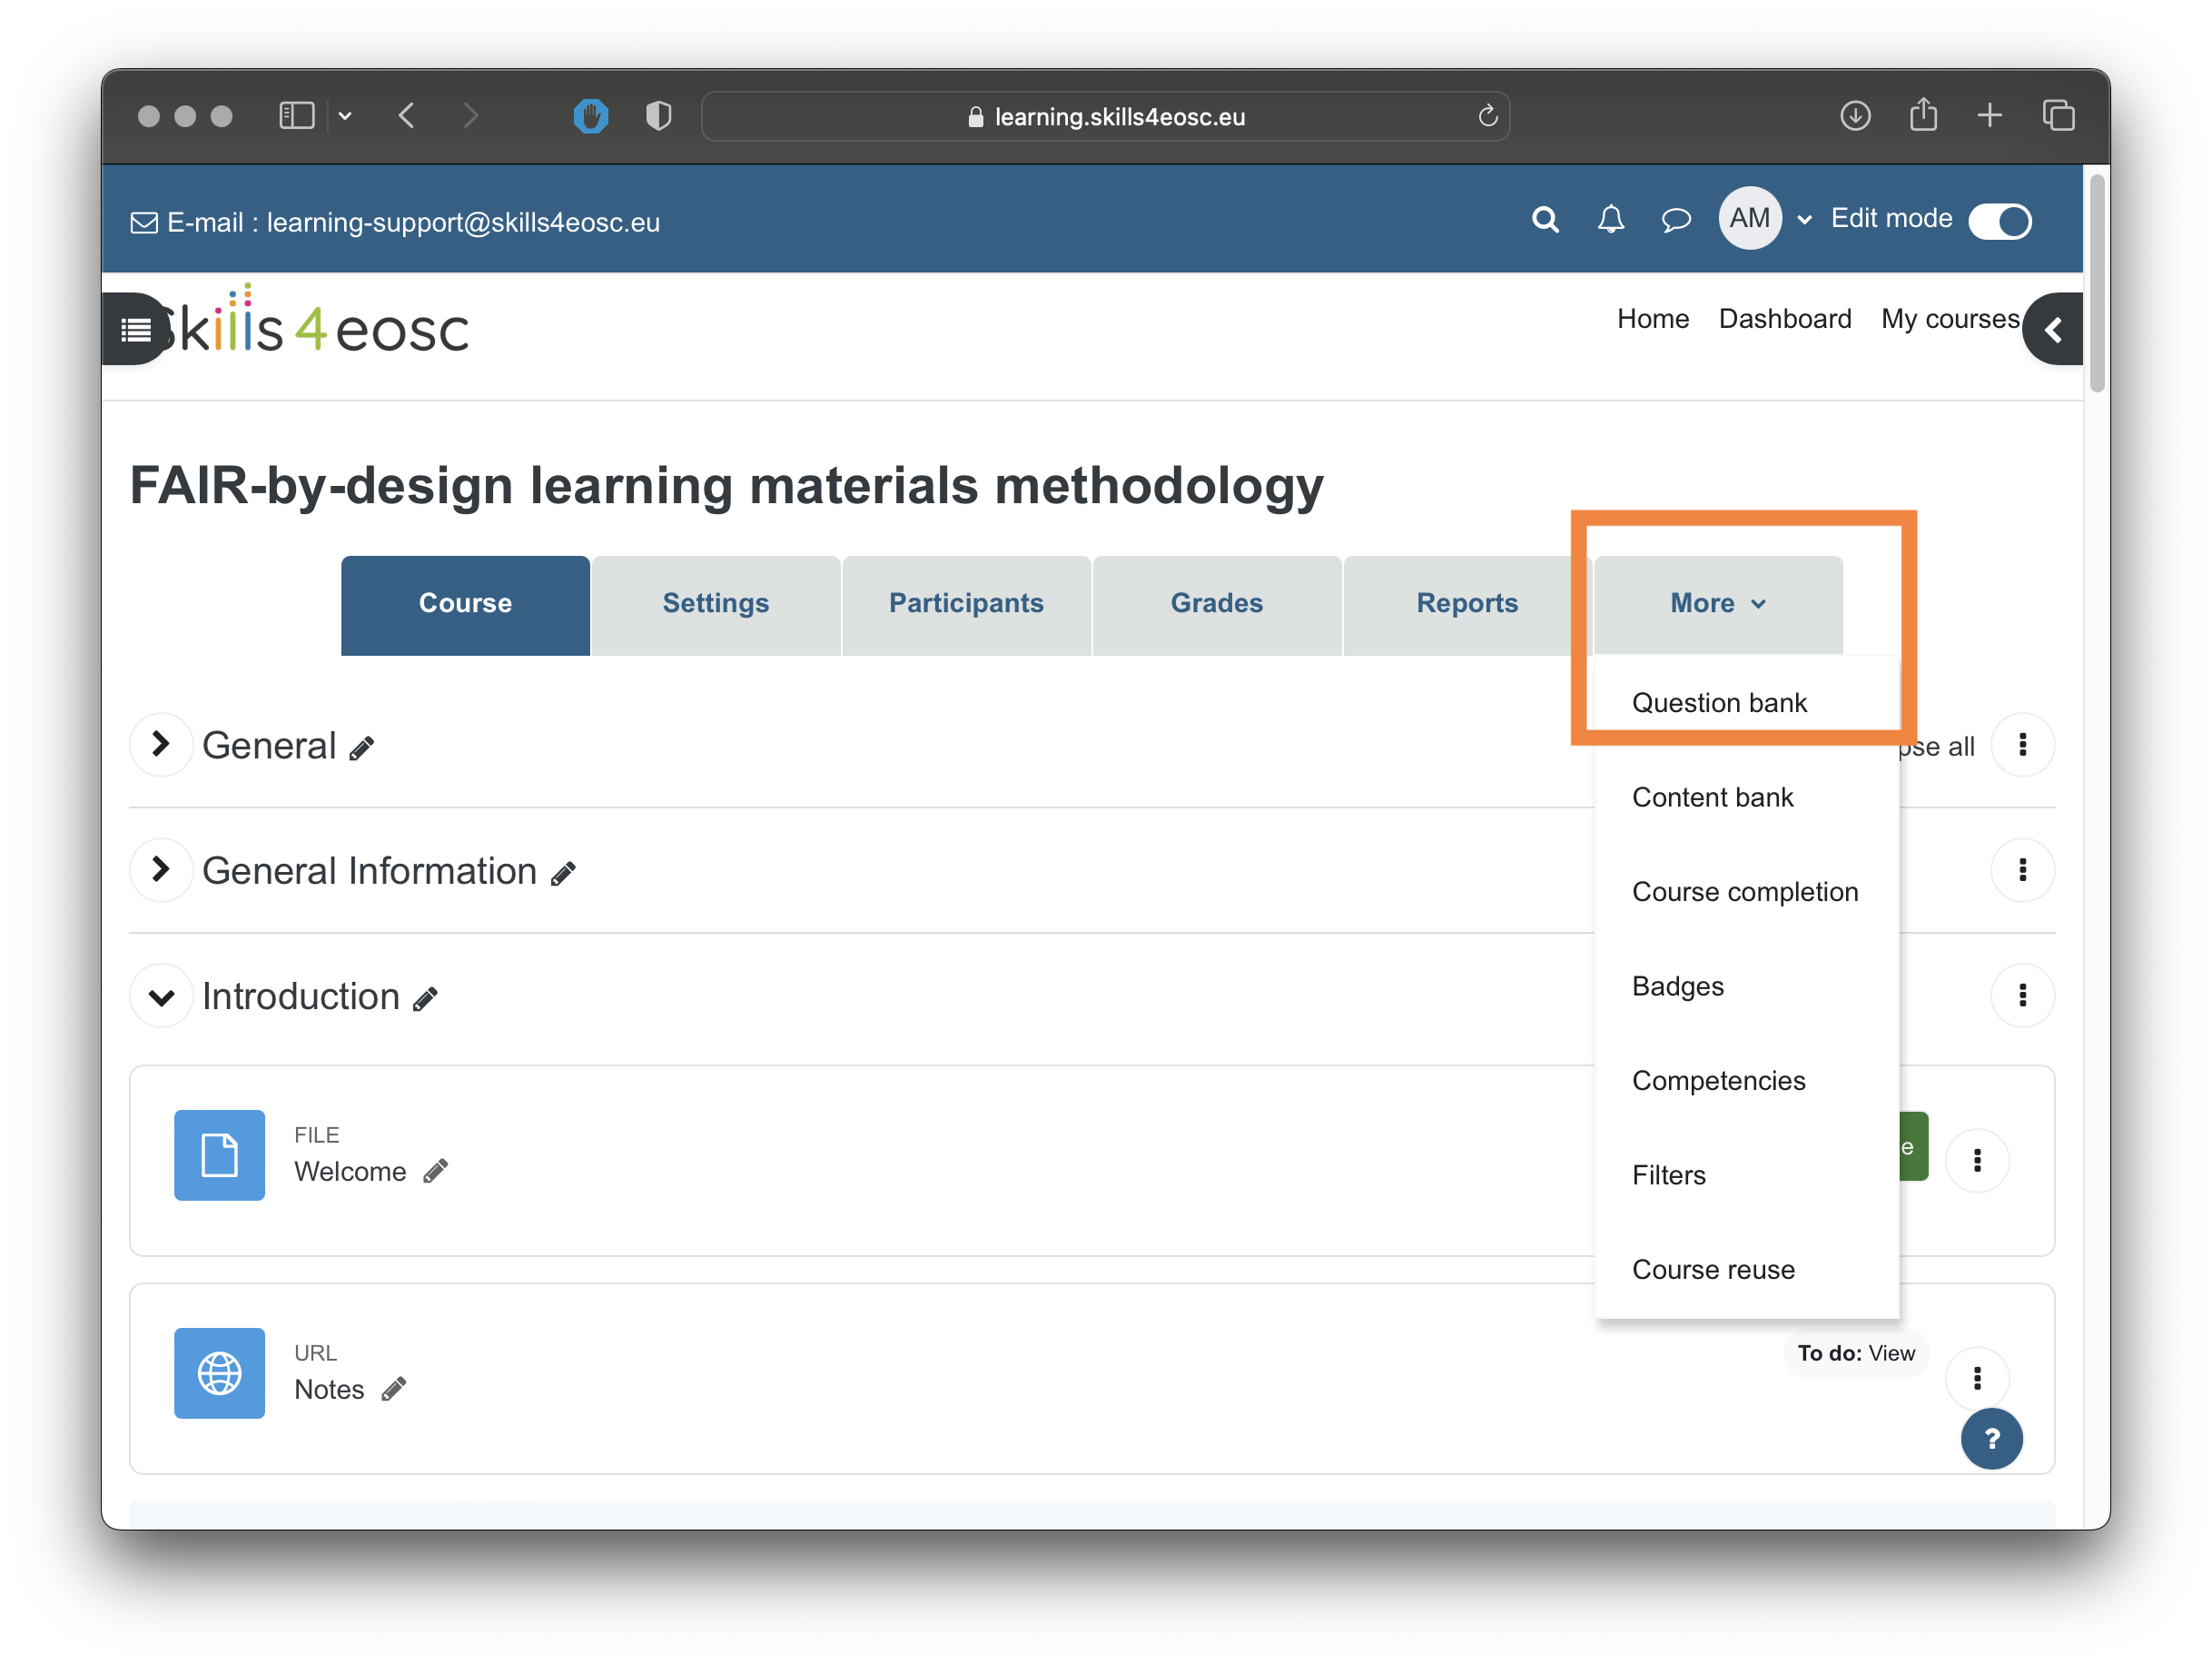
Within the question bank view, activities such as creating and editing categories, adding questions and importing and exporting of questions can be performed.
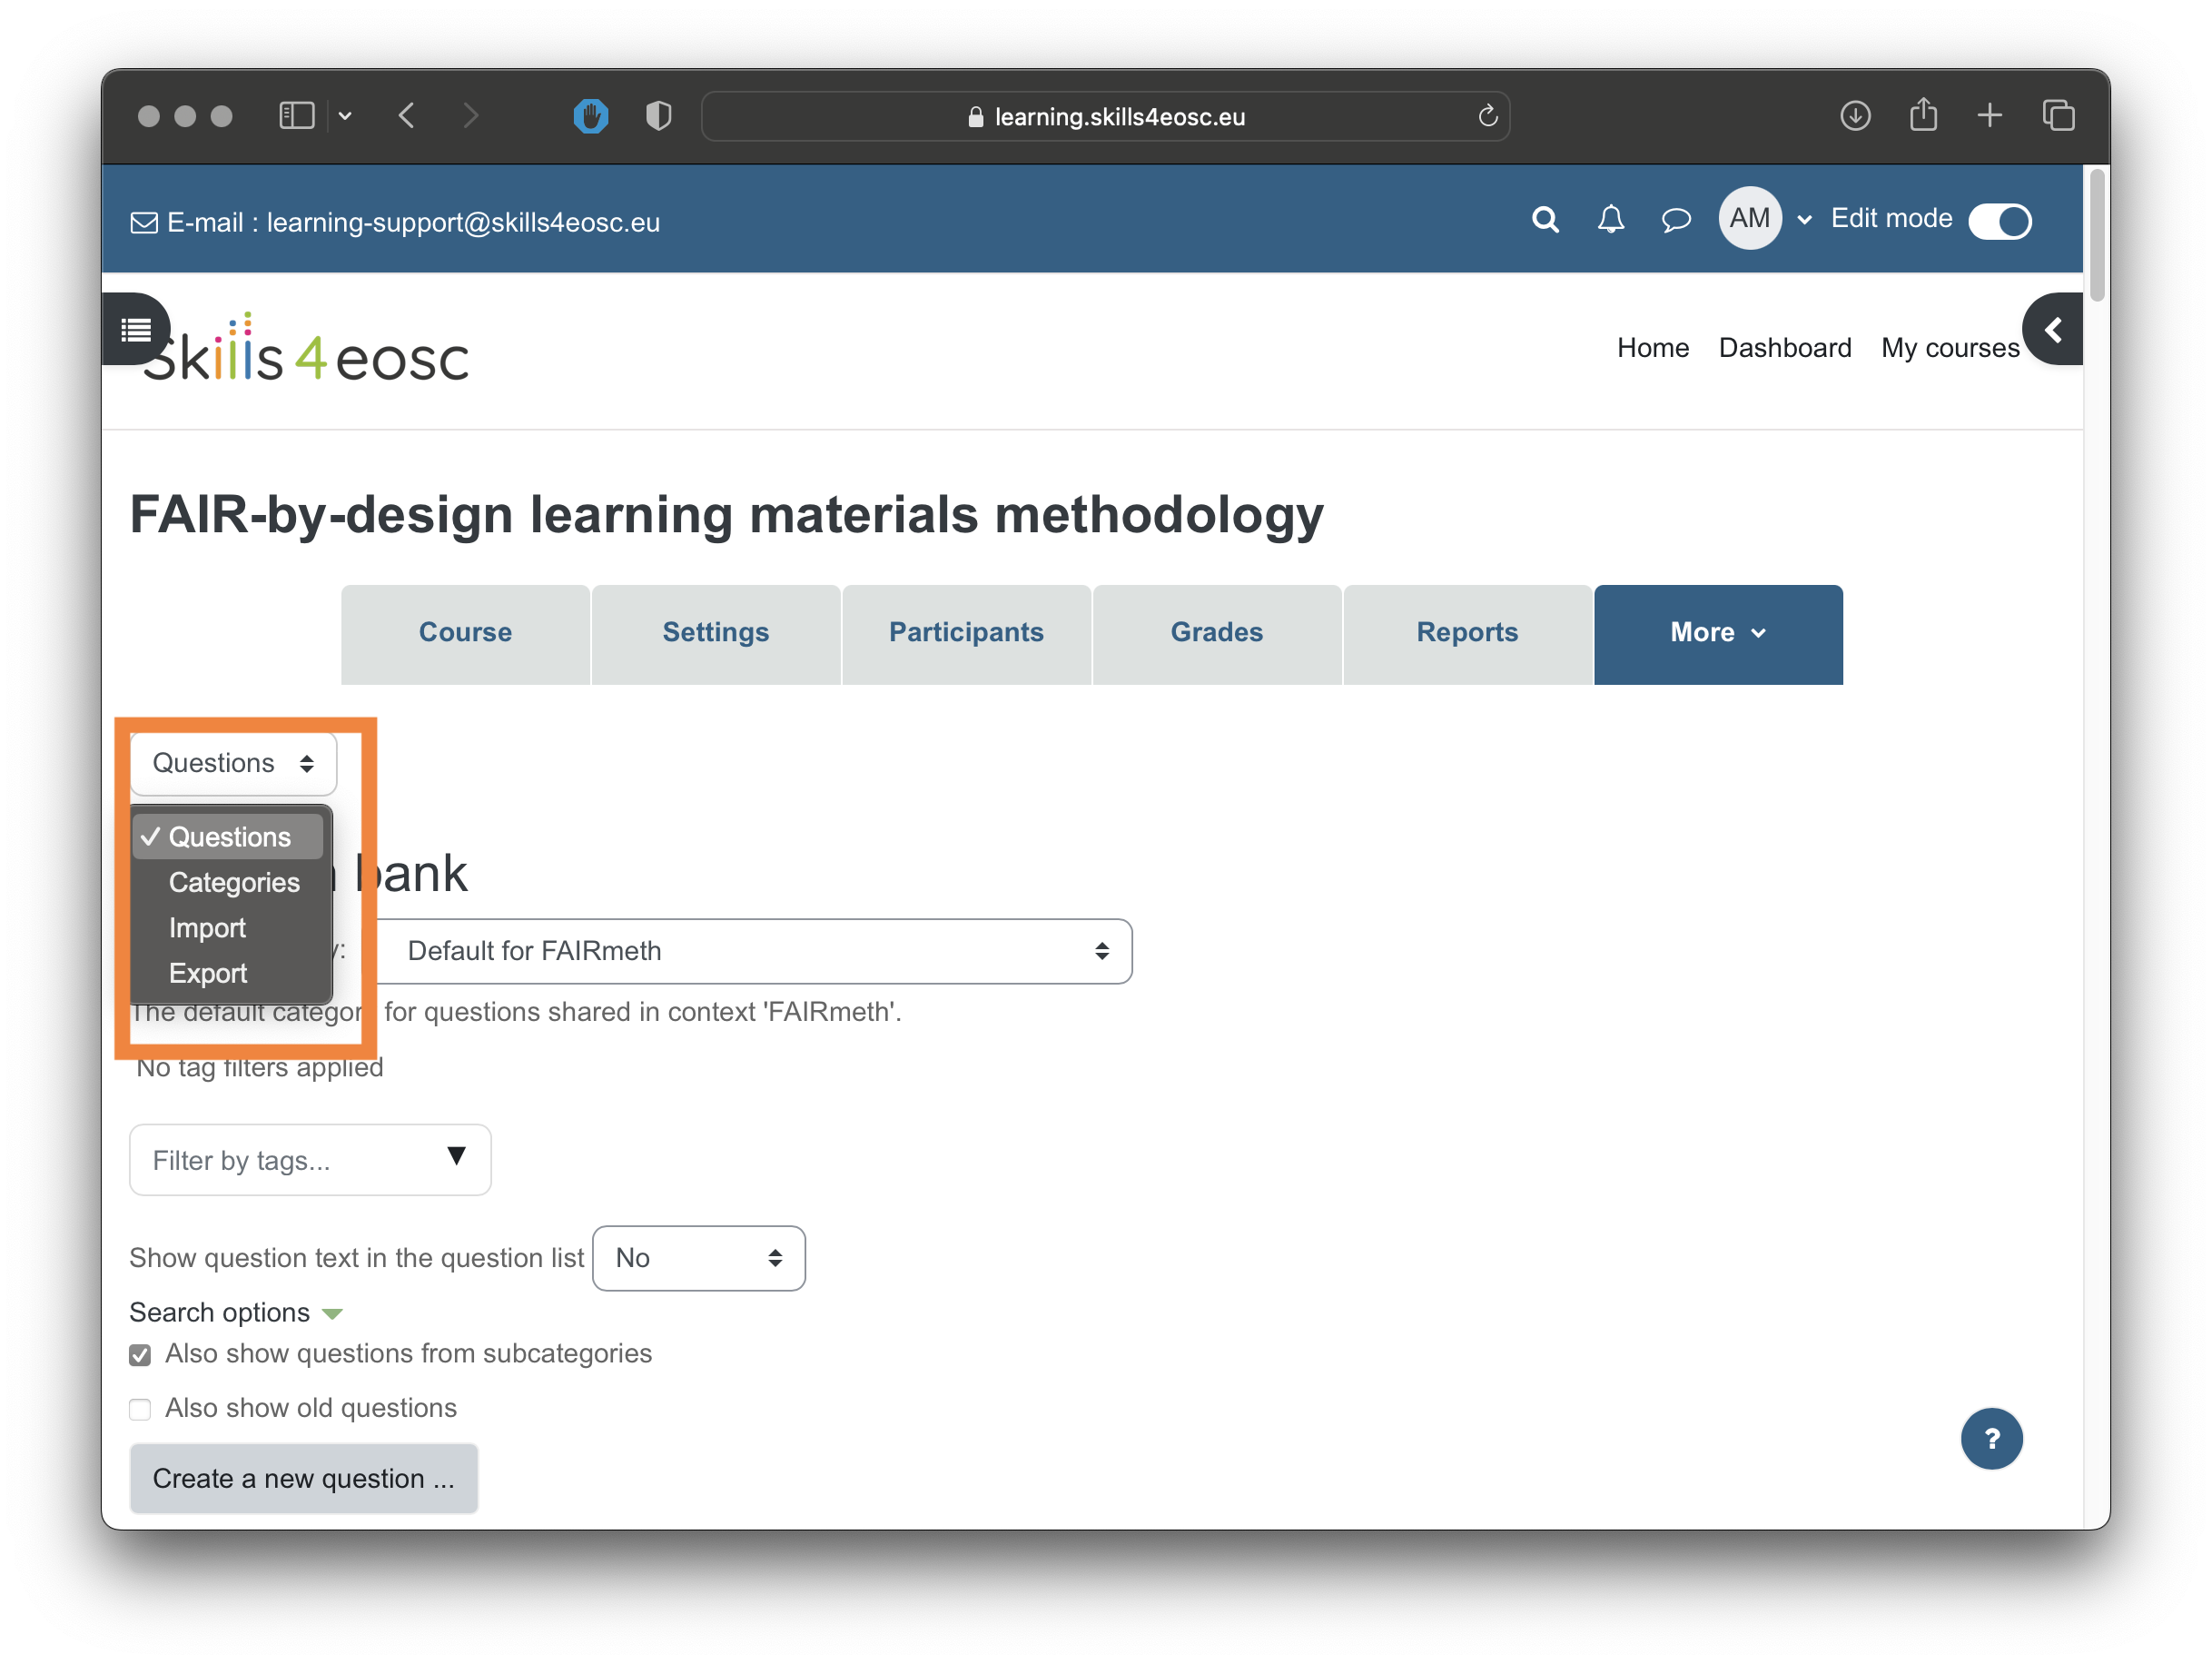
Creating a new category
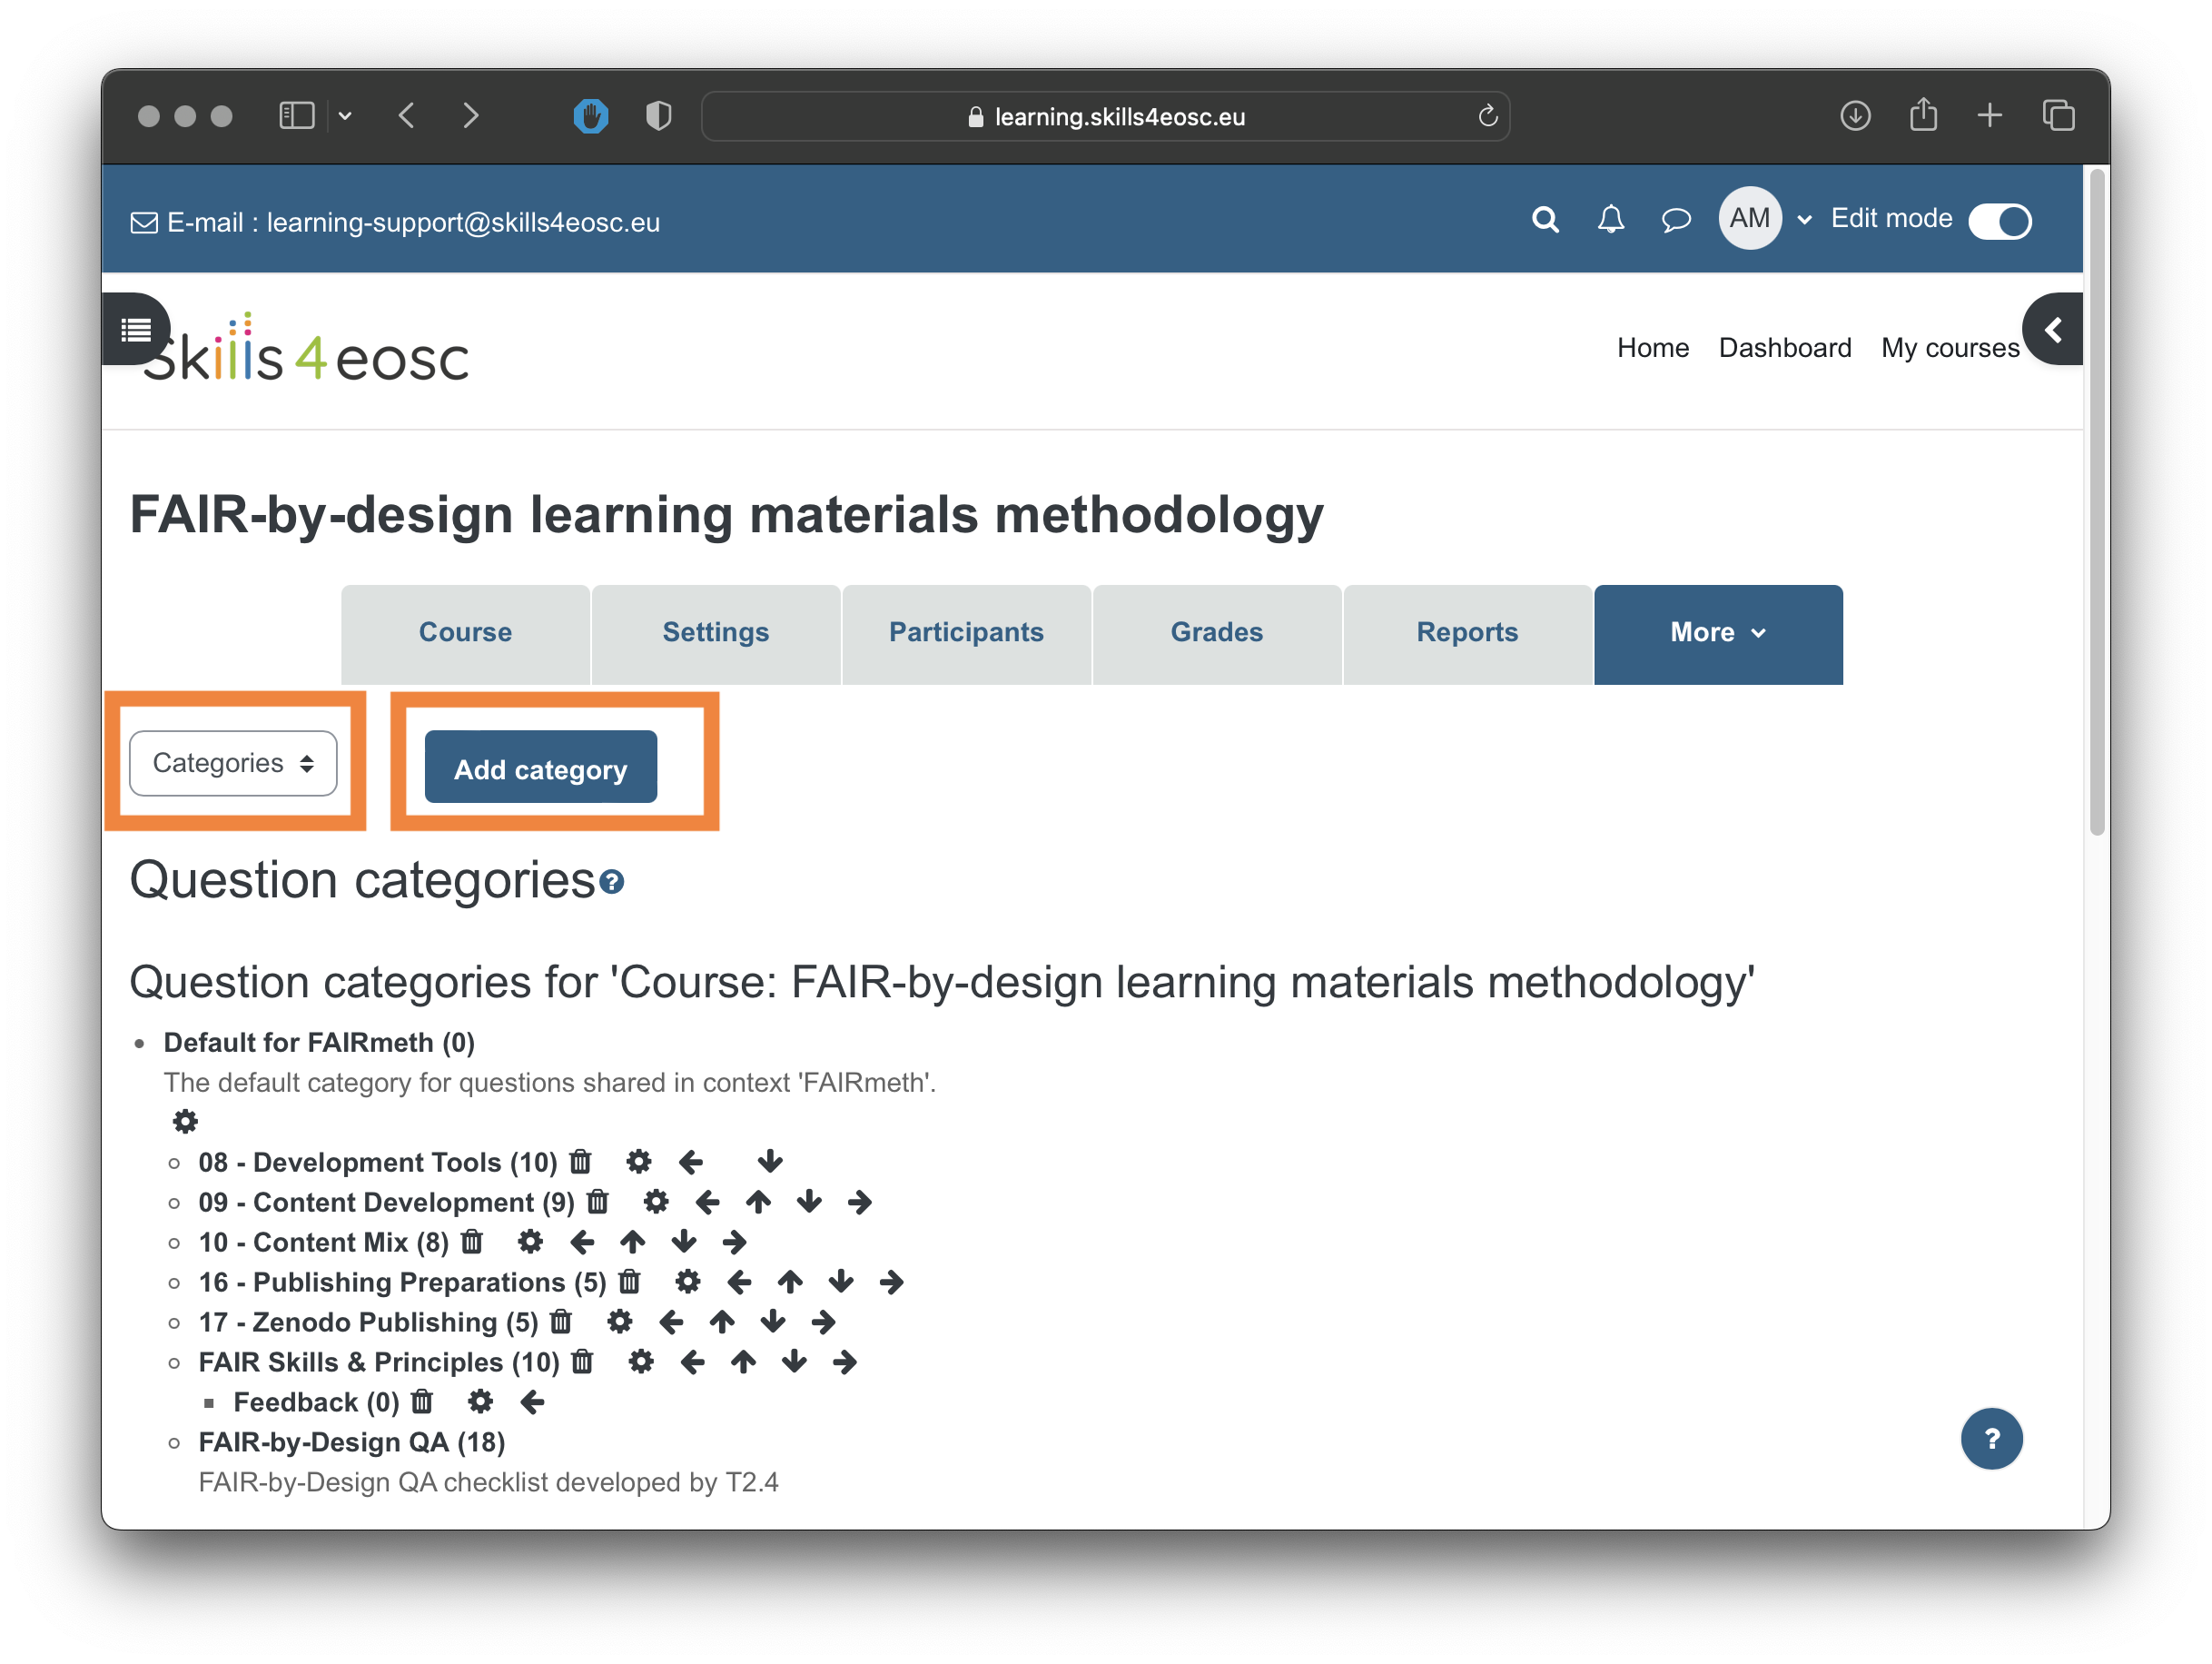
To create a new category for the questions in the question bank, from the "Categories" view select the "Add category" button.
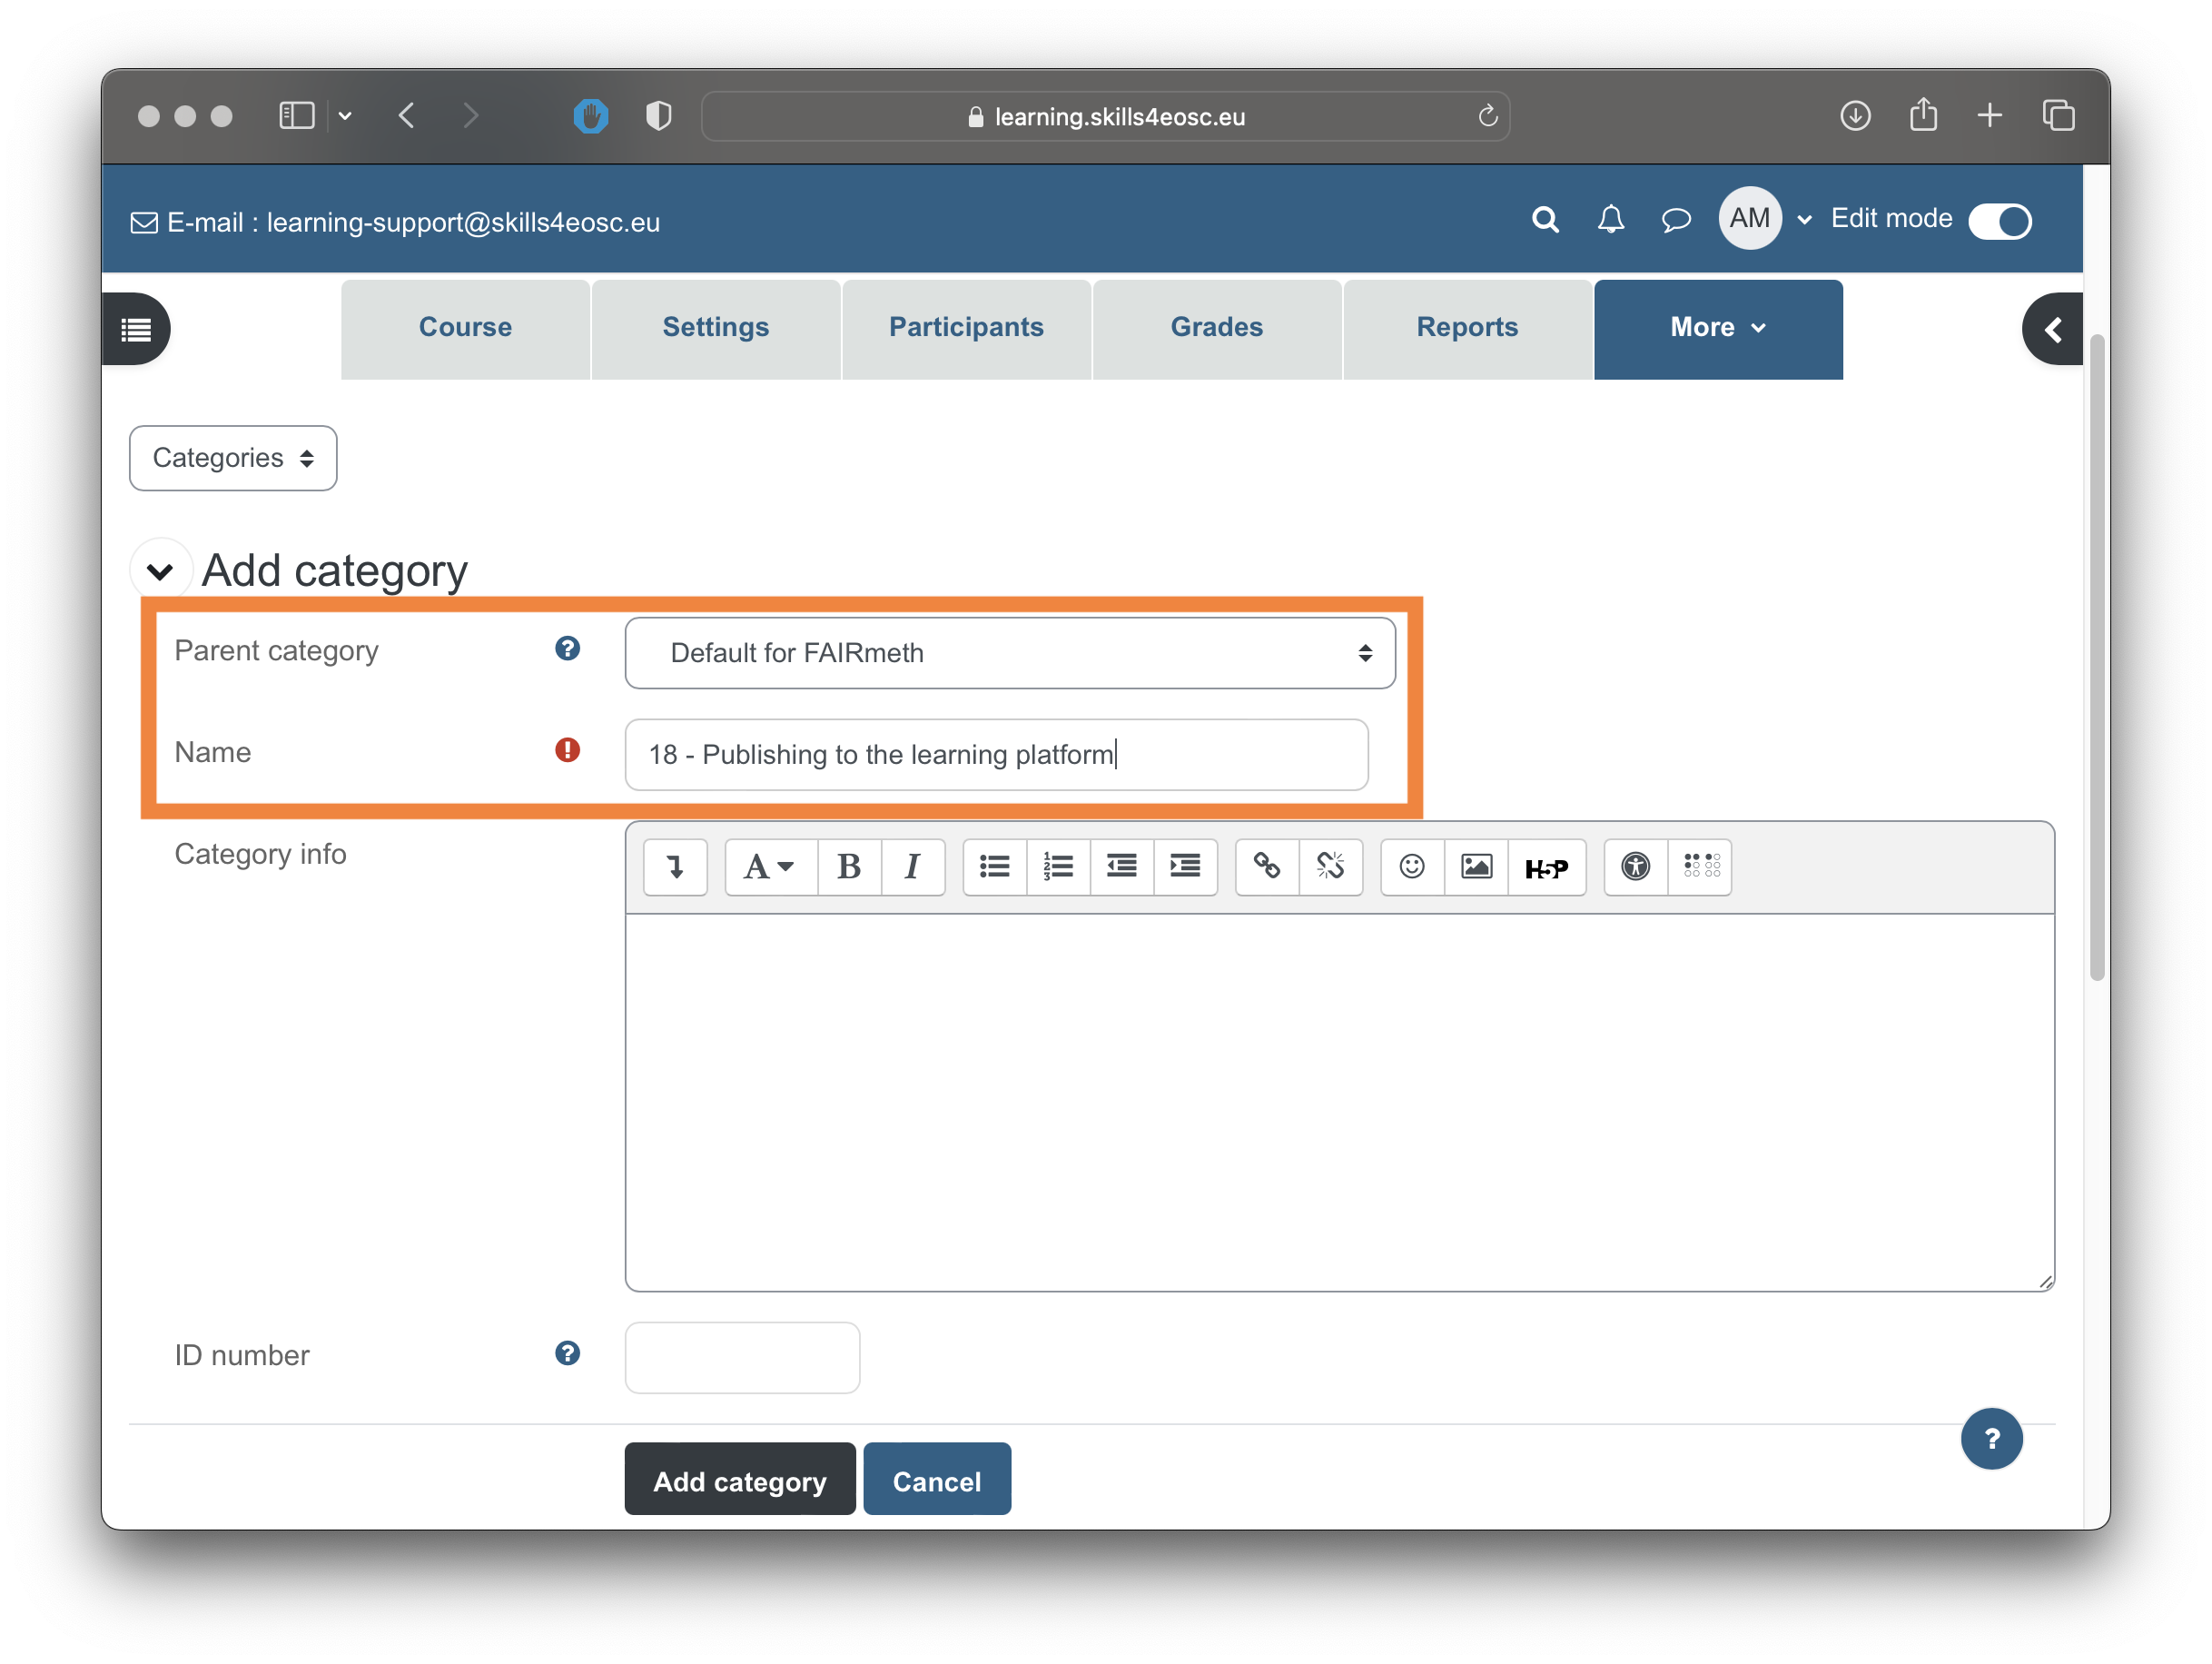
For the newly created category, first select the parent category, and then define the name for it.
Adding questions to questions banks manually
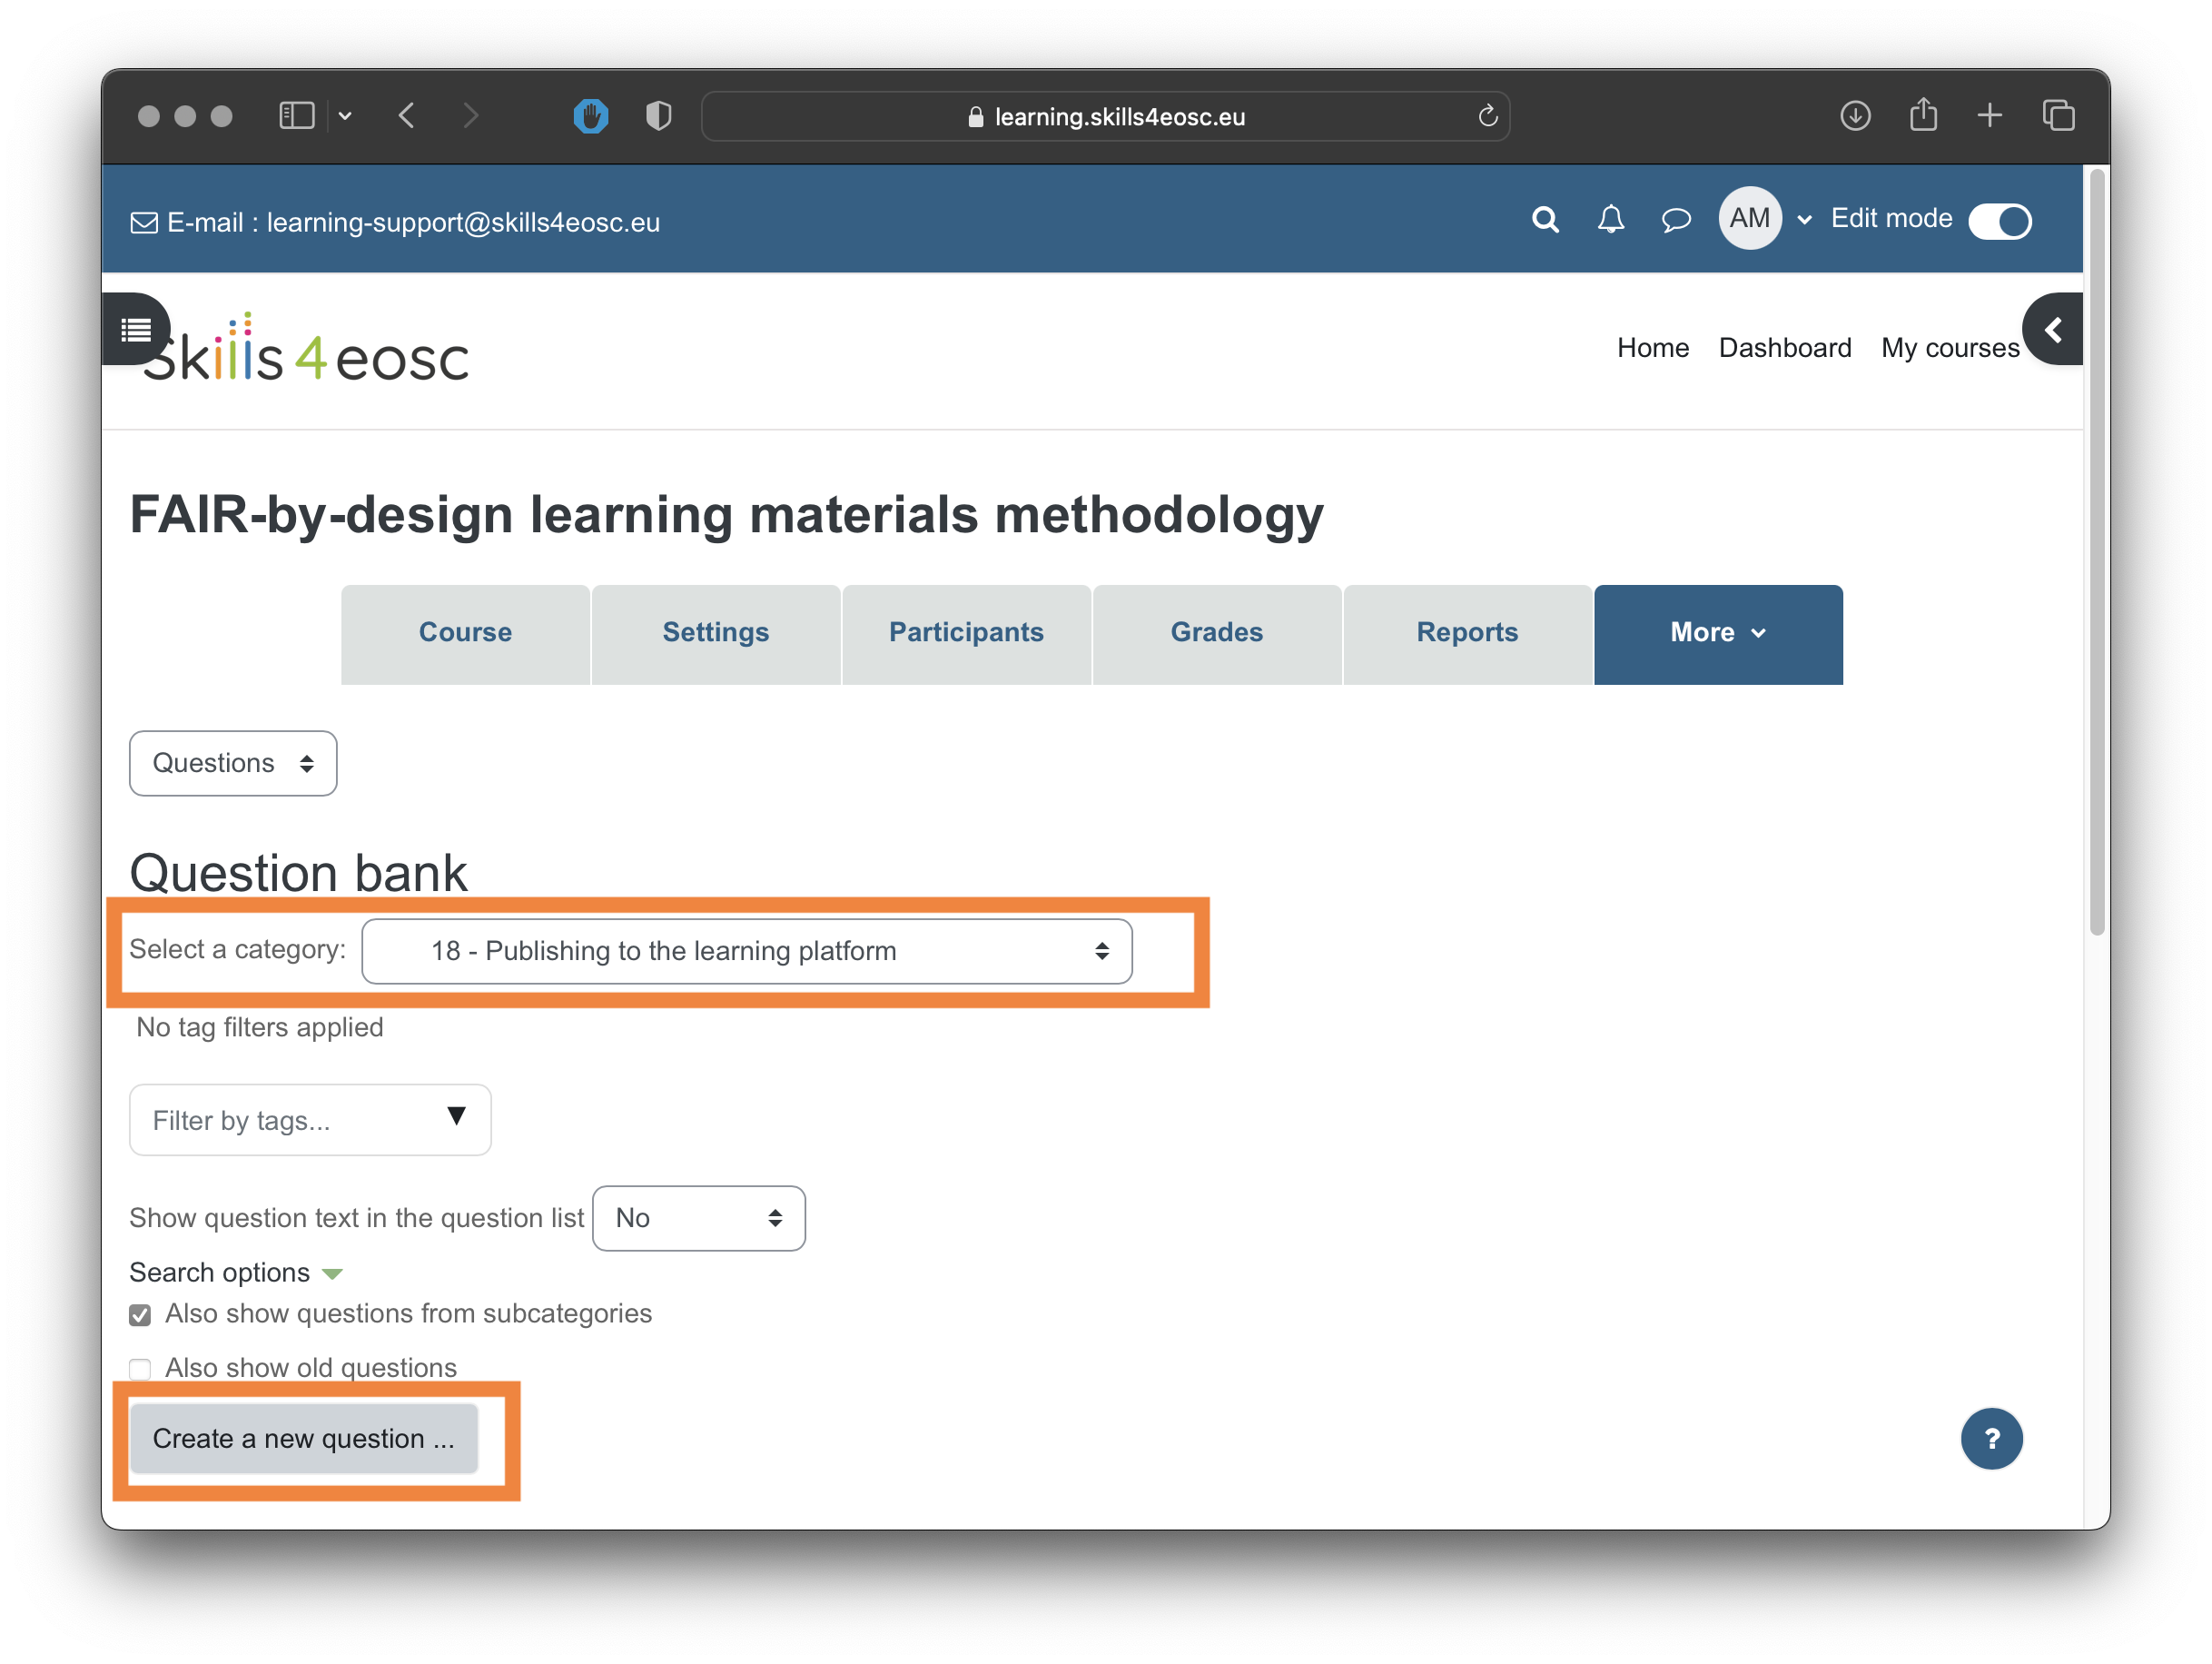
Individual questions can be added to the question bank manually. To add individual question to the question bank, from the "Questions" view of the Question bank, first select the category/sub-category for the questions. Then, select the "Create a new question" link.
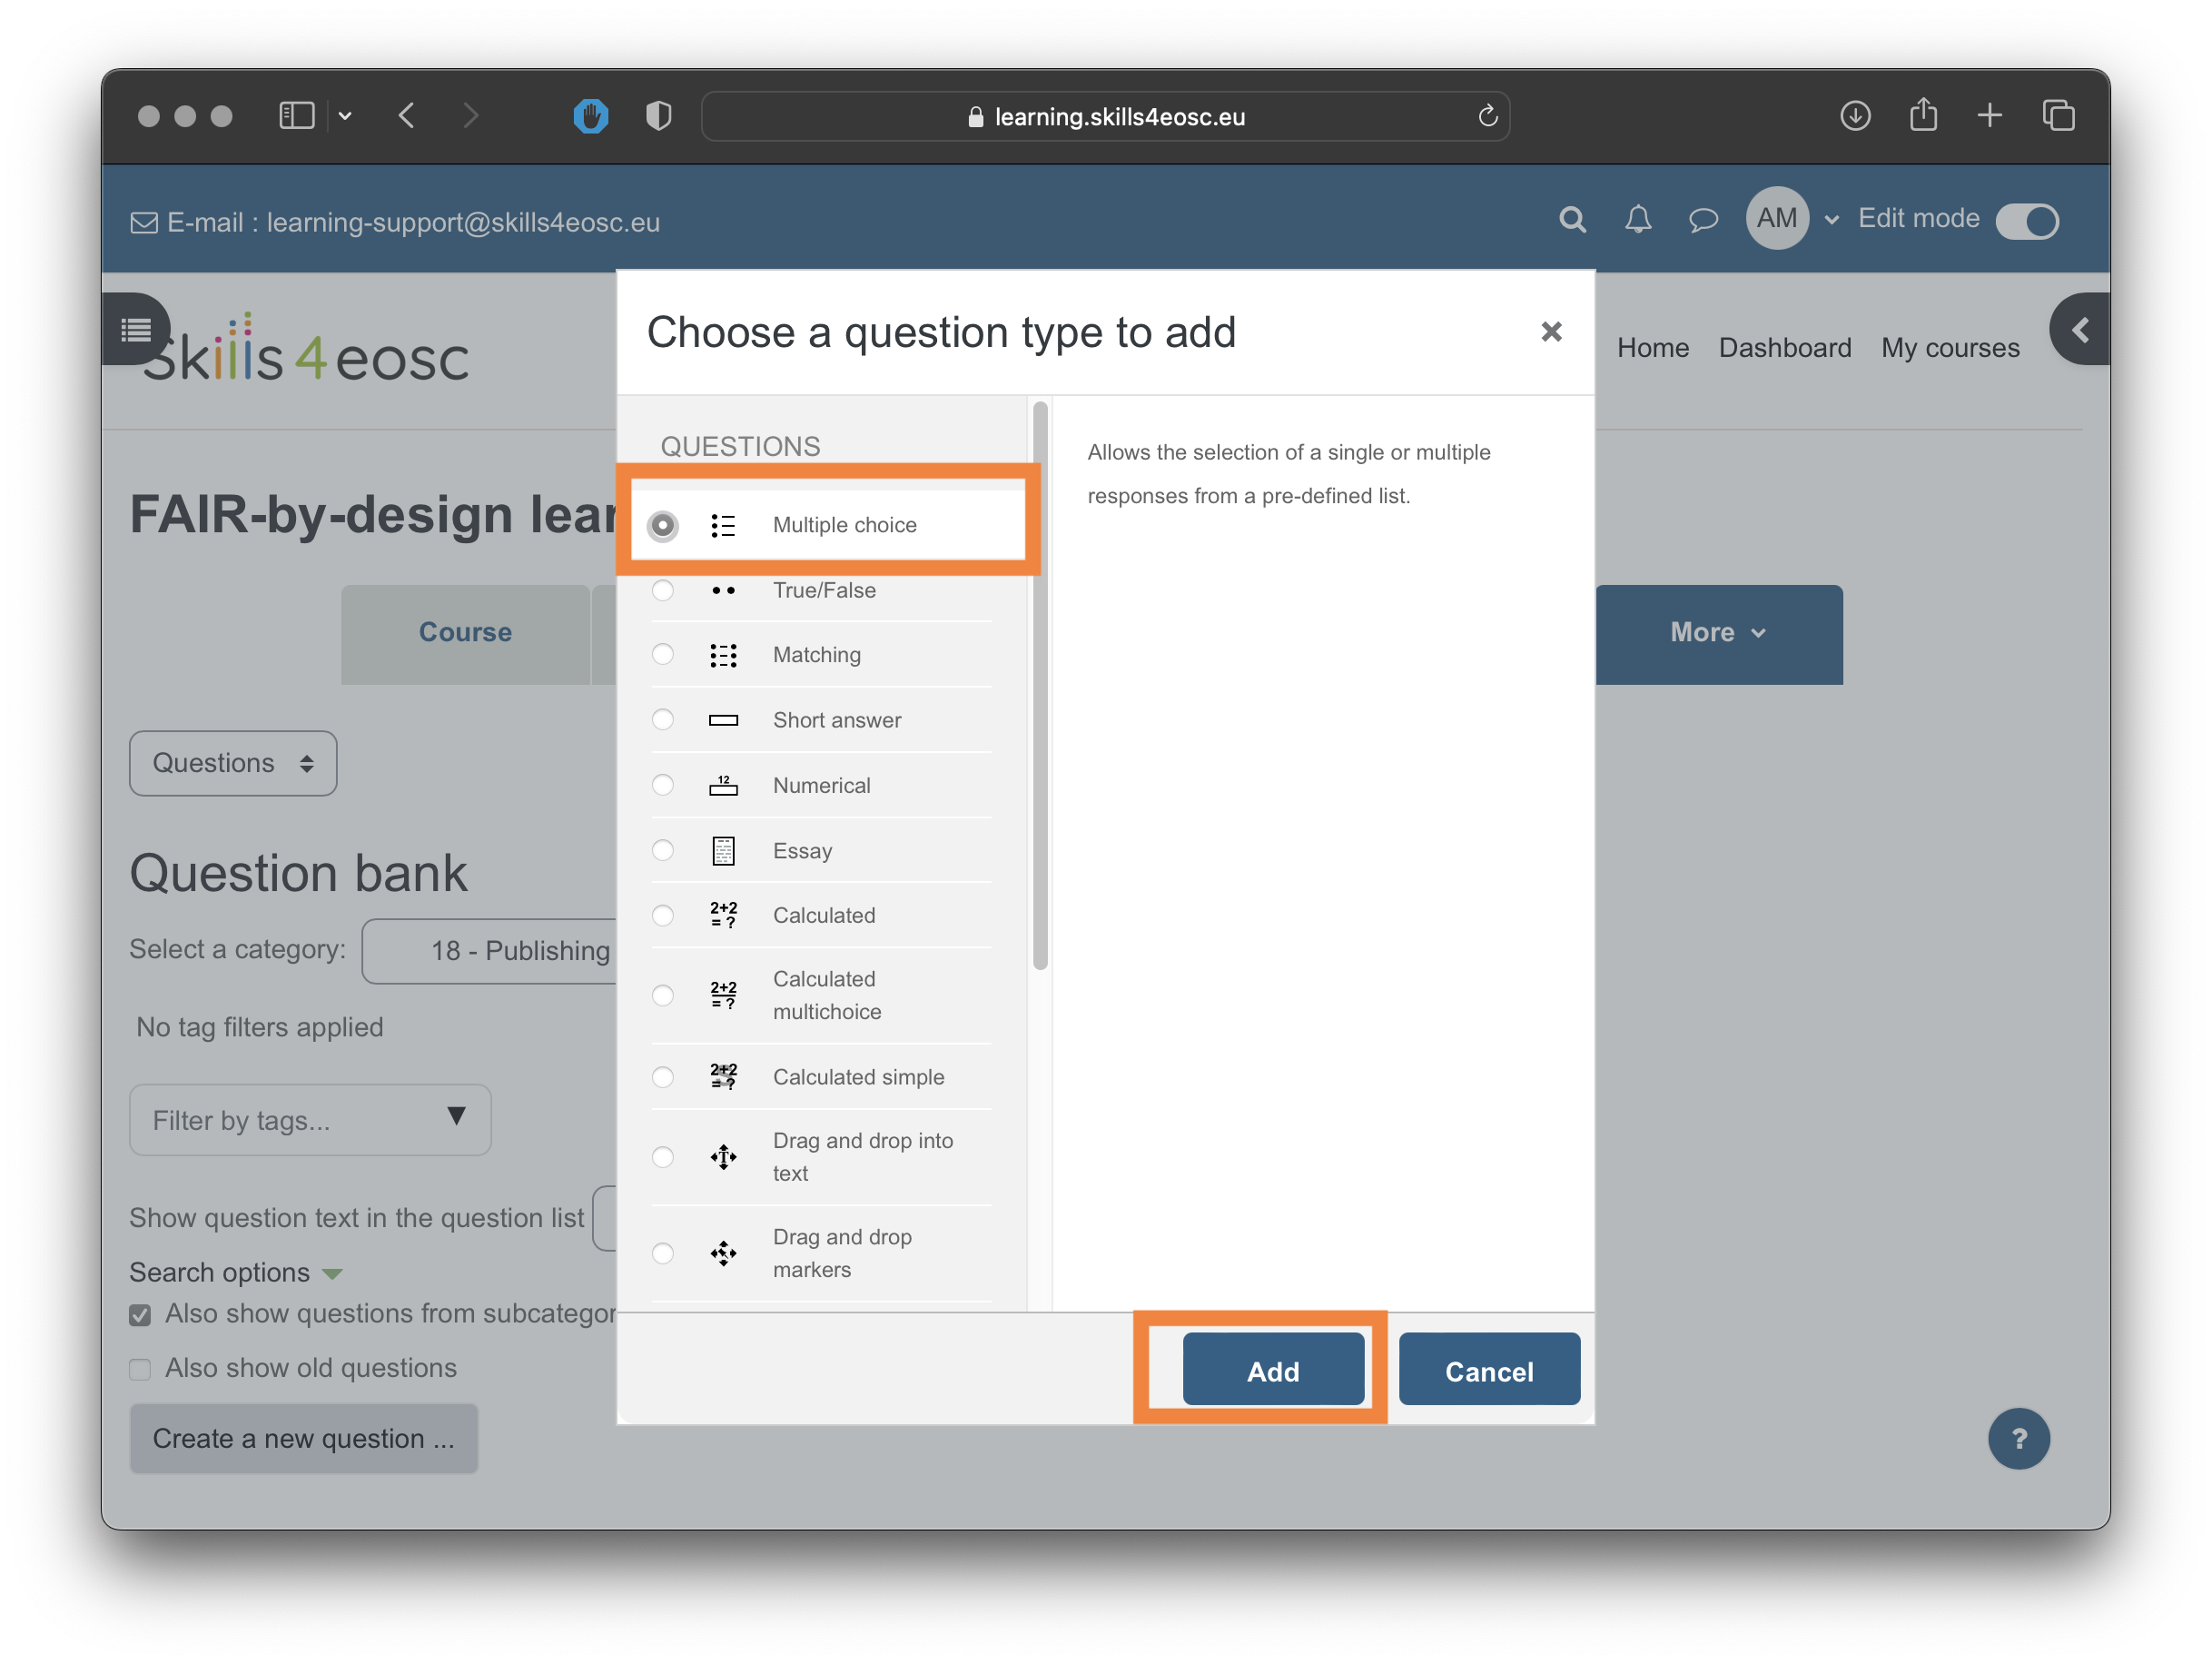
The next form allows for the choice of the question type for the new question.
Depending on the type of the question, a form to edit its properties is shown. Once the properties of the question are finalized, the question can be saved to the question bank.
If a multiple choice questions is selected, the parameters to be configures are the question name, question text and the answers
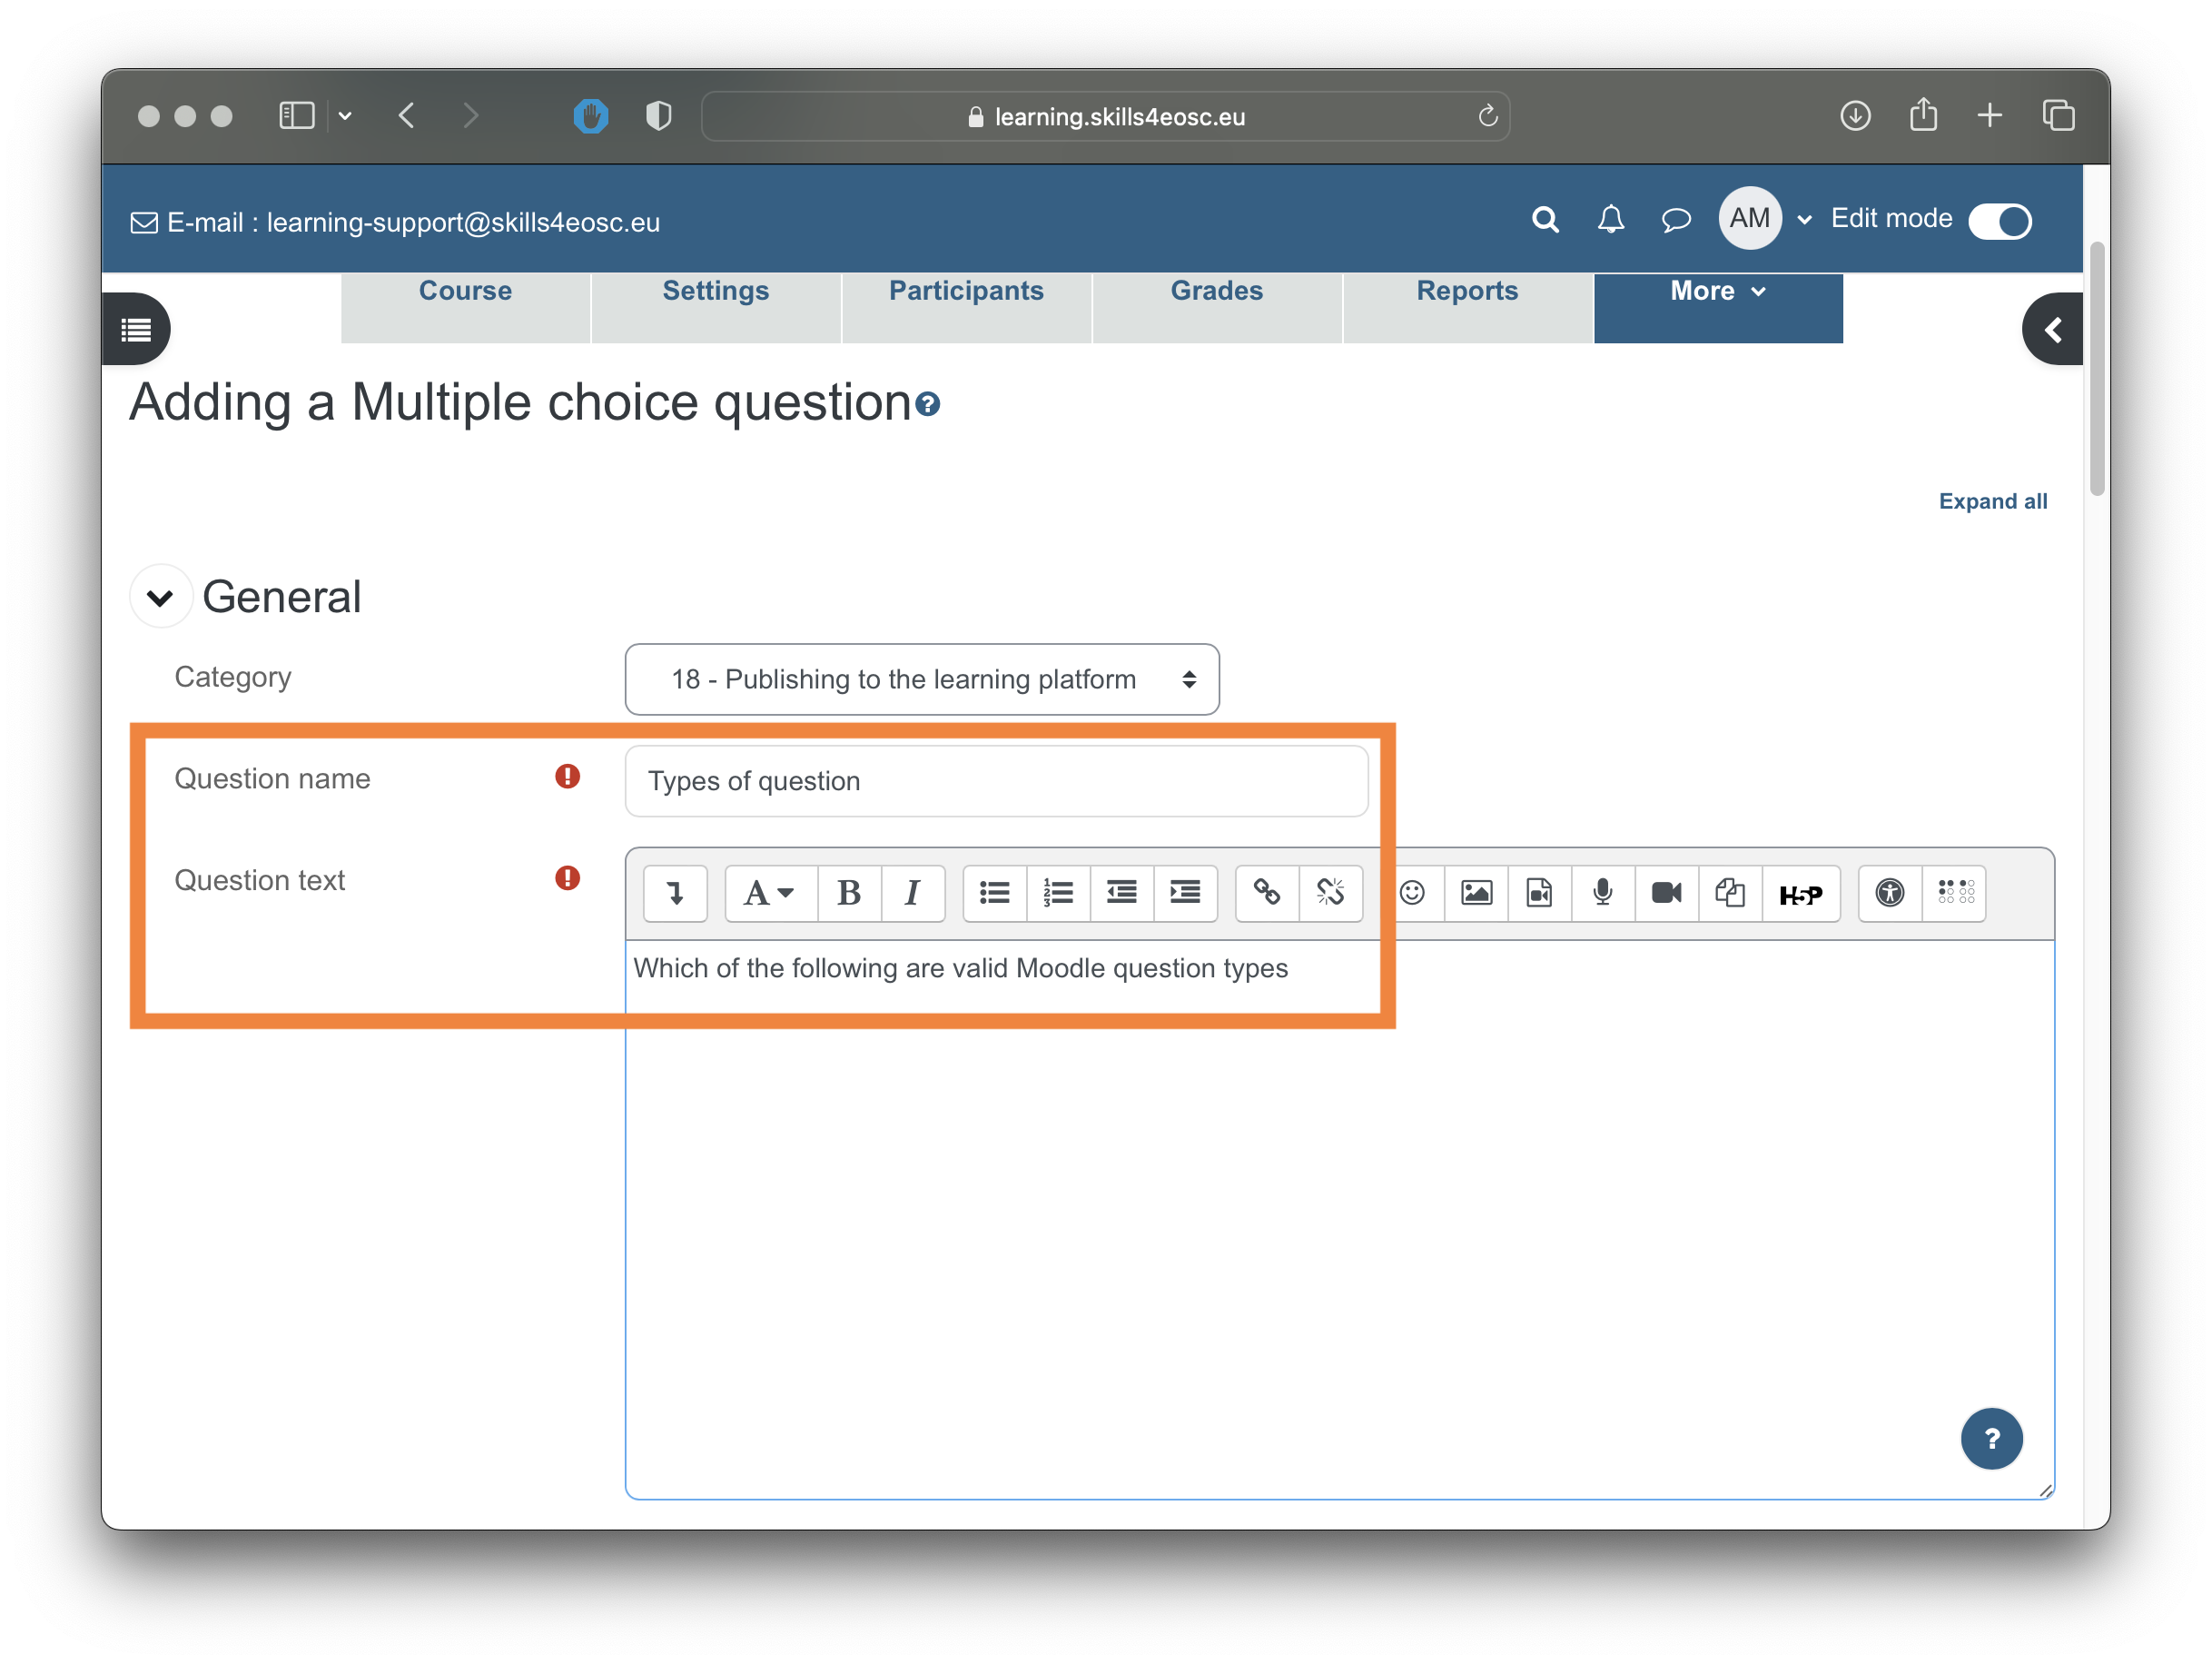
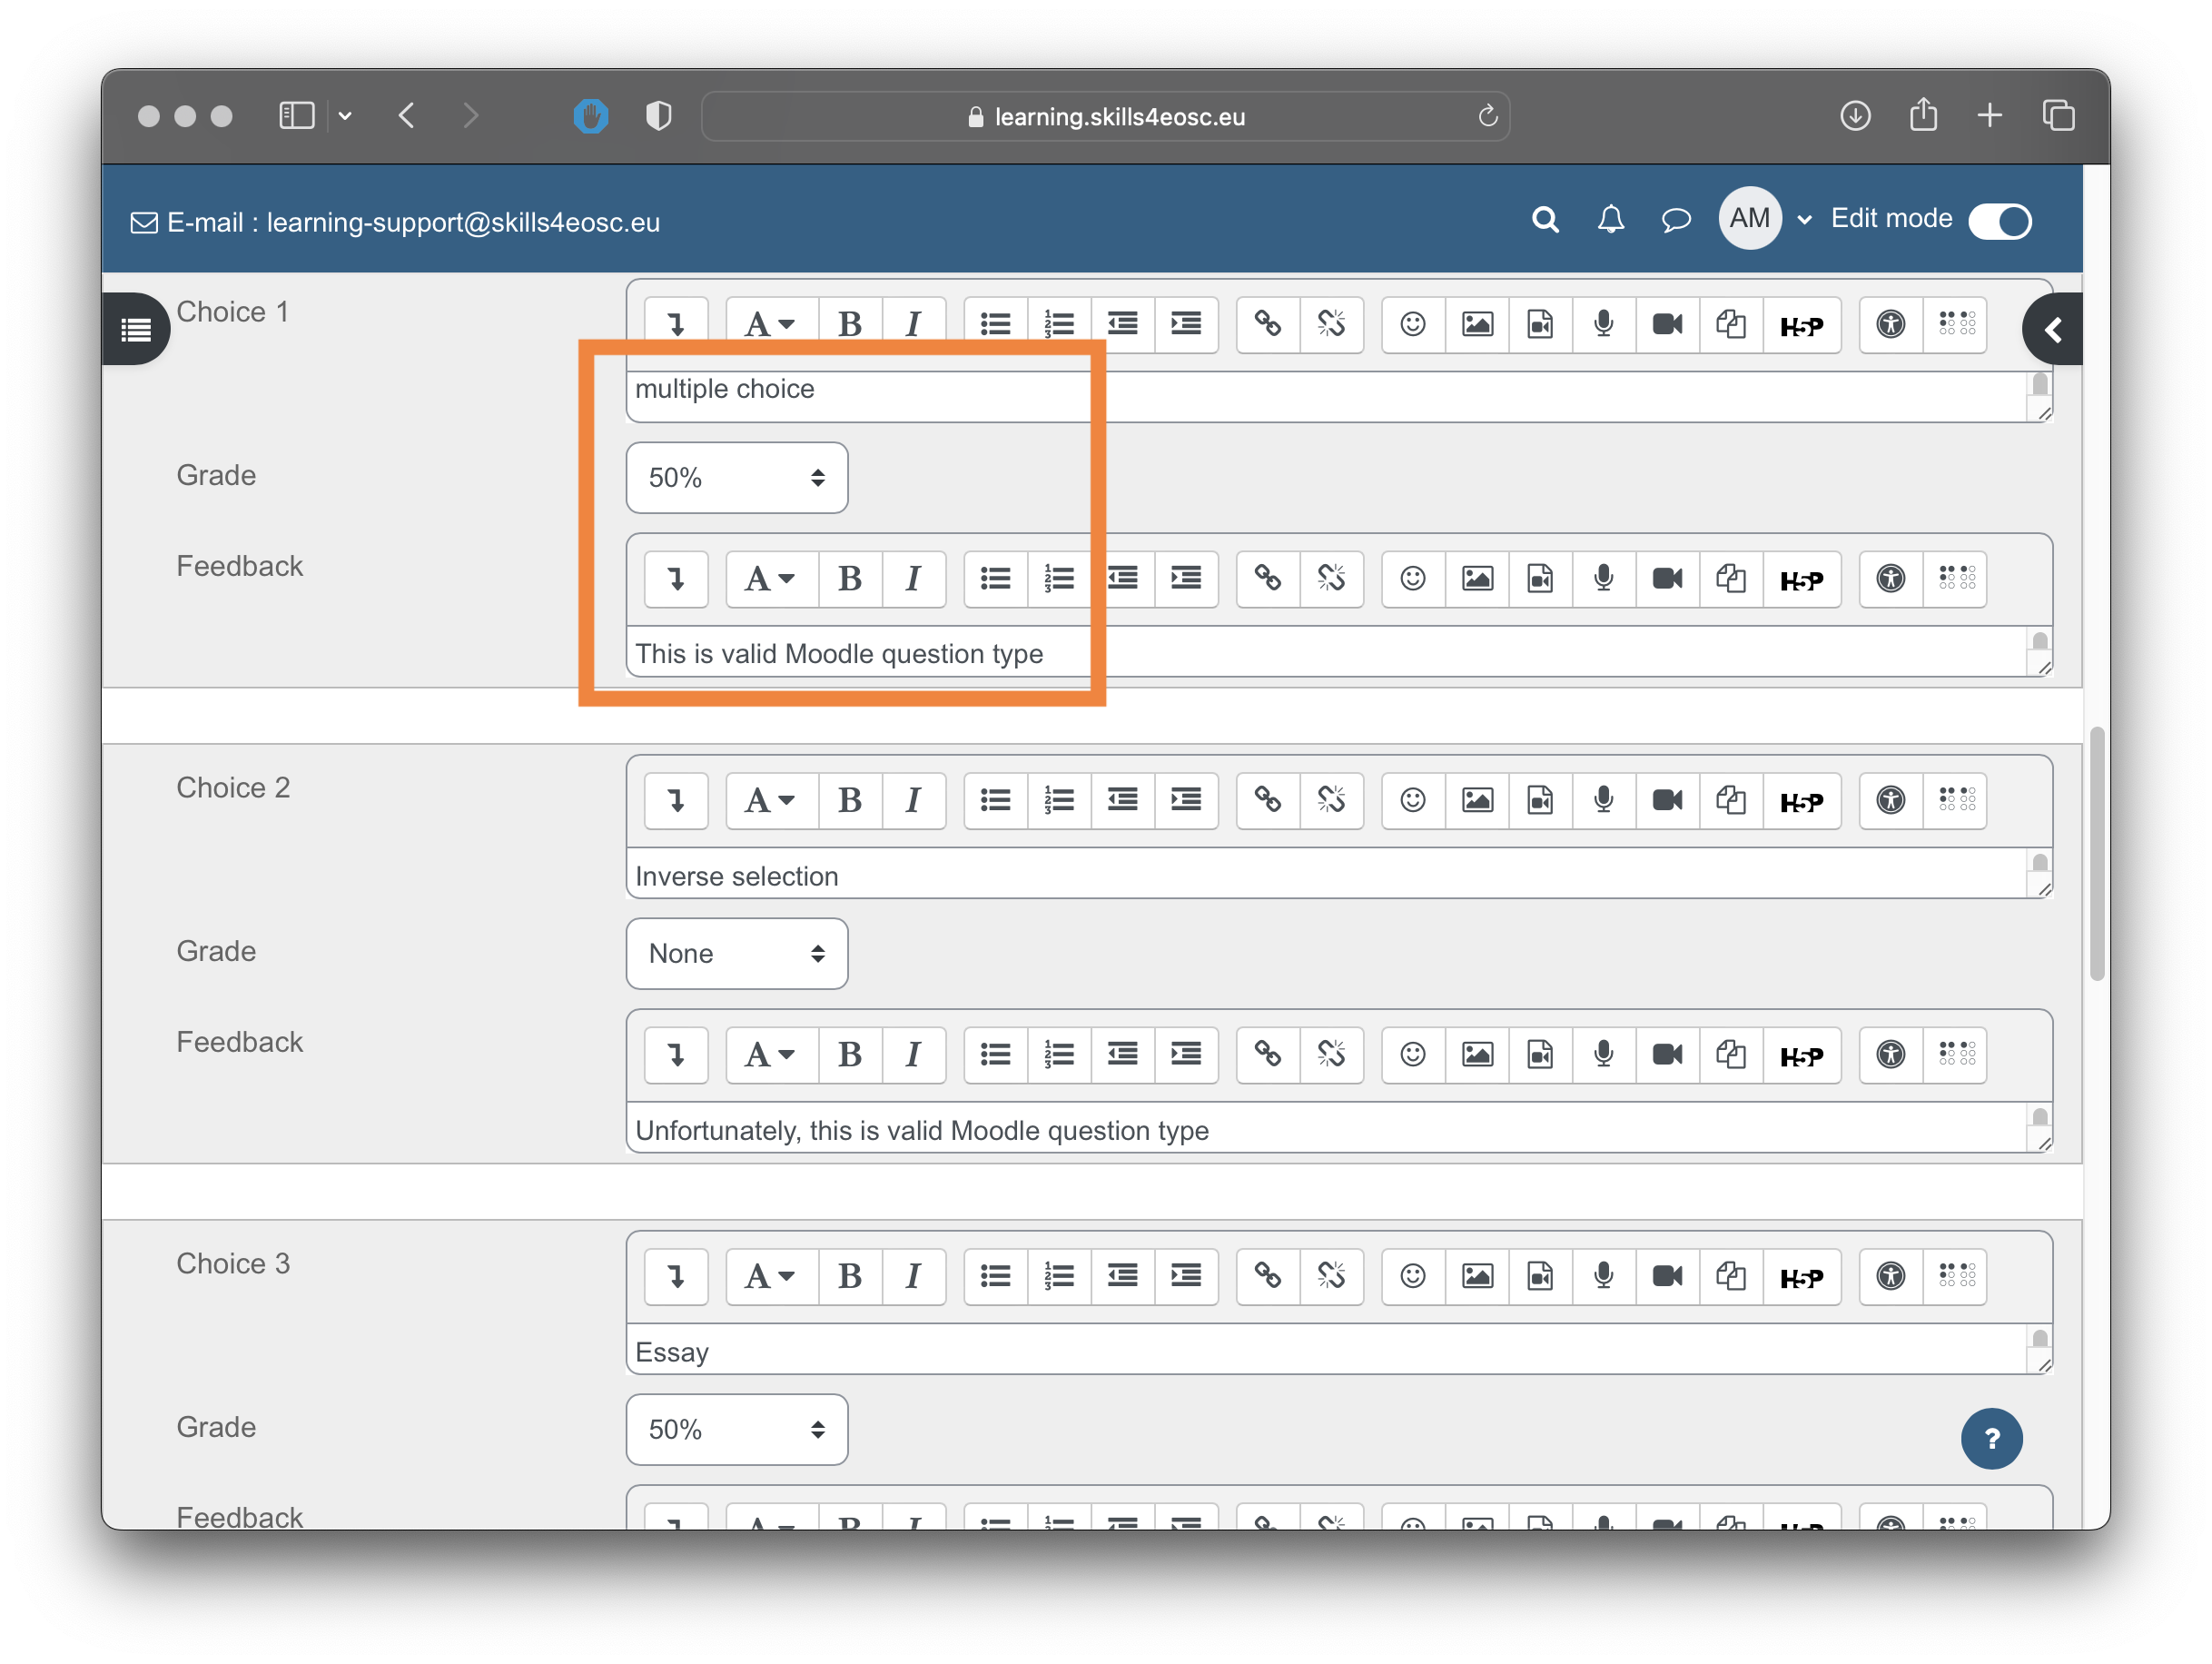
For the multiple choice questions, one or more answers can be valid. For each of the offered answers, the choice text, grade and feedback can be provided. The choice is the displayed option, while the feedback will be displayed when reviewing a finished quiz. The grade selection defined how much each choice influences the final grade in percentage. The percentage can be also negative for the wrong answers.
Importing questions into questions banks
To use already prepared questions outside of the learning platform, or questions exported from other courses or learning platforms, the import questions feature can be used.
As discussed previously, one of the most popular format for editing questions and their transfer between courses and platforms is the GIFT format.
Remember that in the GIFT format, the questions are written as follows
Which of the following types of questions is not graded automatically
= Essay
~%-10% Multiple choice
~%-10% Numerical
~%-10% Short answer
In the example above, the wrong answers have negative score of -10% of the grade for that question.
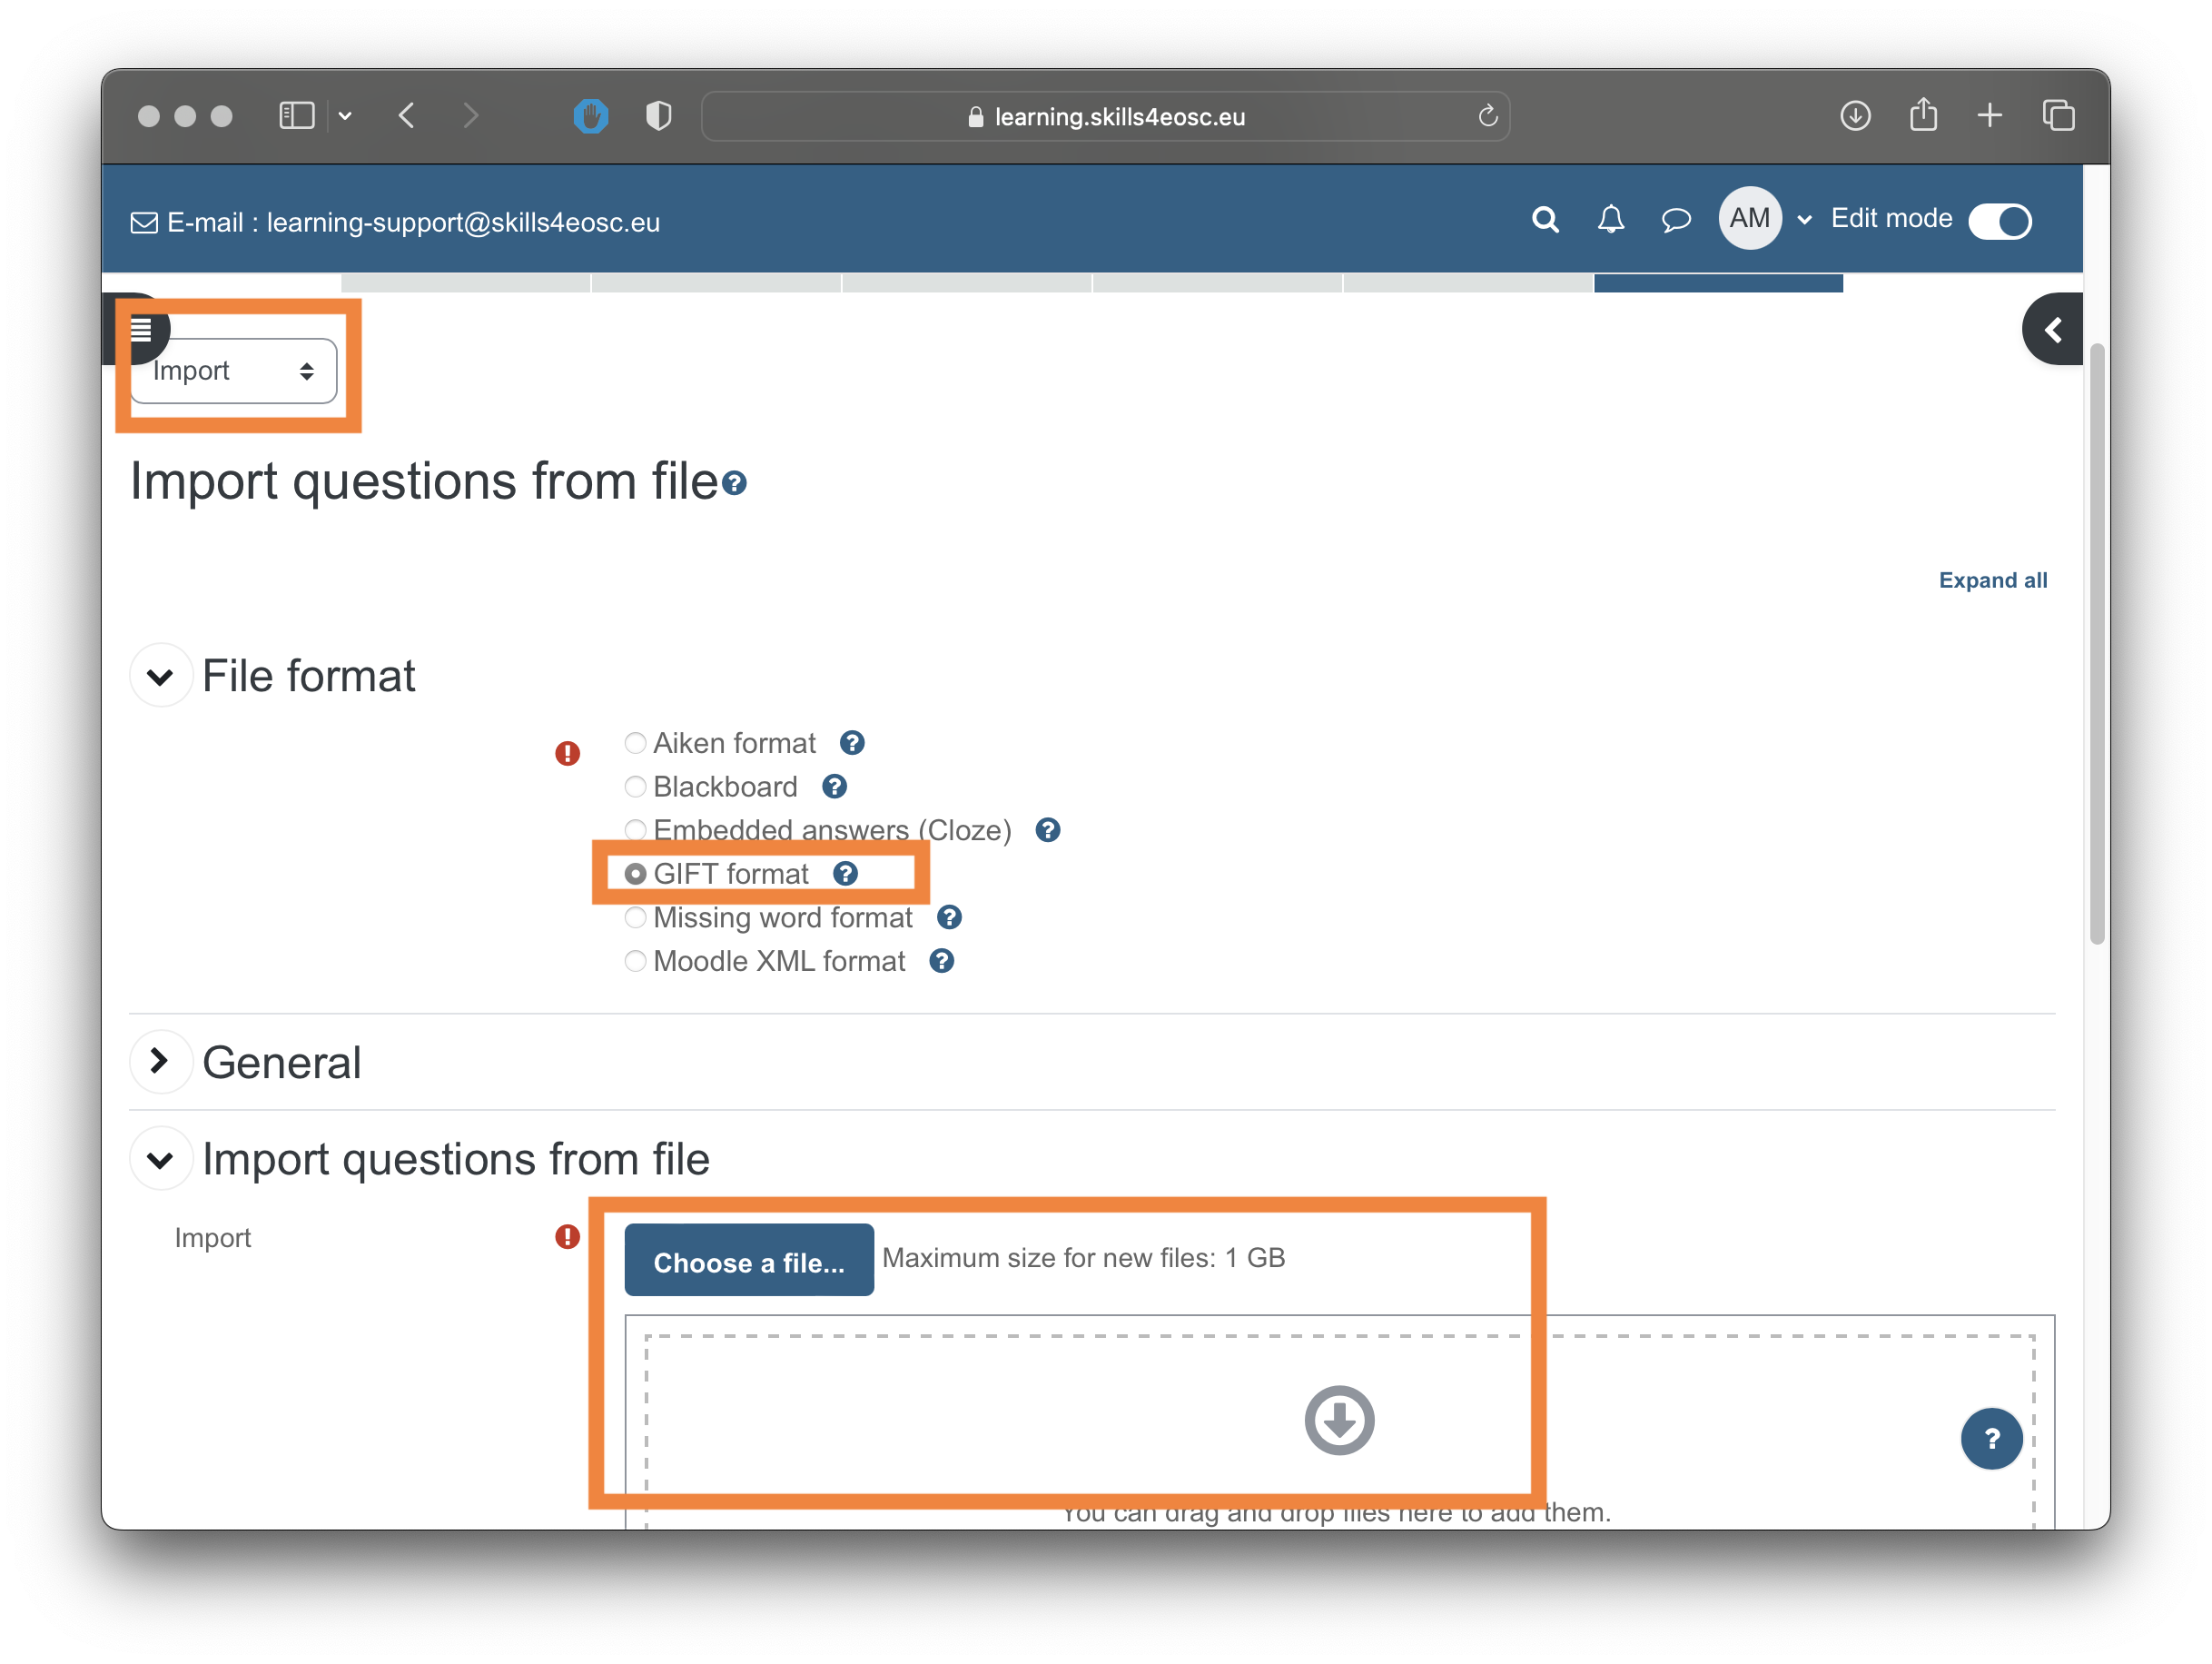
The category of the imported questions can be either specified in the GIFT file using the $CATEGORY: name_of_category modifier, or selected from the General section of the import form.
Creating quizzes
The creation of quizzes as methods of knowledge assessment can be done in two steps.
First, a quiz needs to be added as new activity with type "Quiz" to the specific topic of the course.
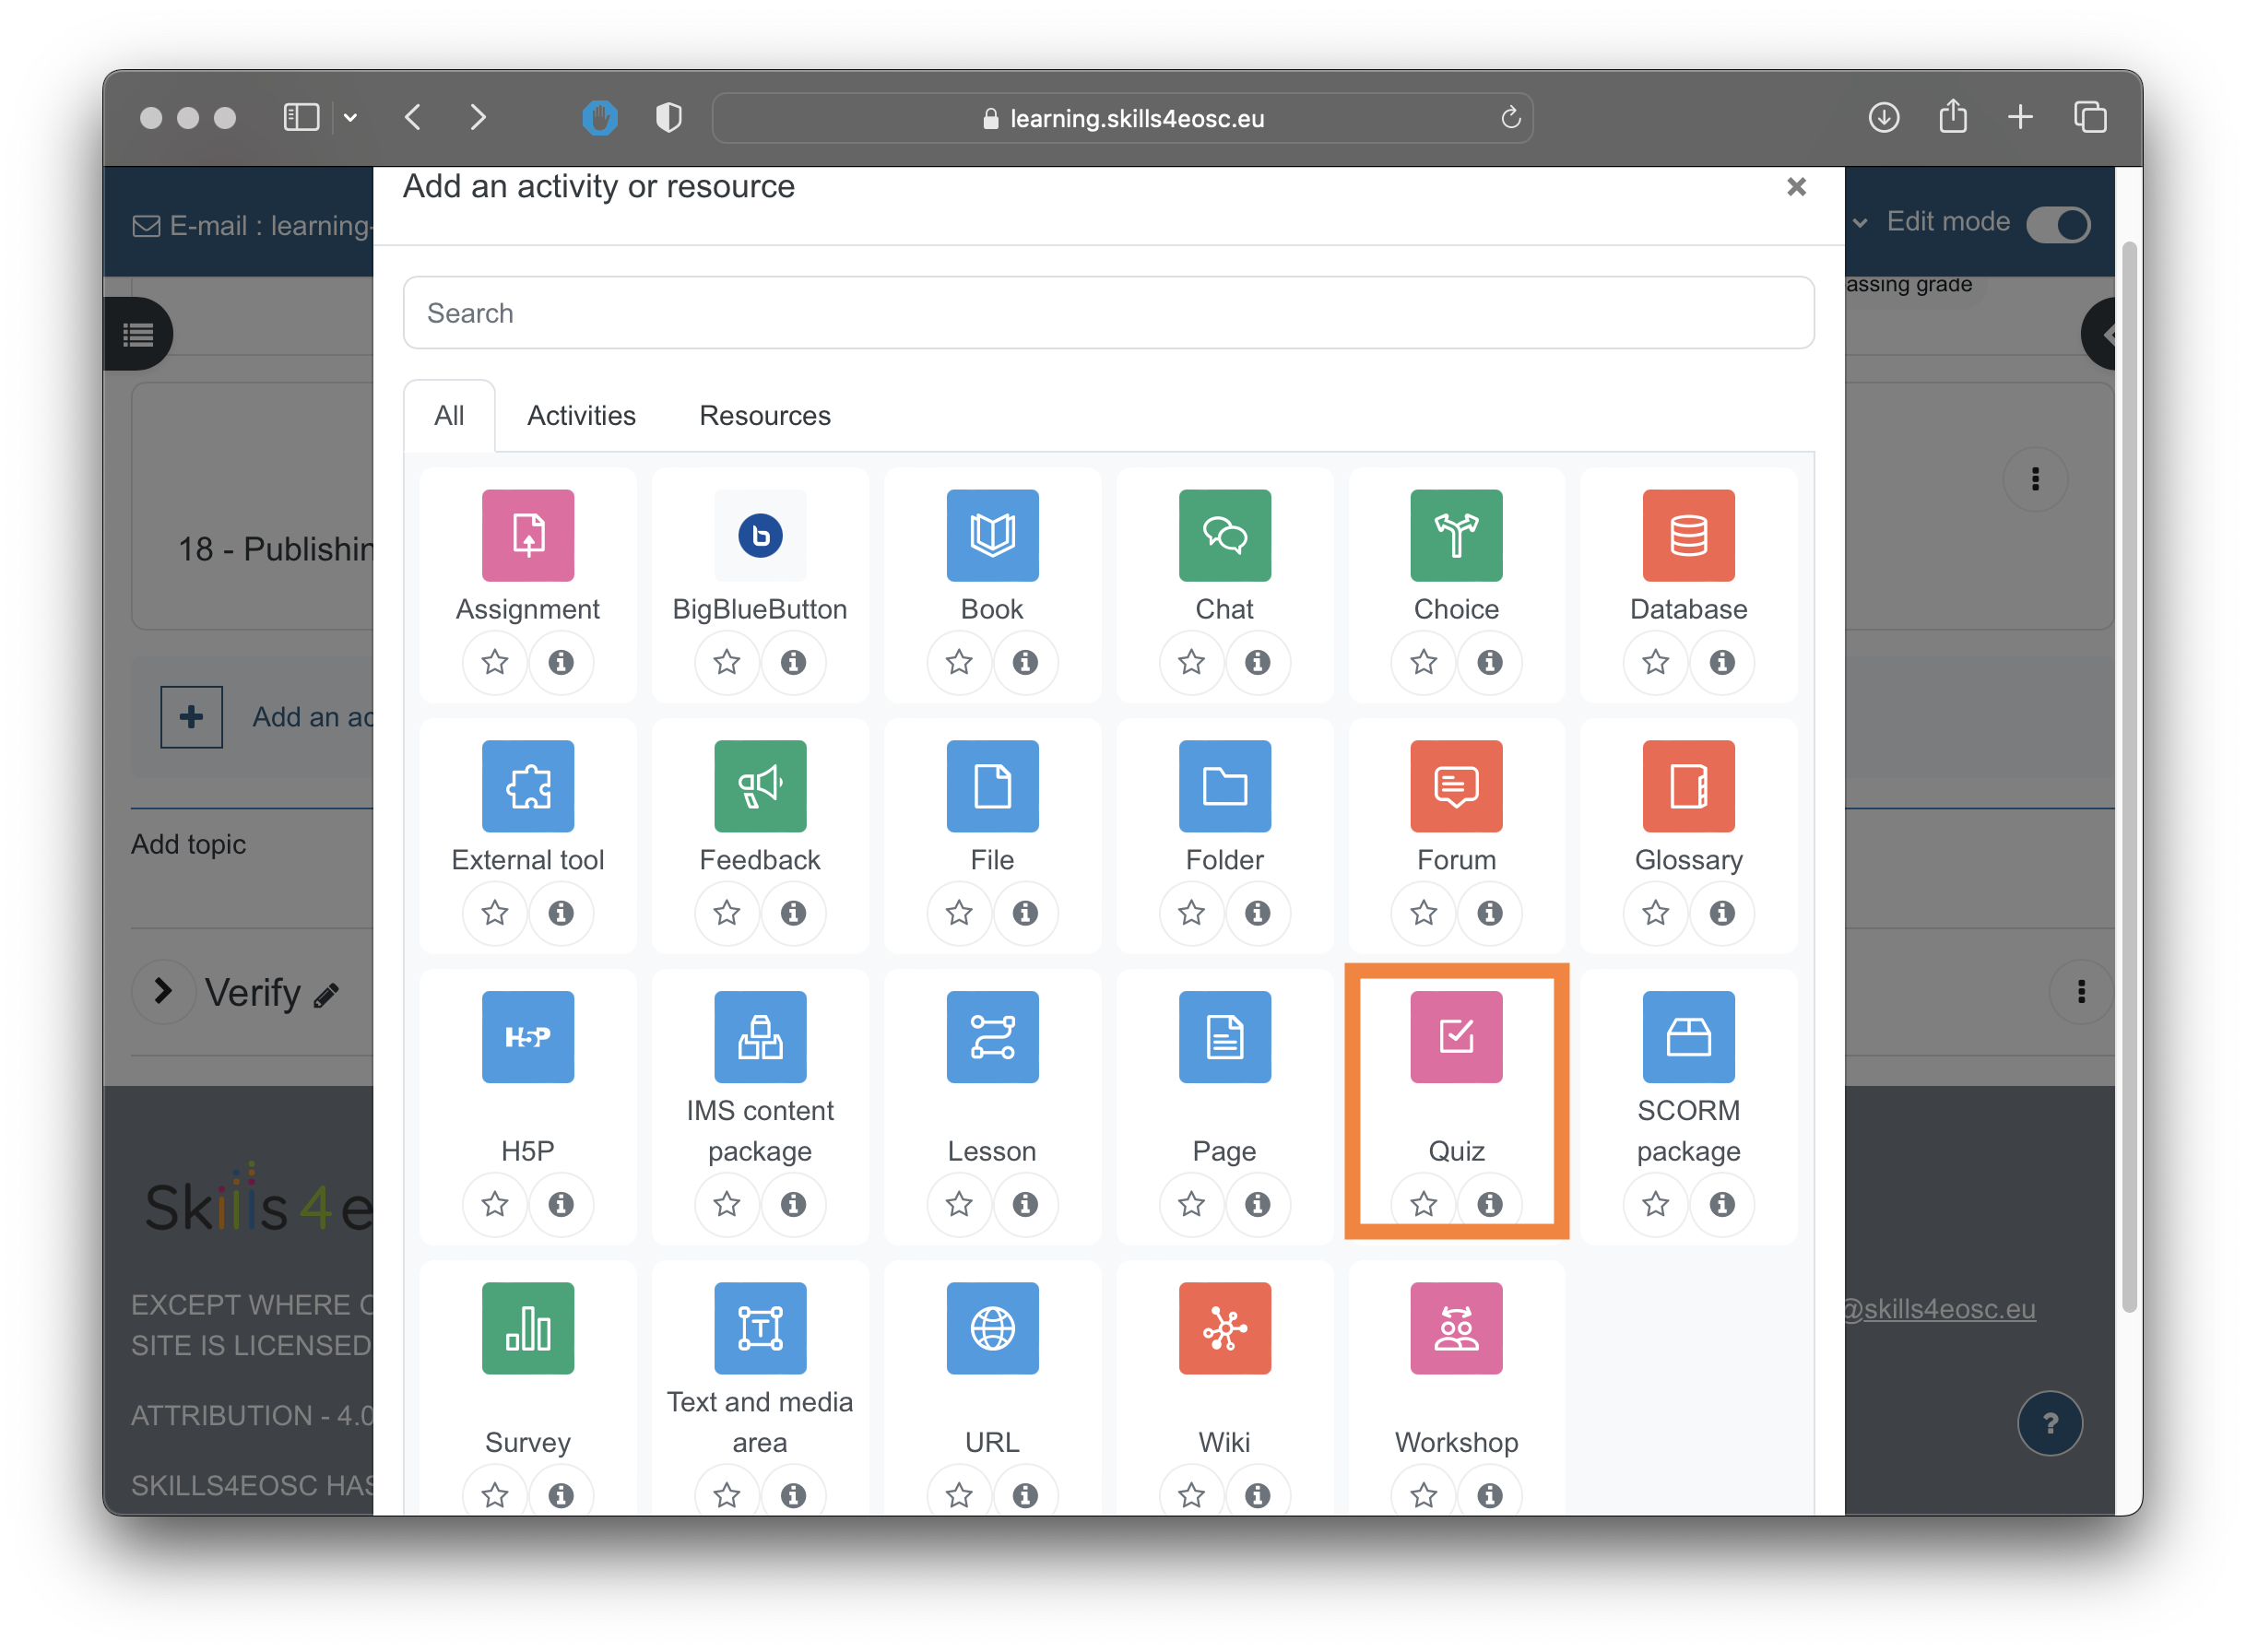
The quiz attributes include name, start and end time for the quiz to be available for the learners, as well as the time limit for each attempt of the quiz.
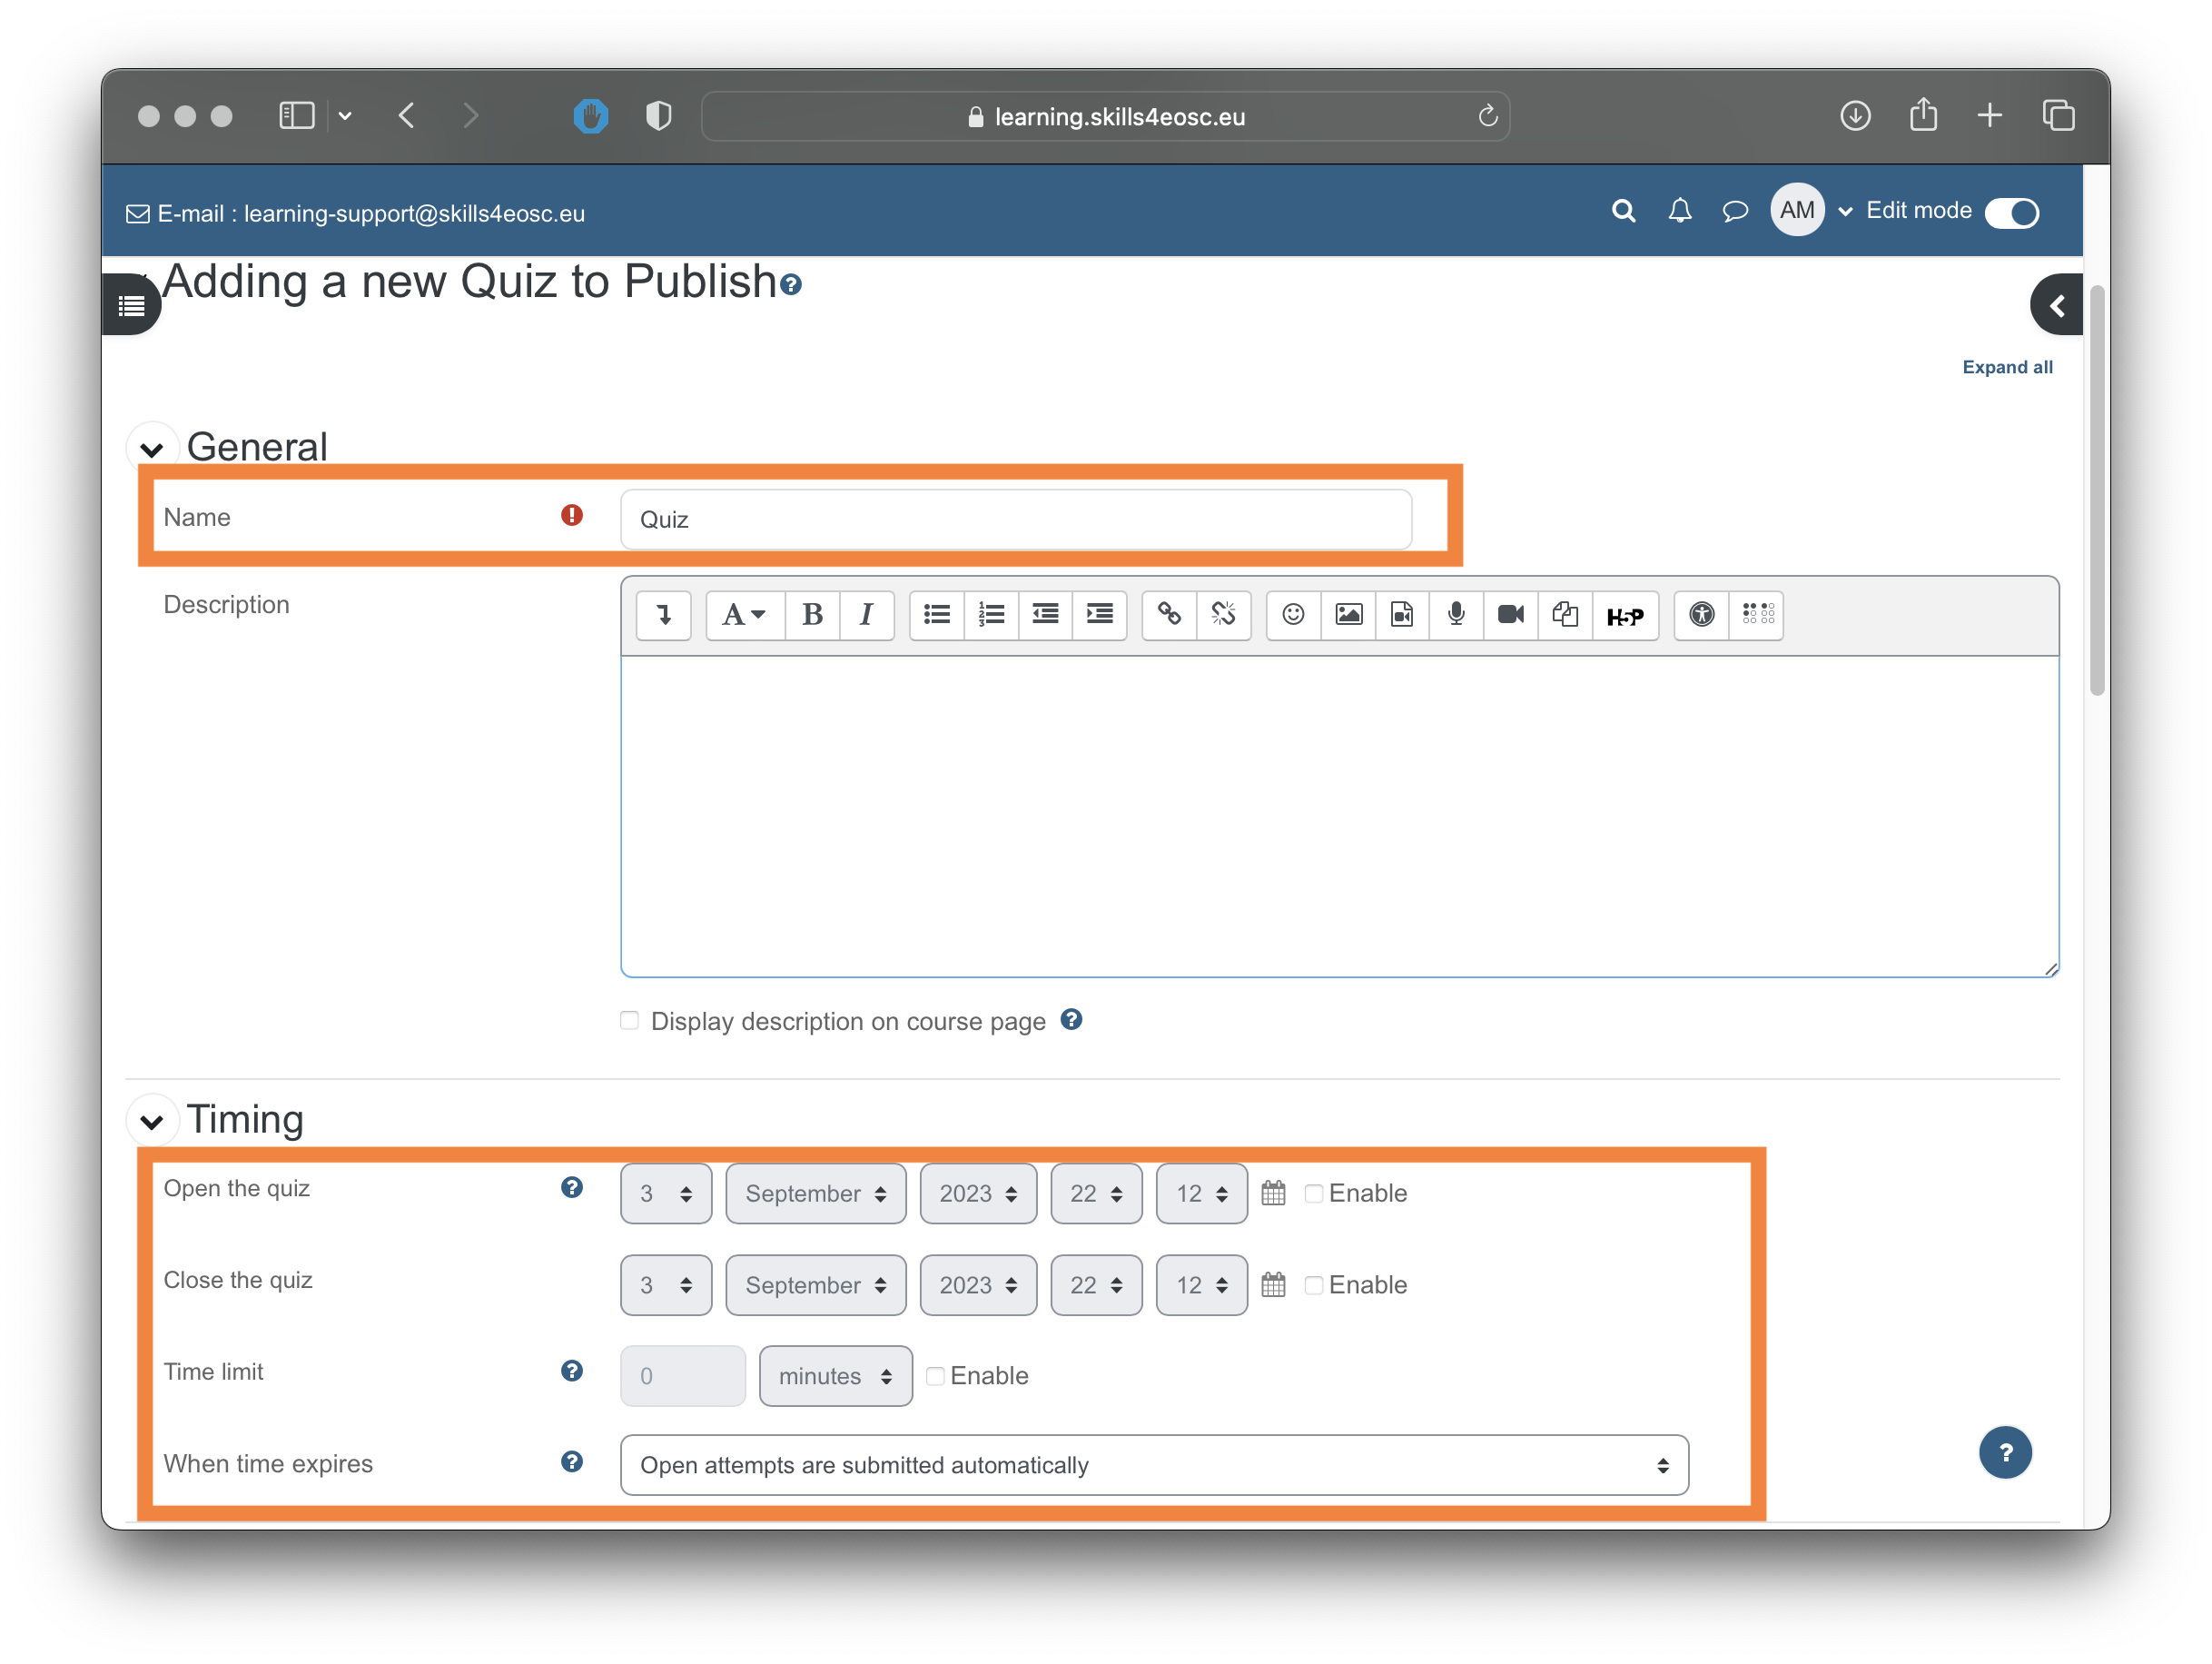
Once the quiz is created, the next step is the selection of the questions.
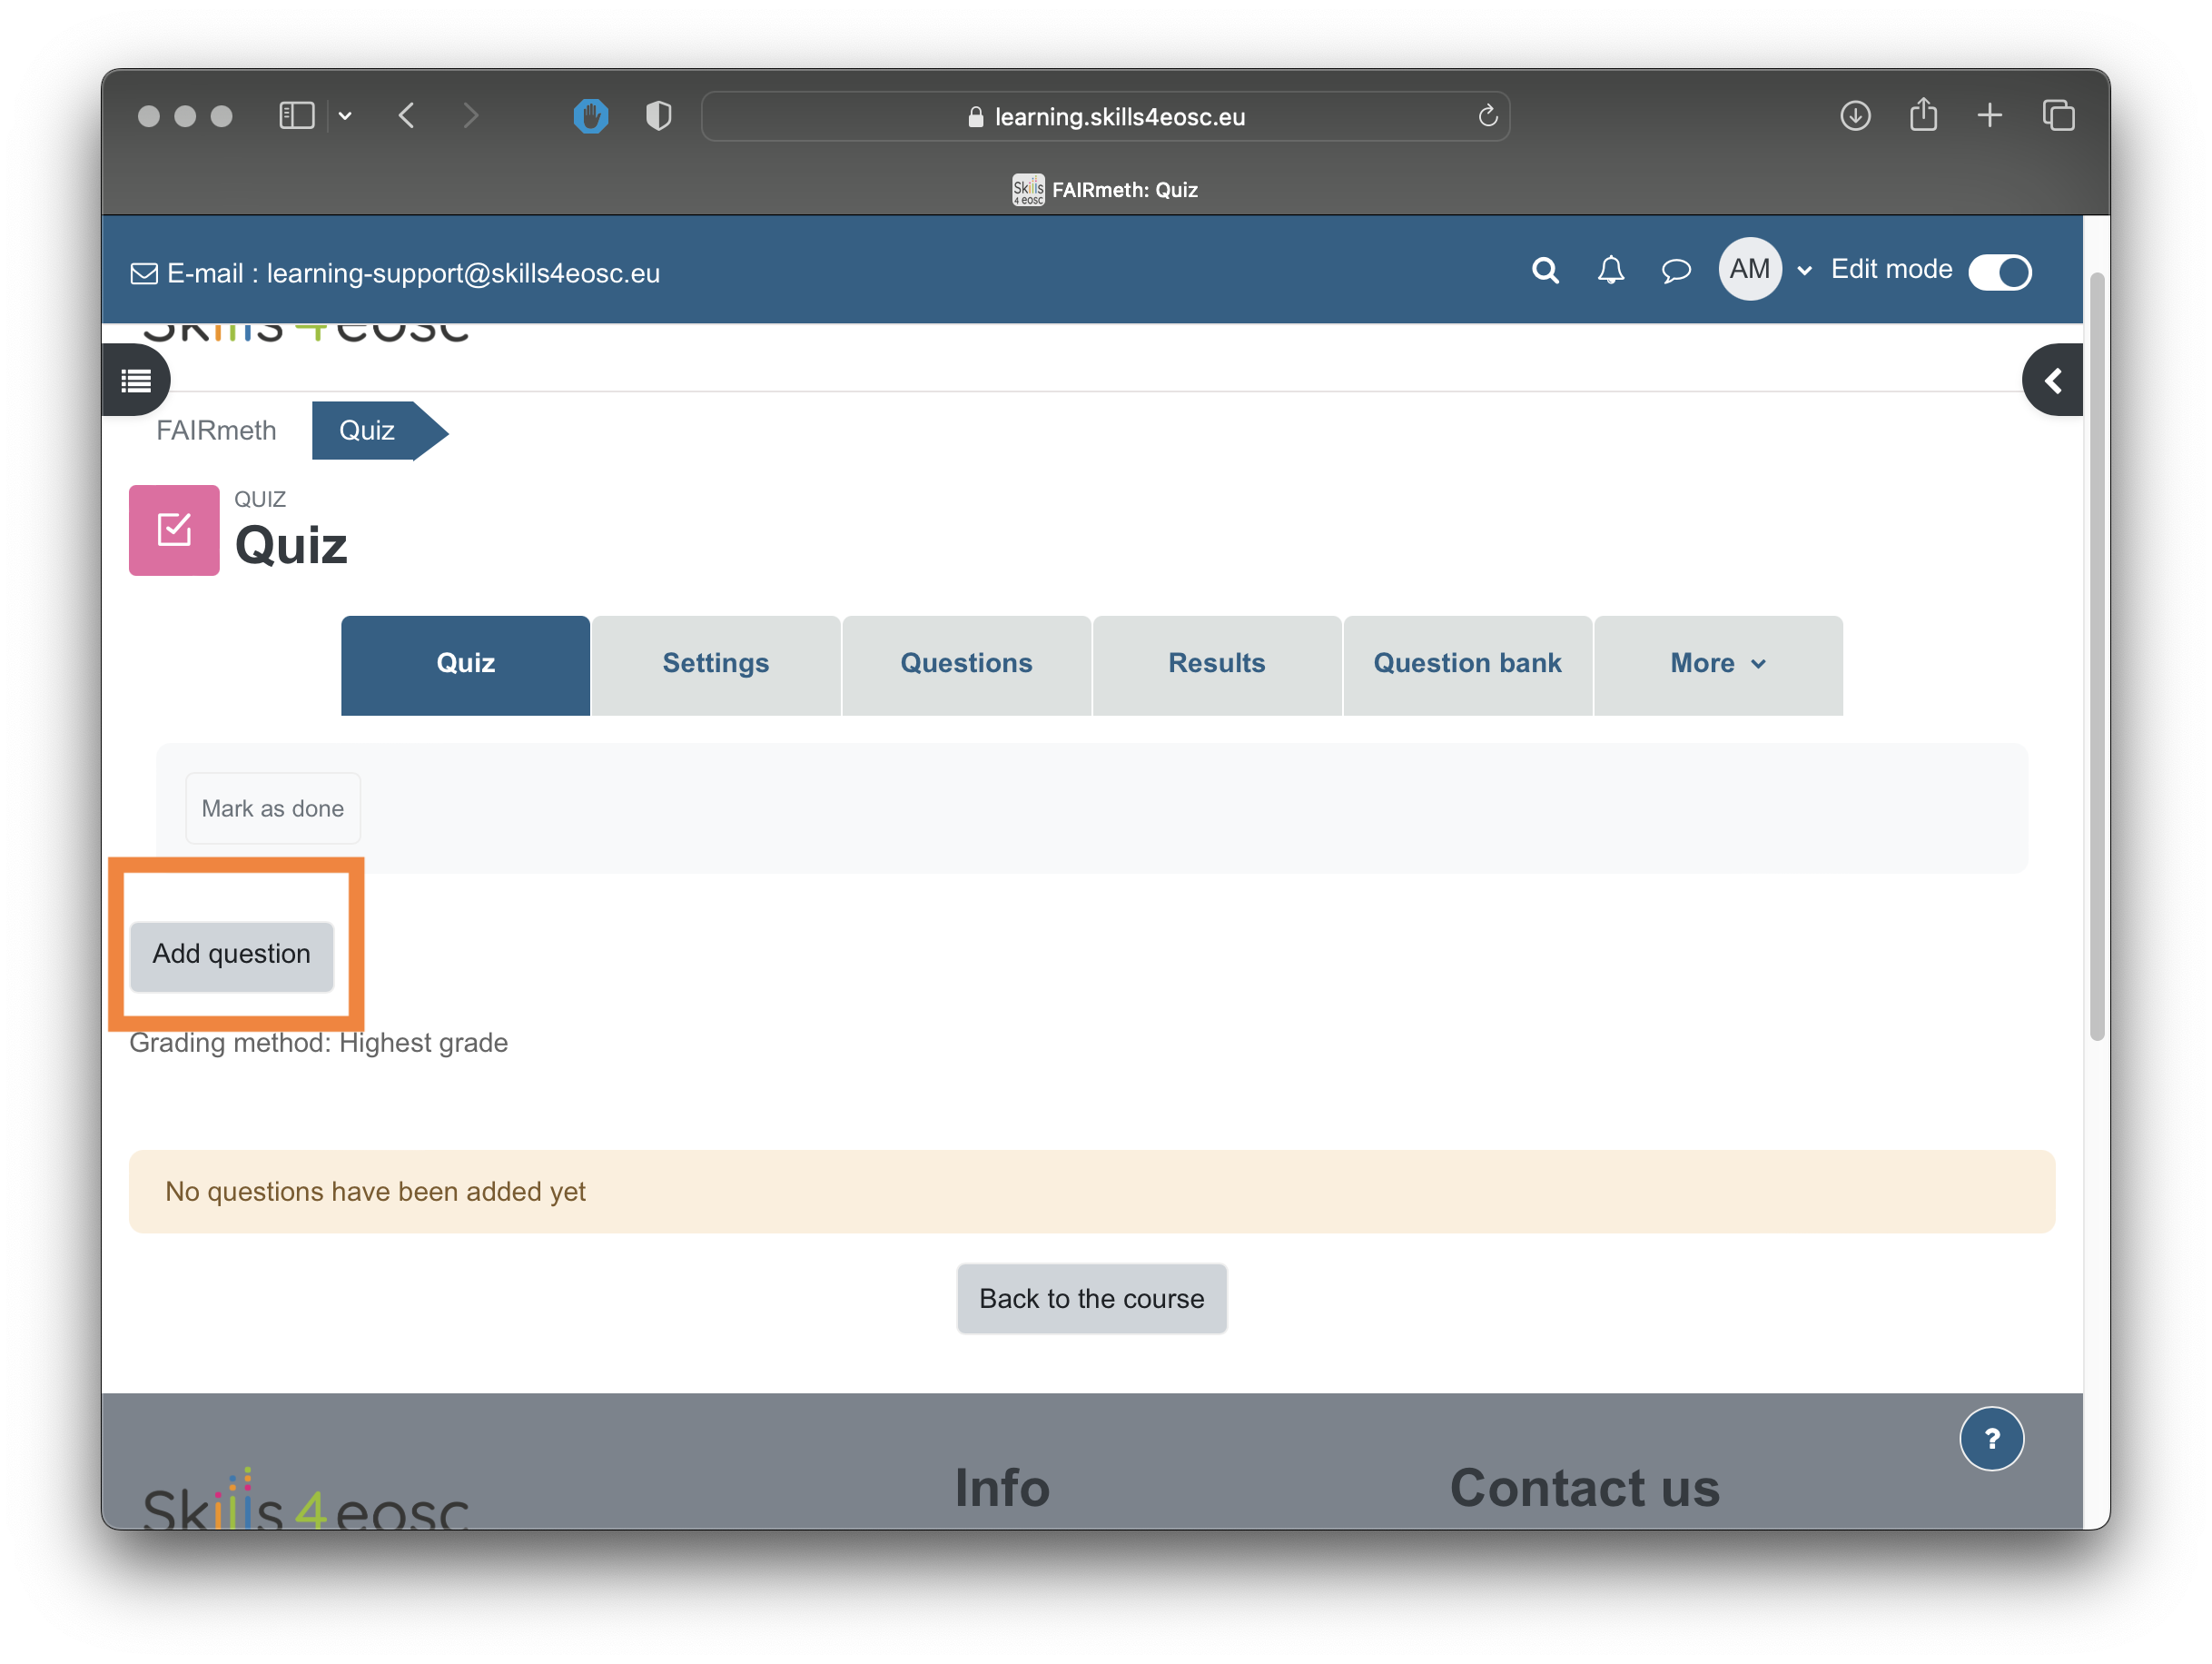
The questions view of the quiz allows configuring the maximum grade of the quiz, whether the questions should be shuffled at each individual attempt, and most importantly to add new questions.
When the "Add" link is selected, three options are available - "add new question", allowing for direct adding new questions to the quiz (and to the question bank) - "from the questions bank", allowing a choice of a specific question from the question bank - "a random question", giving the opportunity to randomly select a questions for that position in the quiz in each individual attempt.
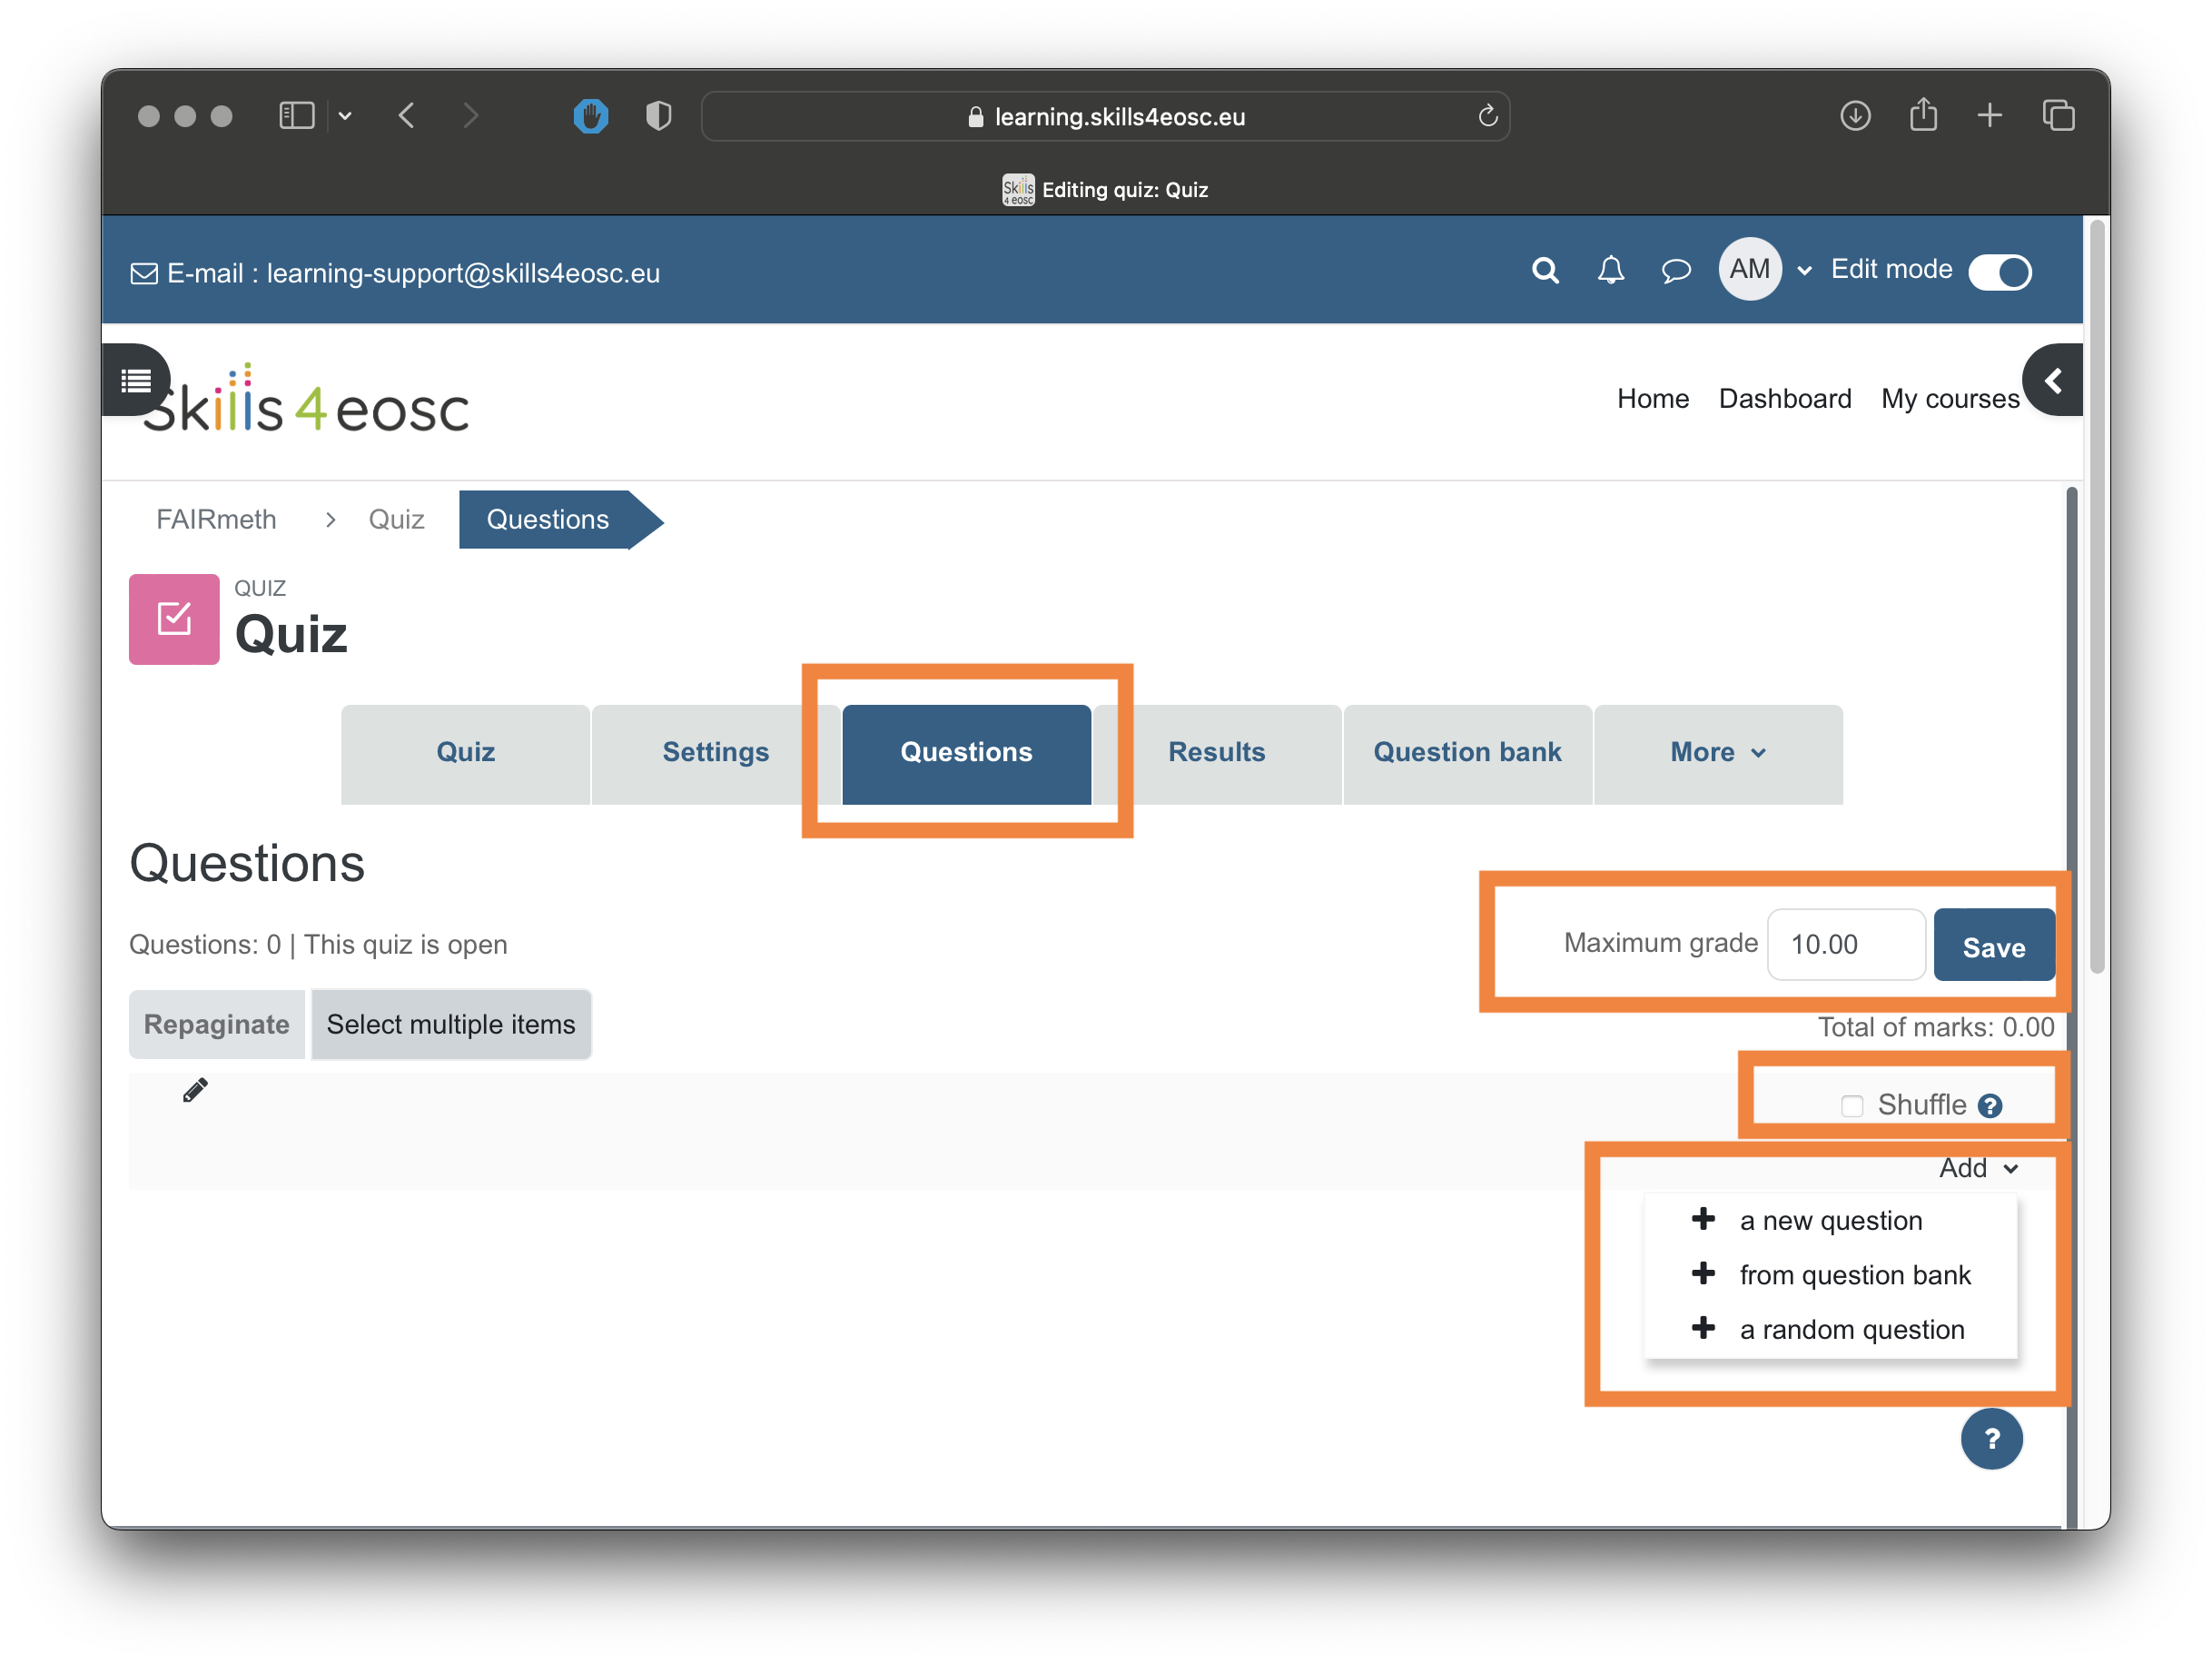
NOTE: the "a random question" option can be used to define test strategies. A strategy can be defined by adding random questions from different question categories/sub-categories, allowing for diversity of the individual attempts, from a specified group of questions with similar goal and difficulty.
Feedback gathering
Gathering feedback from the participants is essential for the whole lifecycle of the learning material, as it represents the main driver for the process of continual improvement. Remember that the gathered feedback should be continuously analyzed and improvement actions should be taken based on this analysis. Additionally, the feedback analysis at the end of the next cycle can be used to measure if the goals set for the new version have been successfully reached.
The Skills4EOSC learning platform already provides template for feedback gathering from the learners.
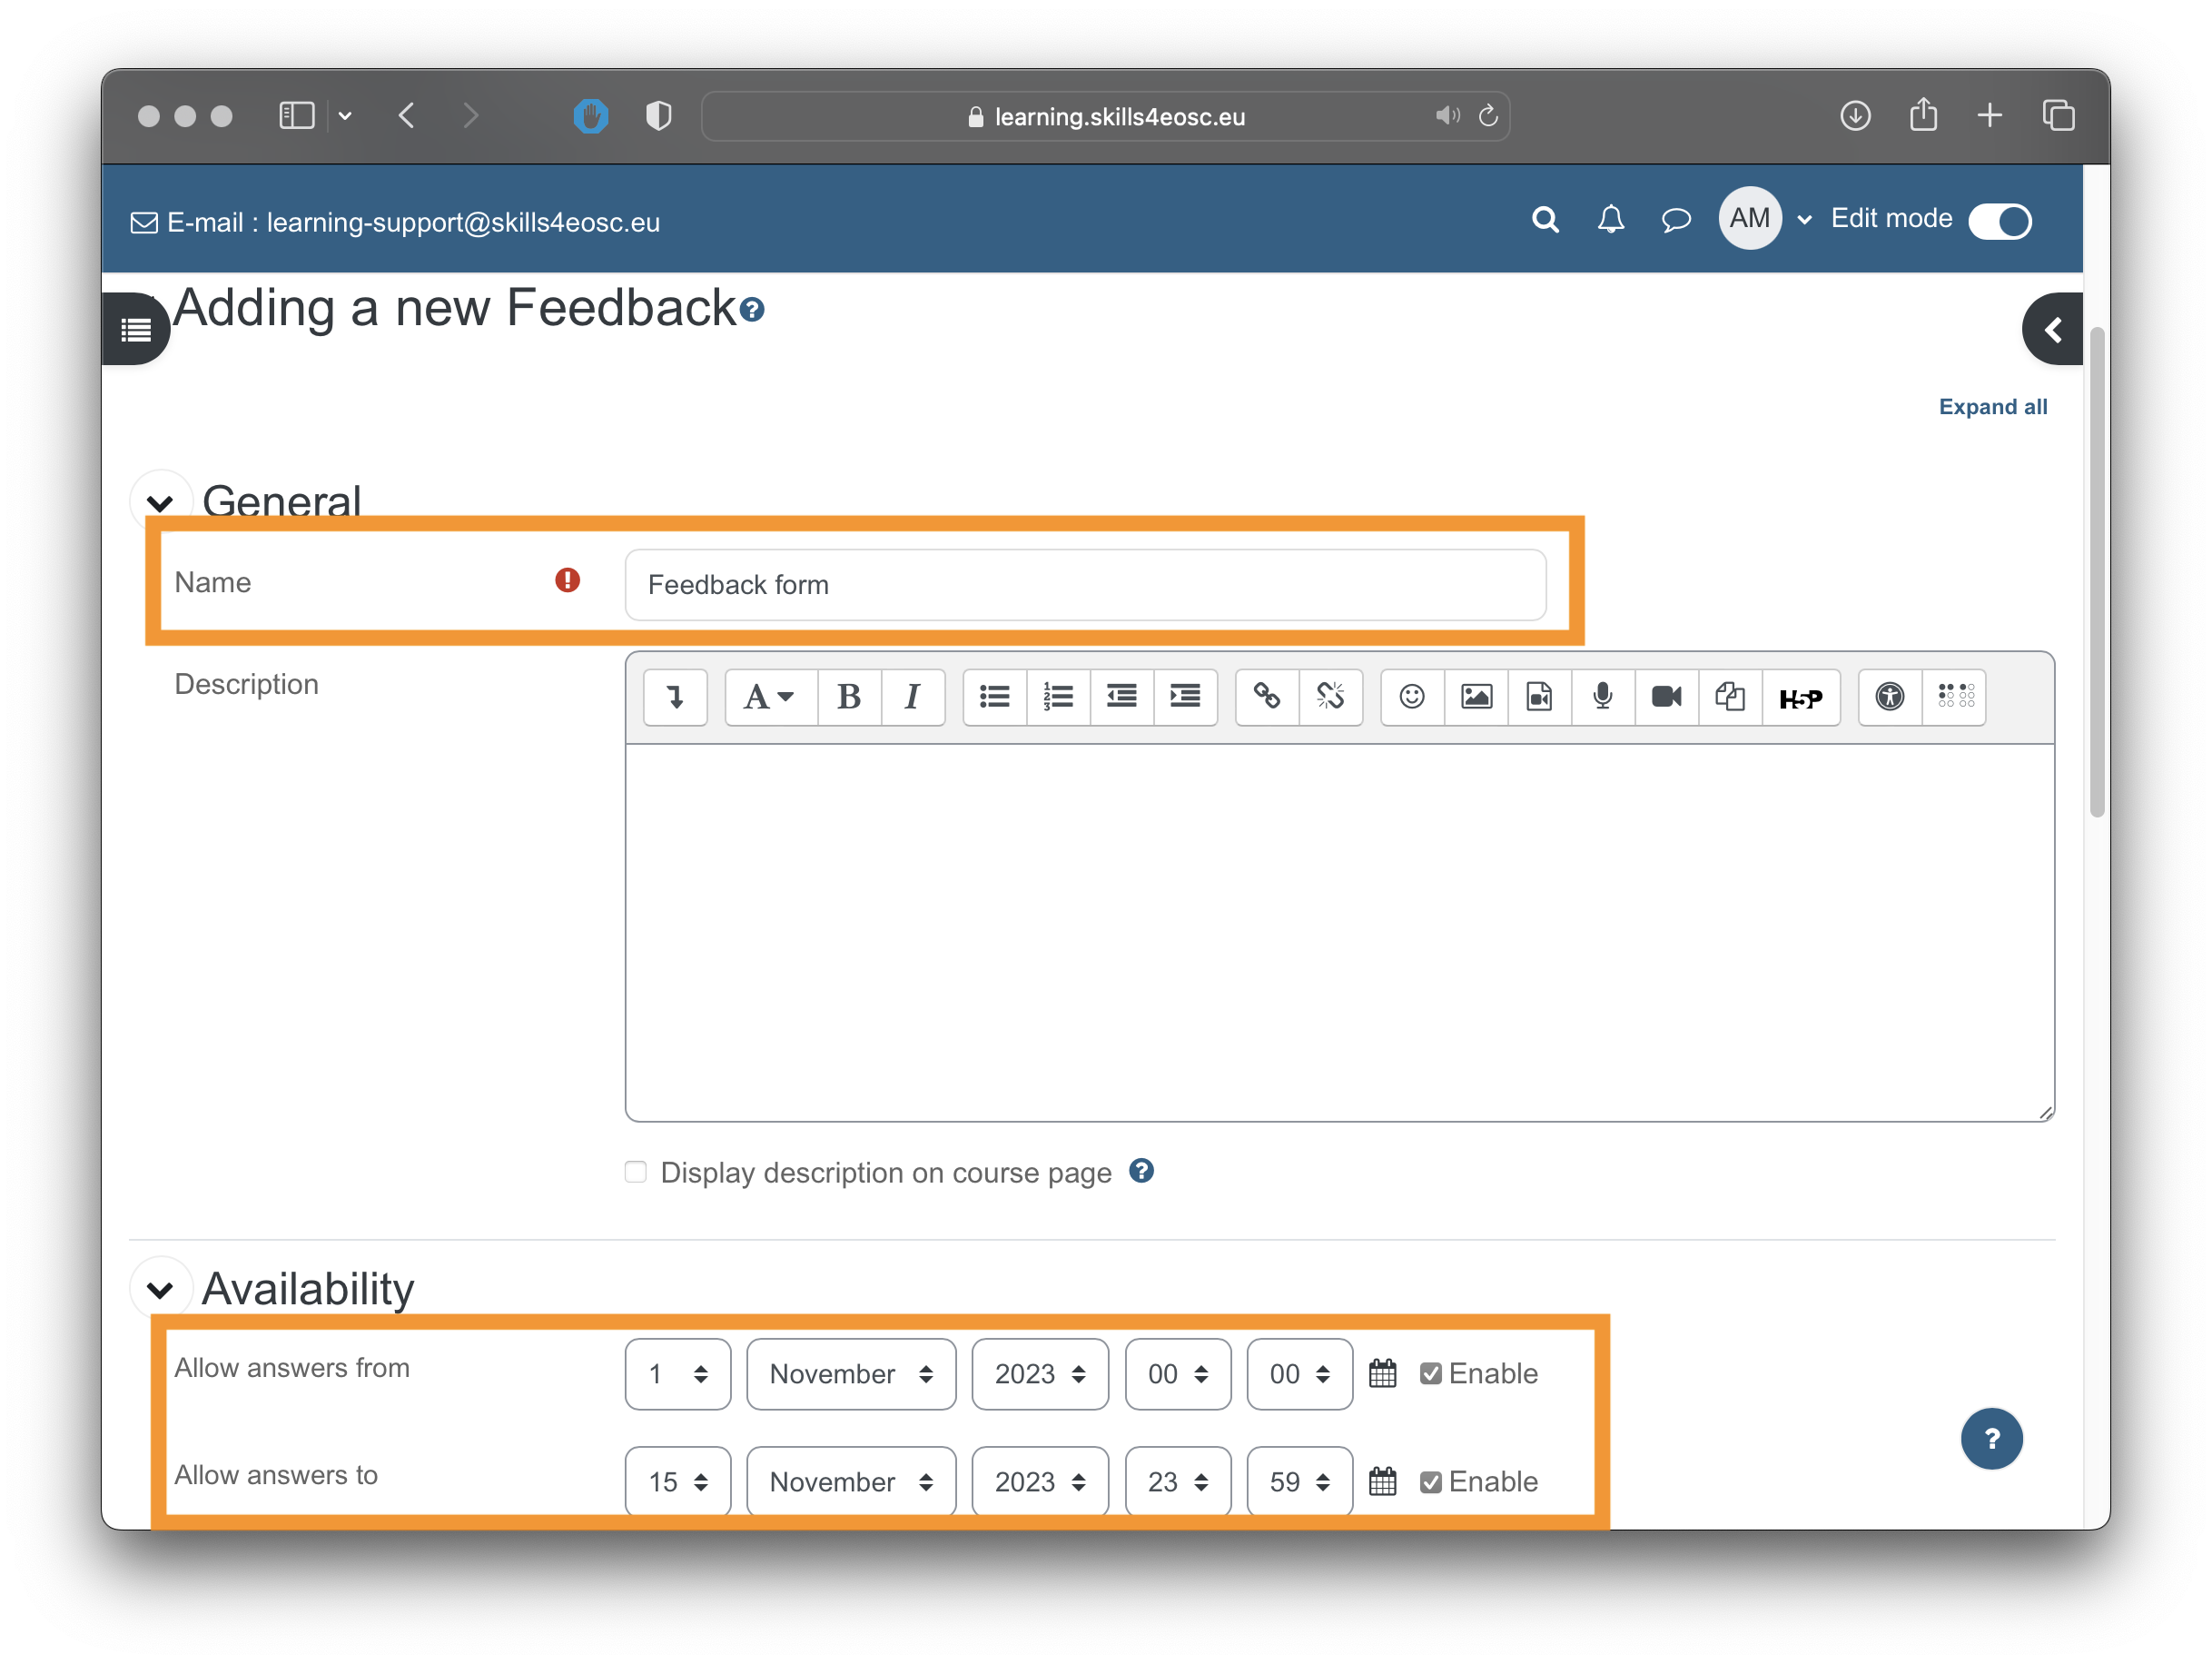
To add a feedback form, use the "Add activity or resource" link and select the "Feedback" item.
Provide the name of the item, as well as the period when the feedback gathering will be available, and "Save and display" the feedback.
Using the "Templates" tab of the newly created feedback form, select the template "Feedback template FAIR-by-Design Learning Materials Methodology" from the "Public" templates section
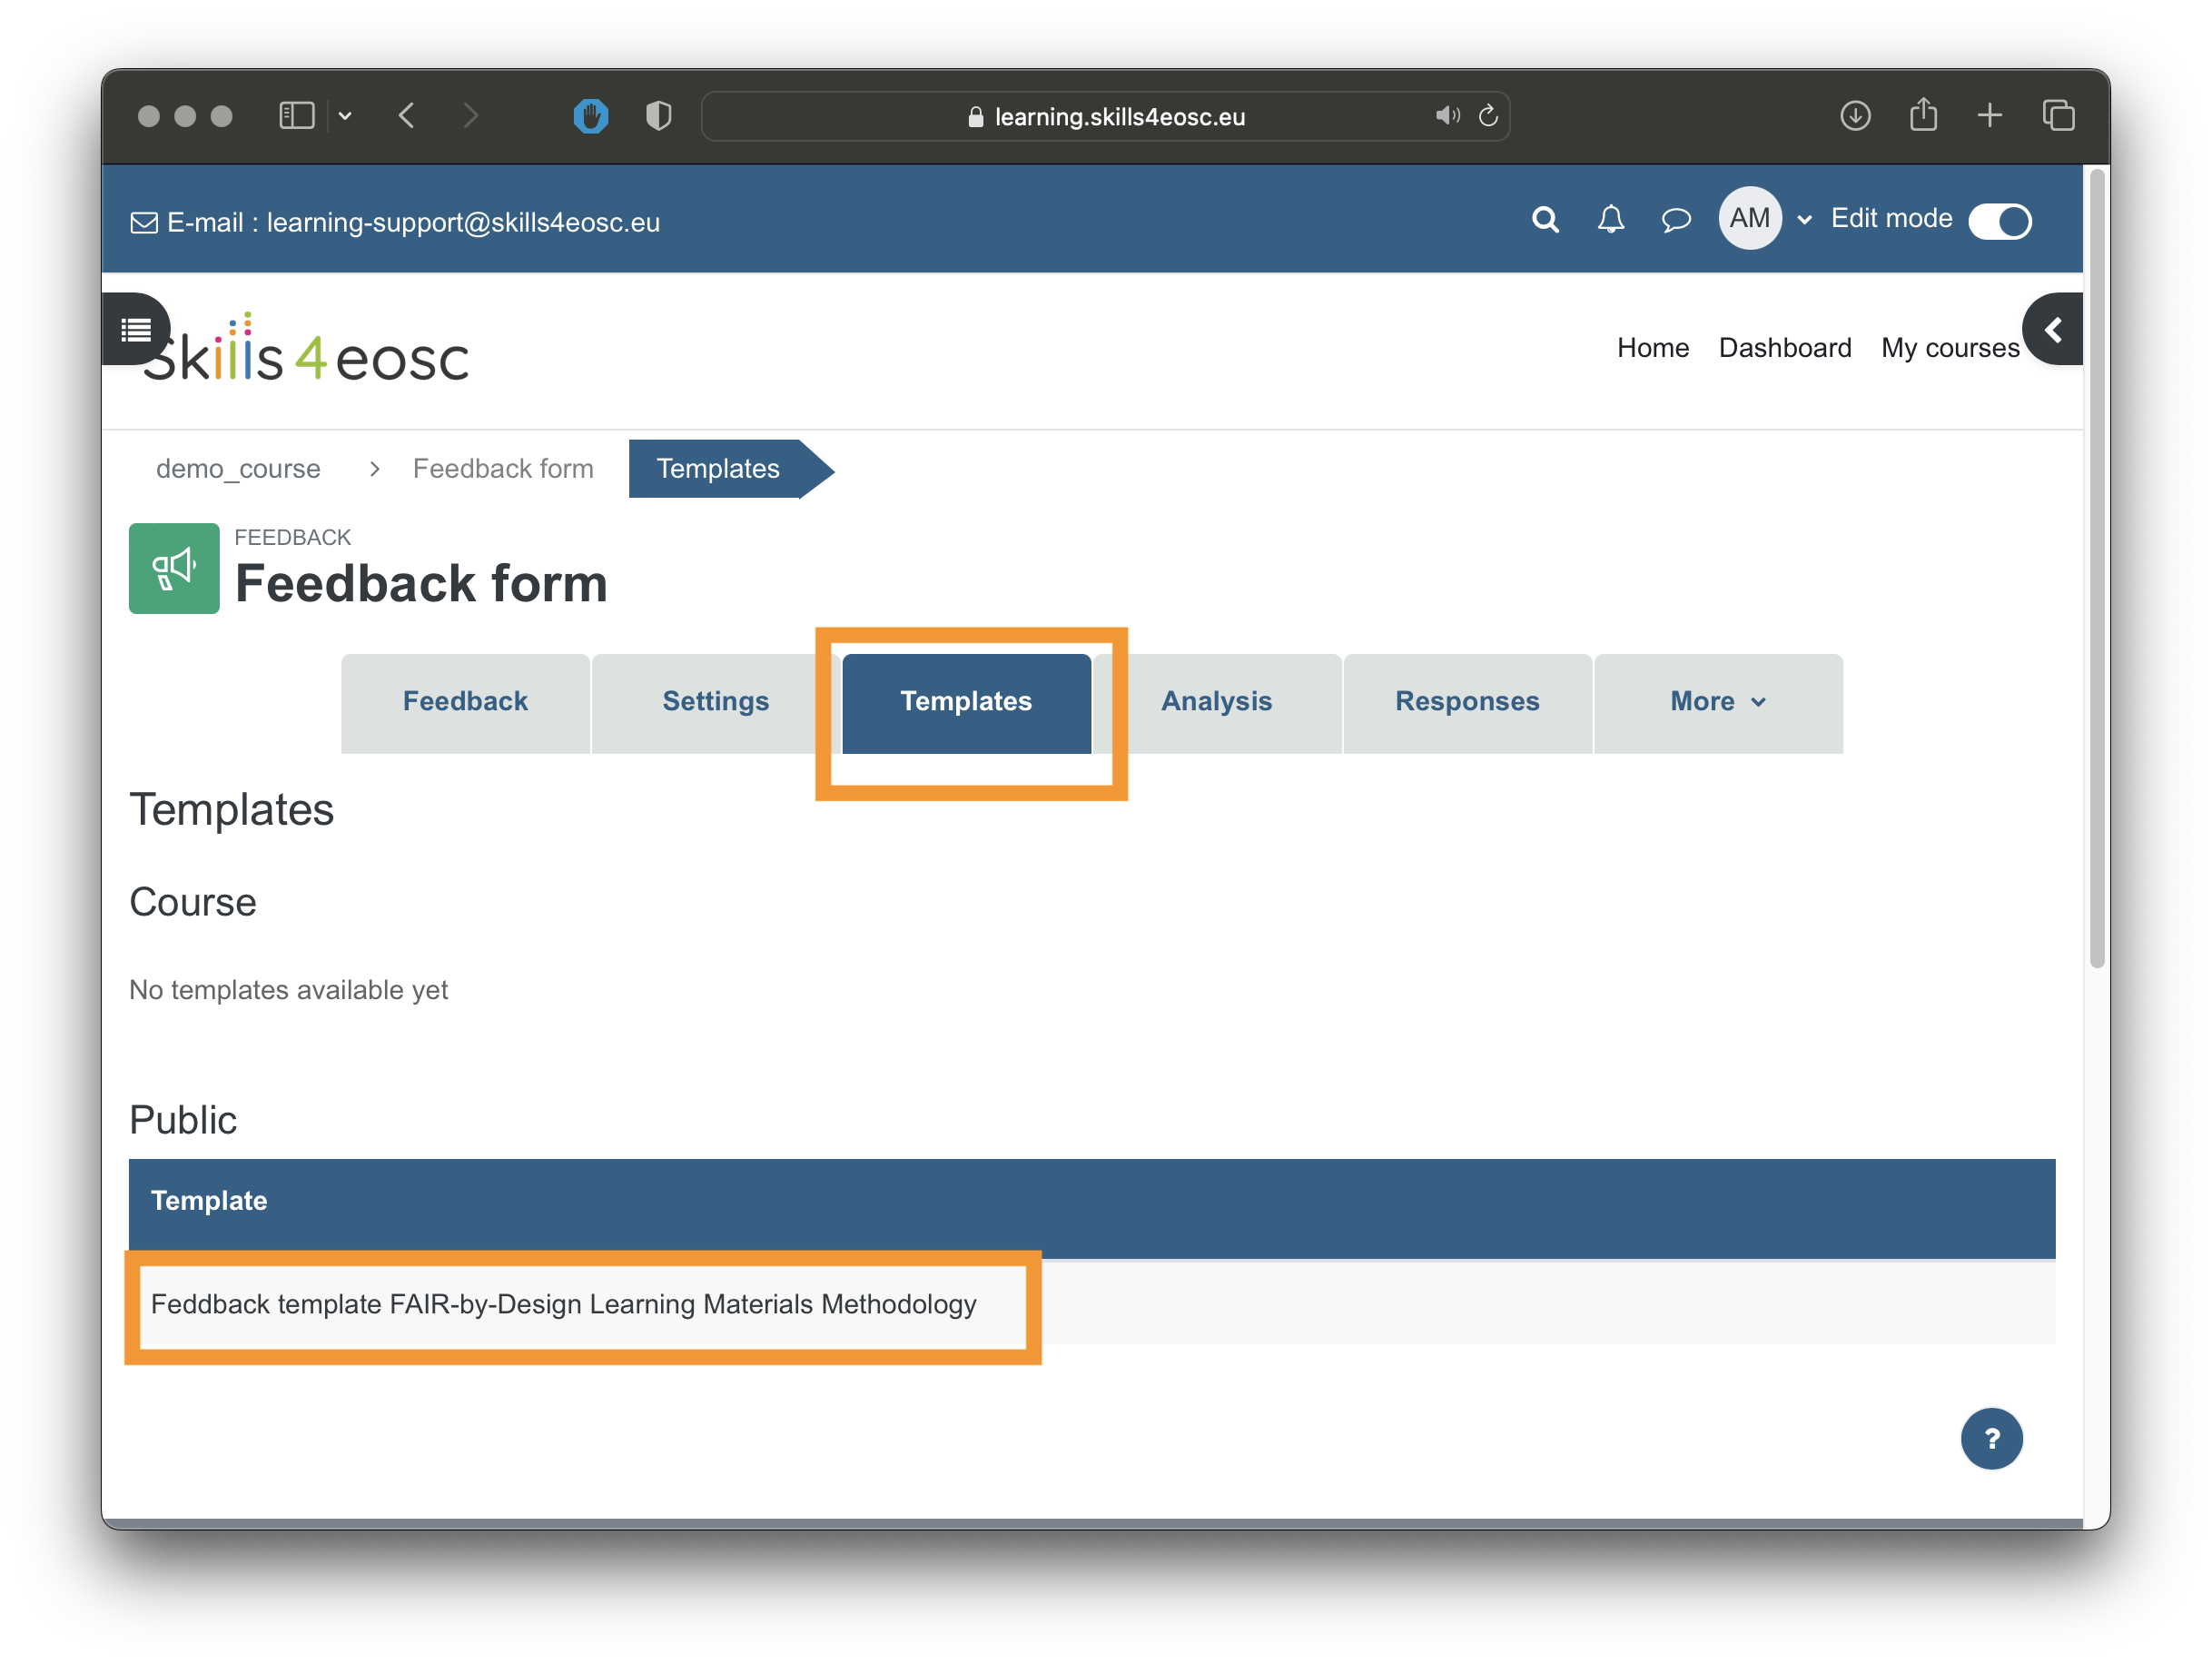
Select the link "Use this template" and "Delete old item" option when saving.
Adding BBB rooms
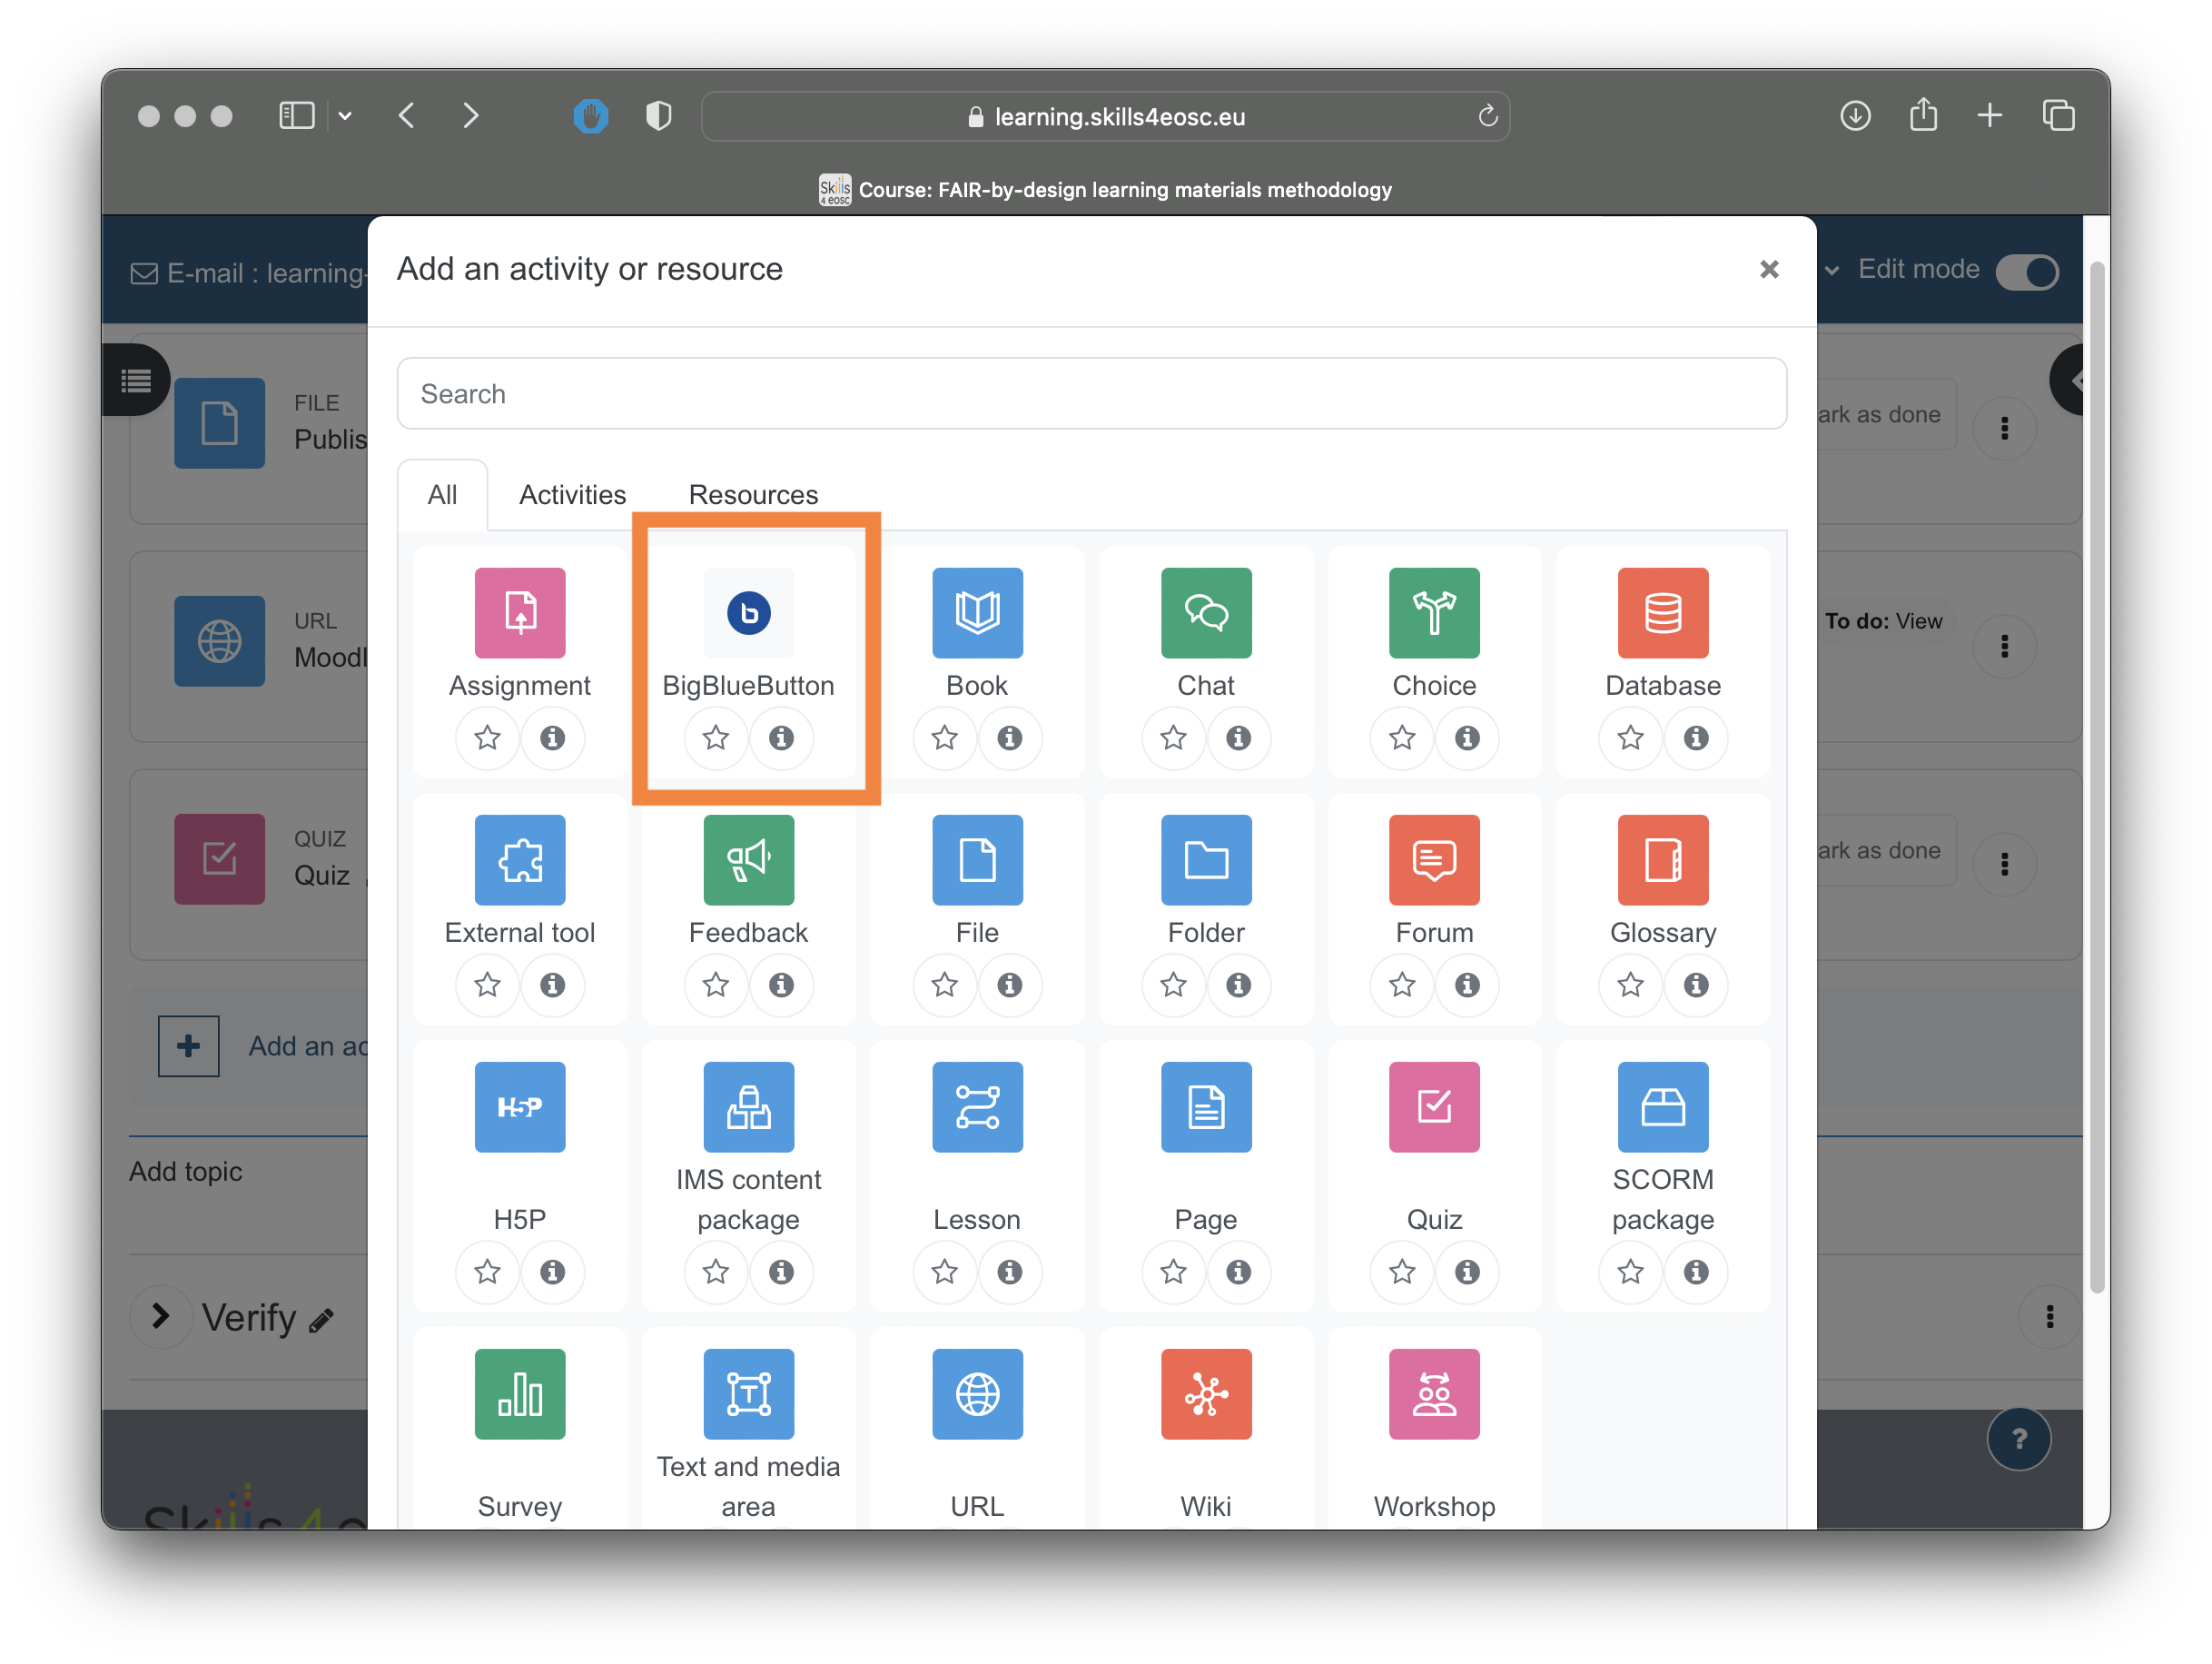
For the courses that will have webinar delivery style, or for the courses that will require recording of the delivery, there is the option to add BigBlueButton (BBB) room.
The BBB room can be added just like any other activity or resource, by selecting the BigBlueButton resource type.
The main parameters of the BBB room are the room name and the instance type.
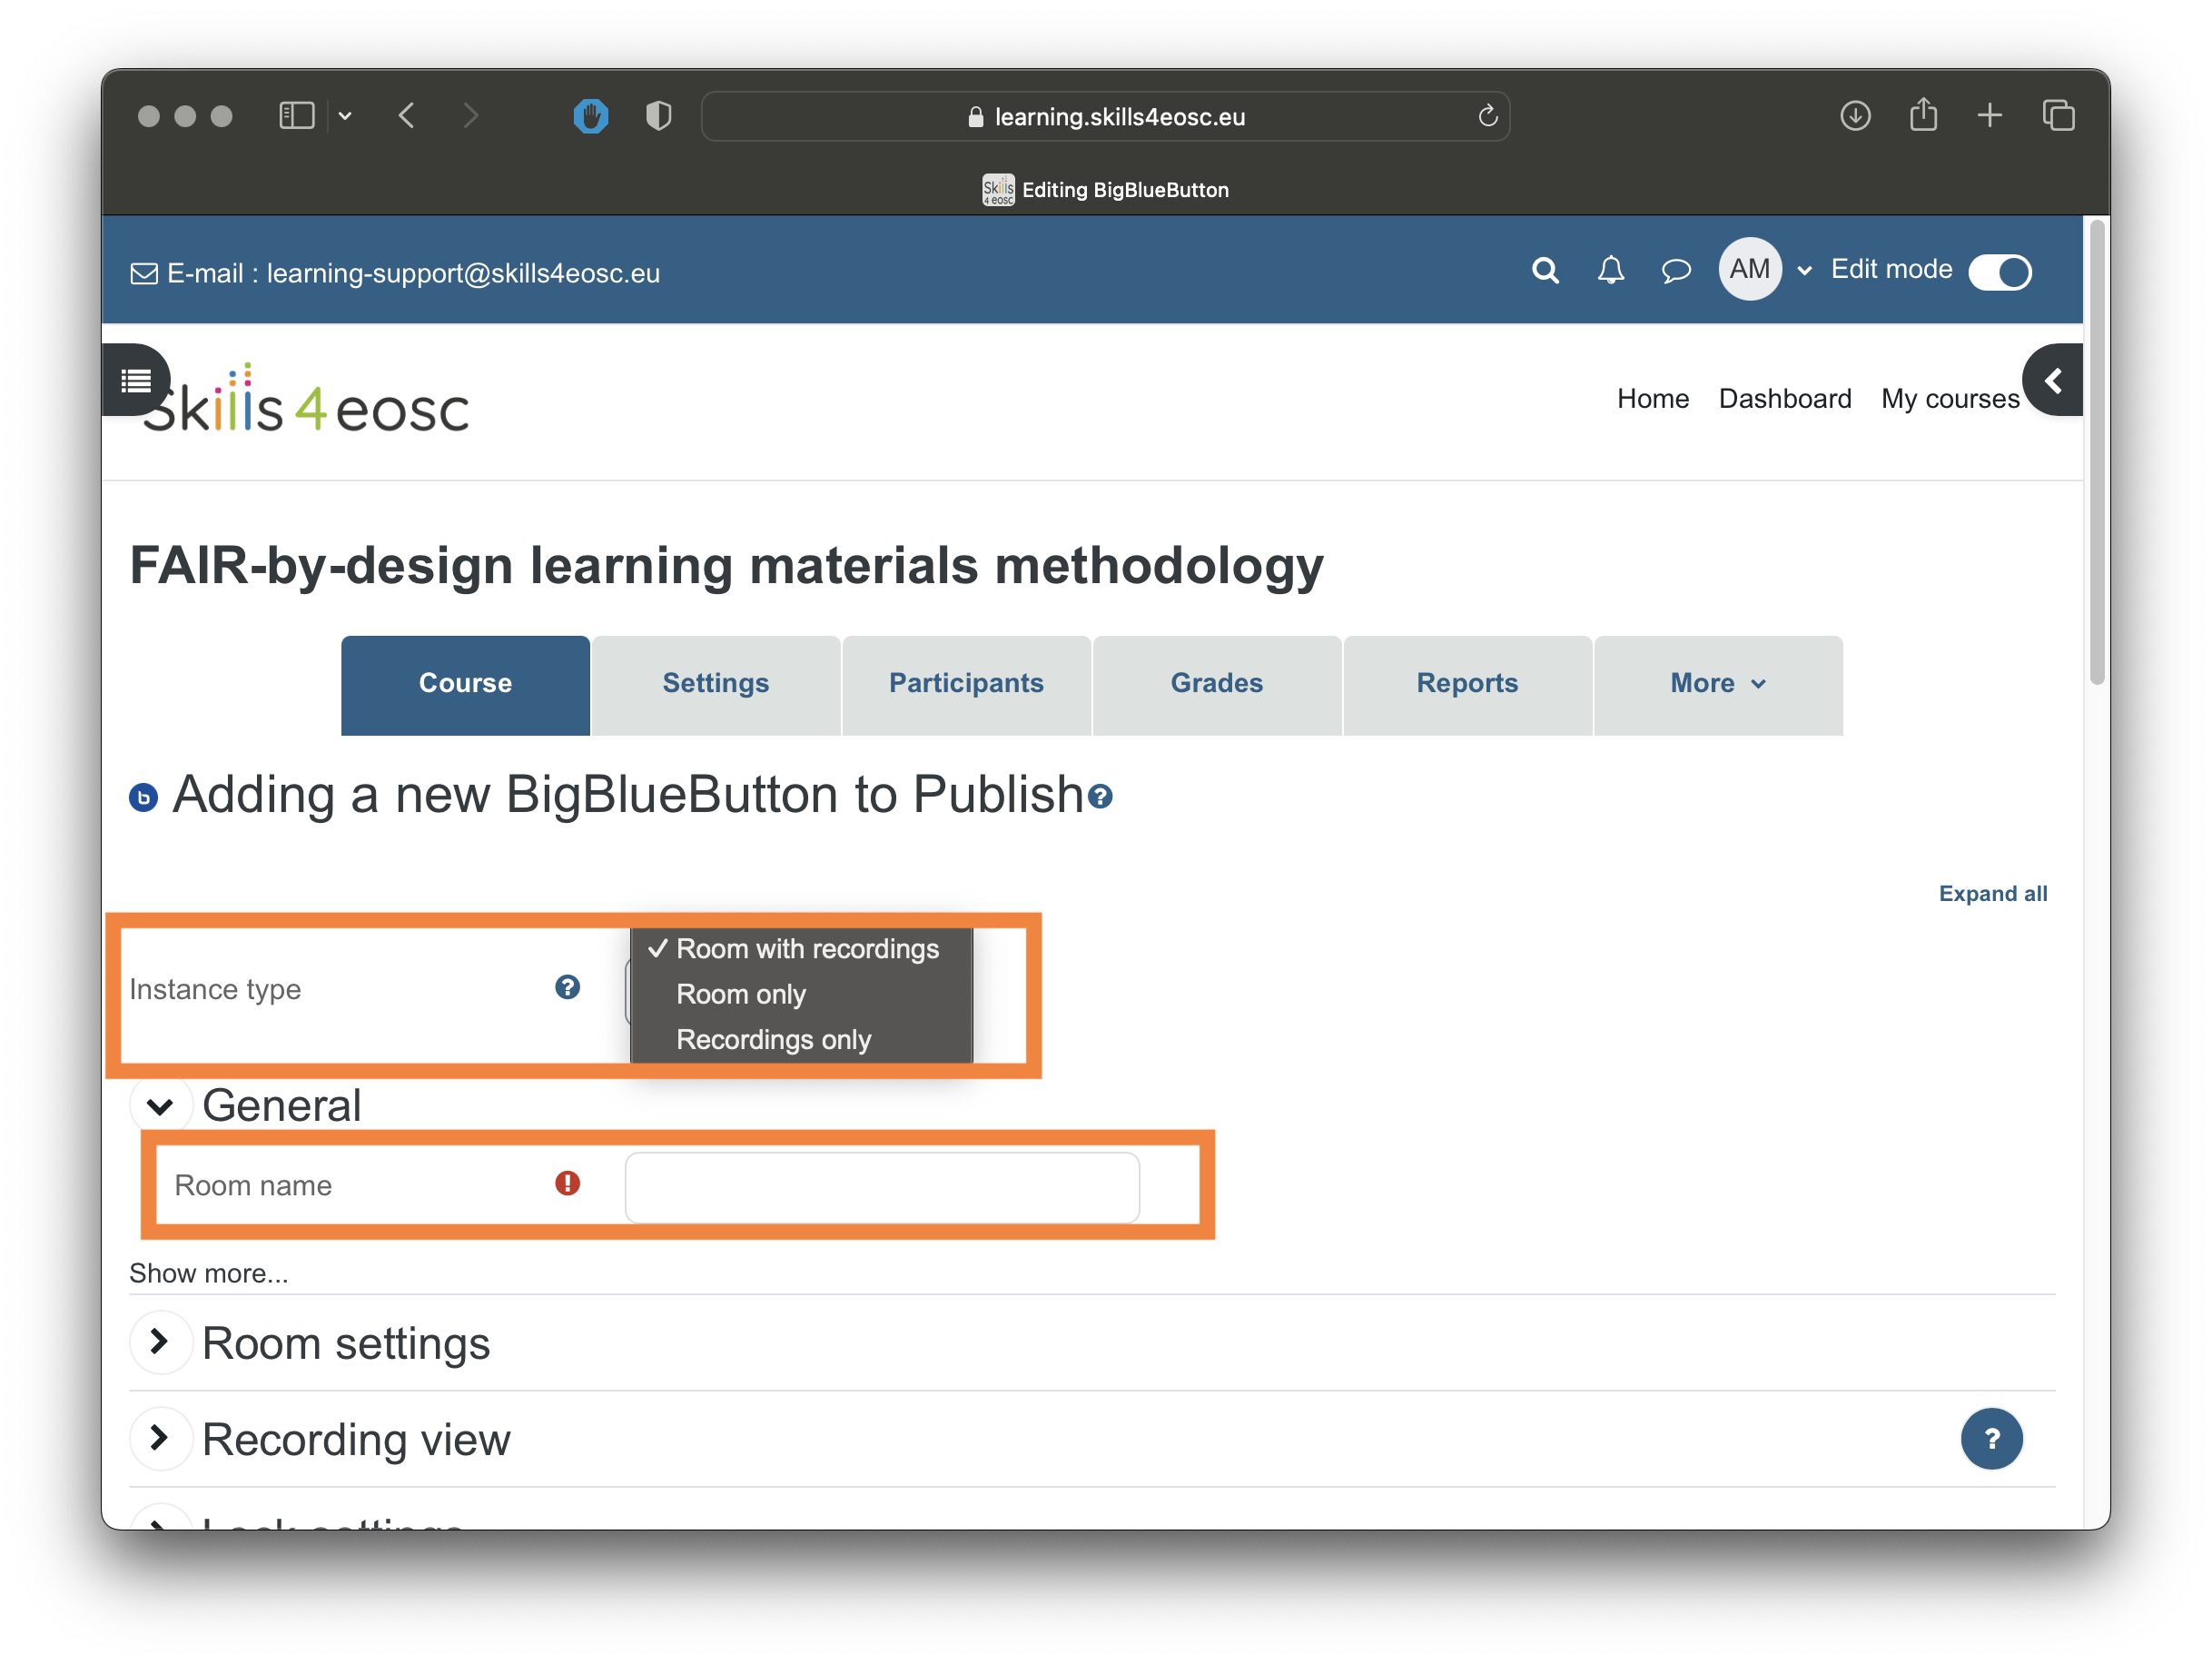
The instance type can be - Room with recording, where the activity can be used for interactive classes, and the recordings of that classes will be available at the same place - Room only, where the room can be used just for interactive classes and no recording - Recording only, meaning that there will not be an interactive room, just previous recordings.
Badges and certificates
The certification mechanism is very important stimulation mechanism for the learners. It provides them recognition for the work, provide job market differentiations as well as verification of the gained skills.
Skills4EOSC T2.5 recommends the use of Open Digital Badges as means to describe the skills obtained with a training. As an example you can take a look at the set of badges that can be obtained for this particular training, wherein there is a defined badge for each separate stage of the FAIR-by-Design Methodology. Obtaining a per stage badge makes you a FAIR-by-Design Methodology Specialist in the given stage alone. The higher-level all encompassing FAIR instructor badge makes you an instructional designer that knows how to implement all stages of the FAIR-by-Design methodology inside and out.
In other words, using digital open badges you can describe the microcredentials that can be obtained by following and being assessed on part of the provided training, or on the training as a whole. Note that T2.5 is currently in the process of developing templates for the digital badges that you can then use a starting point for the visual design of the open badges for your training.
In the following text, a brief introduction is provided to how you can create a badge for your training course.
To add a badge to the course, use the "Badges" link, available through the link "More".
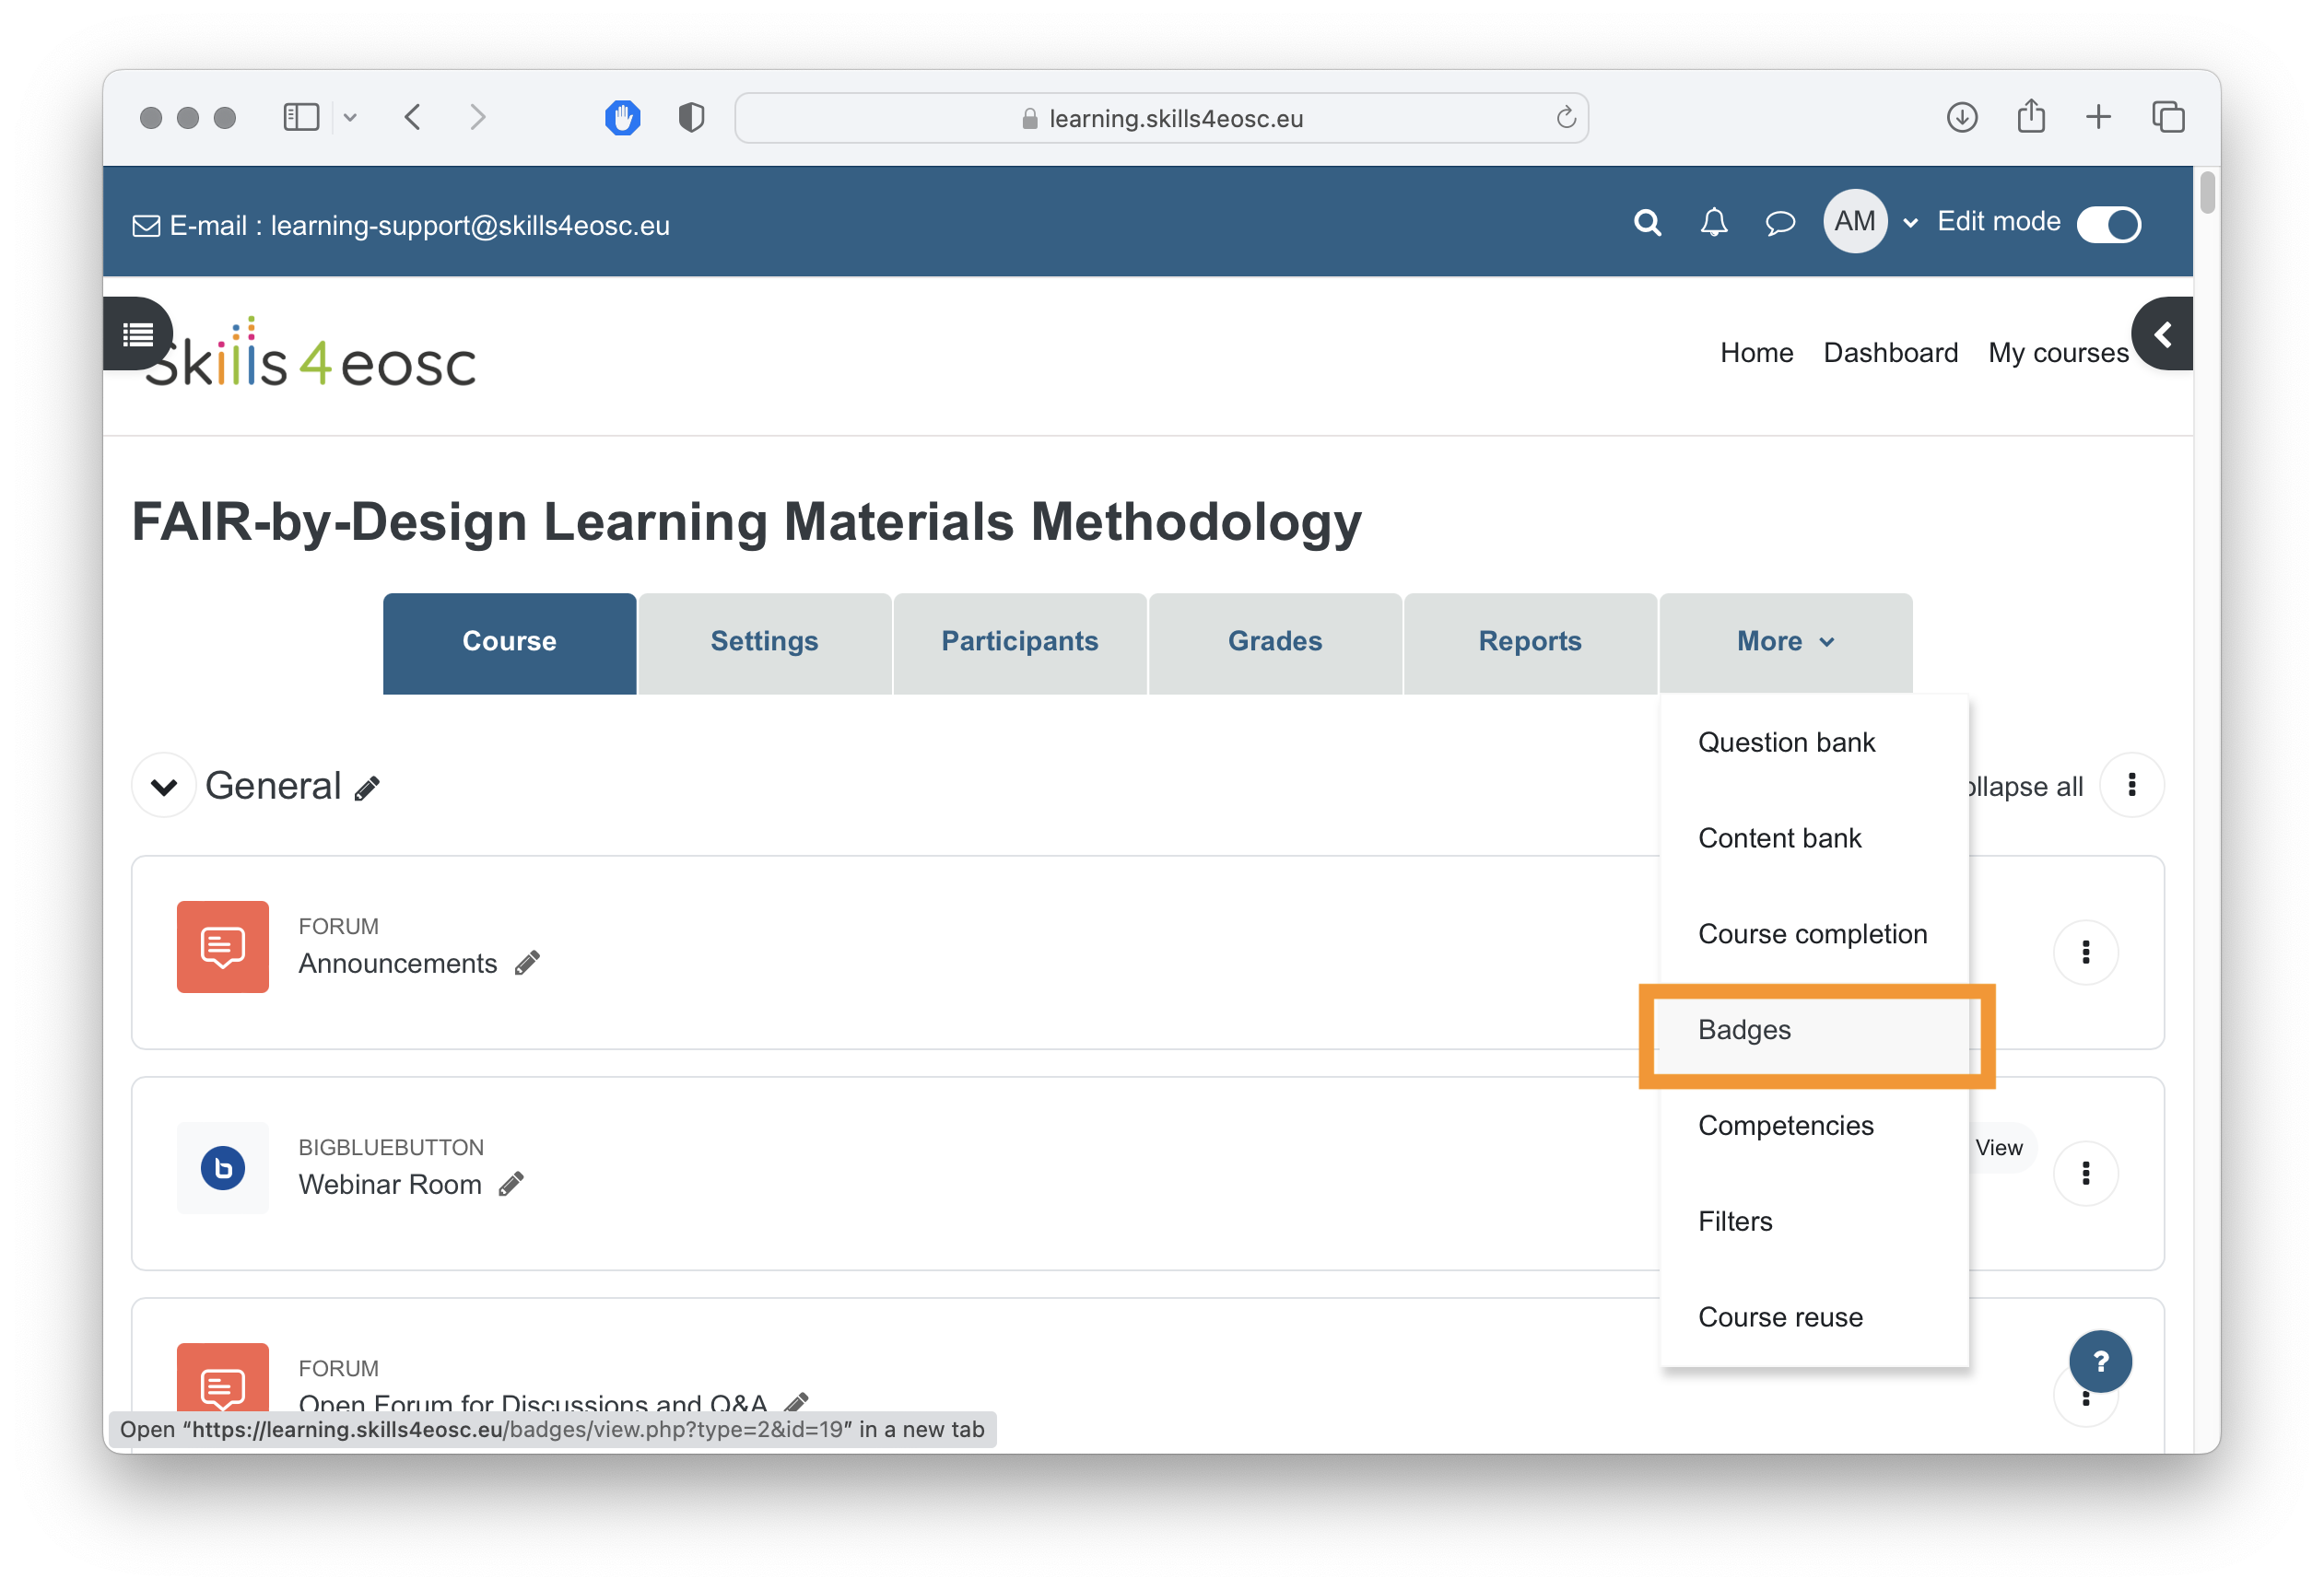
After clicking the "Add new badge", two important steps need to be performed. Firstly, the badge needs to be created with a name, description, uploaded a graphics representation of the badge as well as set the expiry date (if needed). Once this is done, the next step is to define the criteria for earning that specific badge.
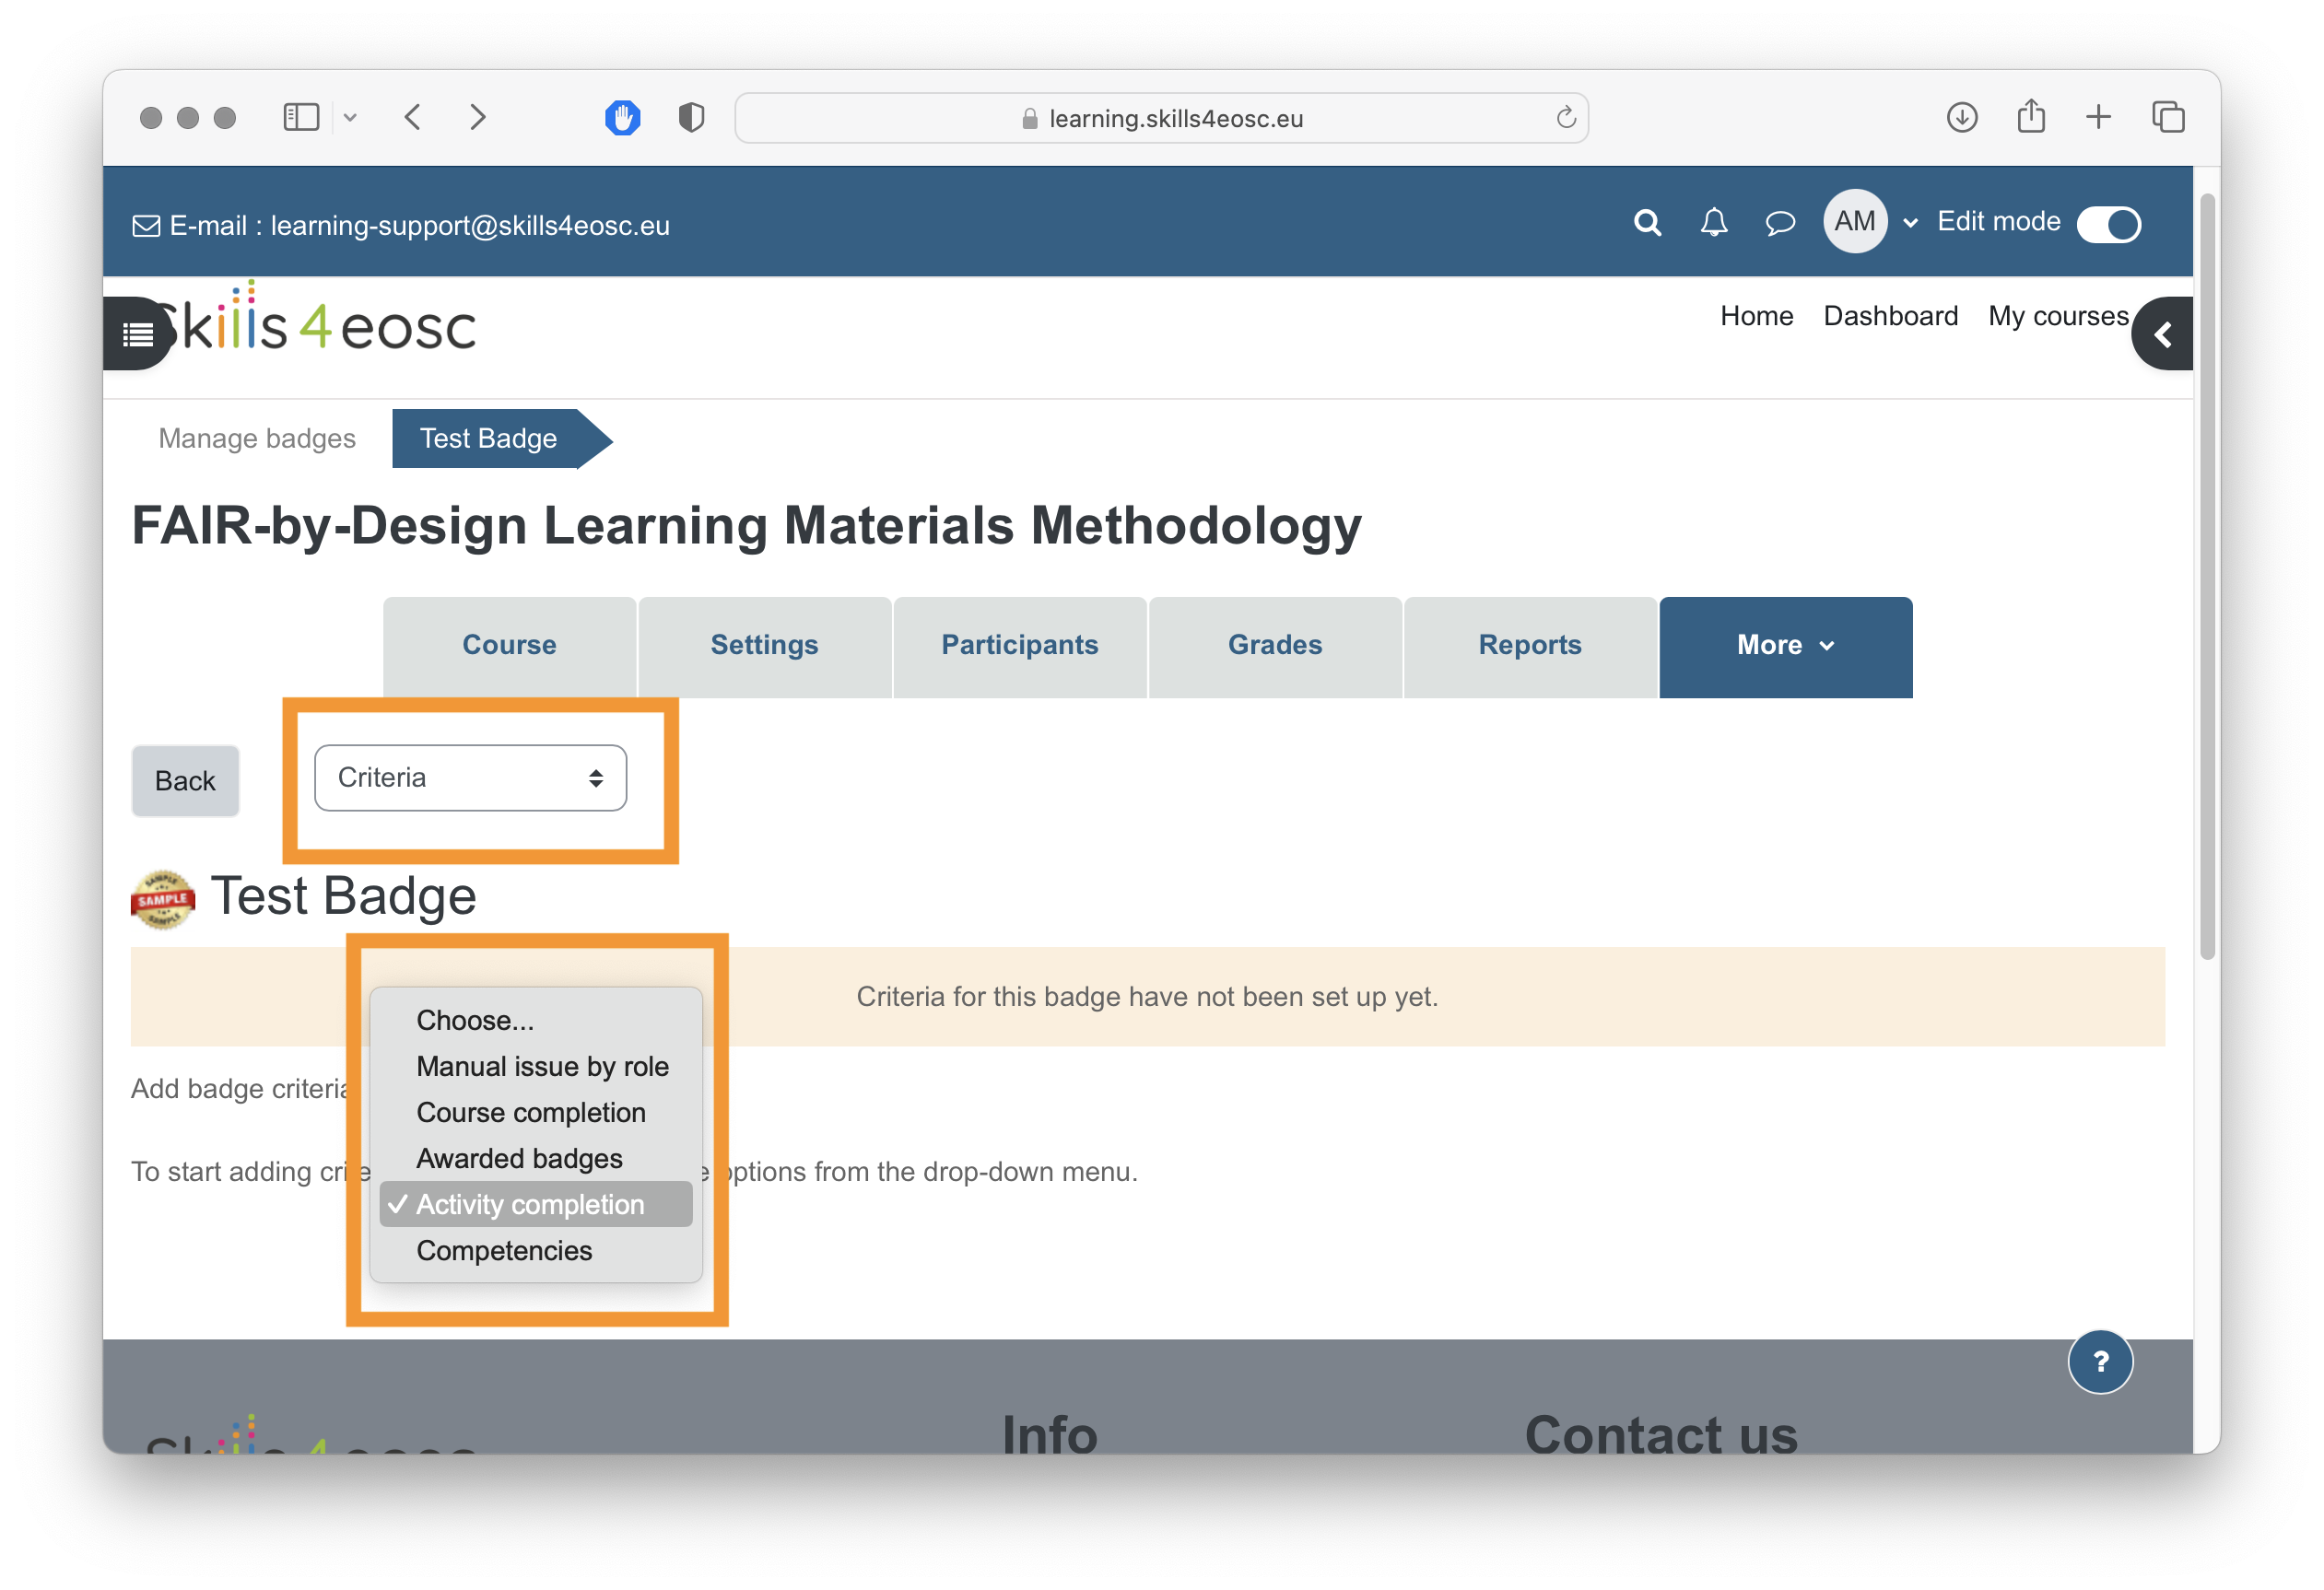
The awarding criteria can be based on previously earned badges (for an overall course badge to be earned if micro-badges were earned before), full course completion, based on activity completions, gained competences or manually assigned. If the "Activity completion" criteria is selected, on the next page all activities of the course are presented and those which completion is recognised by this badge need to be selected.
It is recommended that the Activity completion set of criteria is used, as this will enable automatic issuing of the defined one or more digital badges. Furthermore, the Skills4EOSC learning platform is integrated with the Badgr backpack of digital badges, meaning that one can easily add the earned badge into their backpack, as well as share it on social media or other platforms.
Making the course visible to learners
When the course is ready to be presented to the learners, it needs to be made visible on the learning platform. To make the course visible, in the course setting, the "Course visibility" options needs to be set to "Show".
Indexing the course in the EOSC catalogue
The process of building catalogues of EOSC related courses is undergoing significant changes. Thus at the moment we do not provide any detailed instructions on how to ensure that the learning materials are indexed in the EOSC Catalogue. If you would like to receive a more detailed information regarding this option please contact T2.3 members.
Activity: Adding content to the course on the learning platform
The goal of this activity is to showcase how to add different types of content to the previously created course on the learning platform. For these purposes a Demo course has been created on the learning platform. All participants should have teacher role privileges and can try and test the described steps for adding different types of resources to the learning platform.
Key Takeaways and Information for Future Versions
By adding all learning units as topic to the learning platform together with the link to the syllabus, the feedback form and the BBB room you have completed the minimum requirements for making the learning content available for learners.
More detailed instructions on how to use the learning platform will be provided in a separate Training of Trainers. Until then you can always use the FAIR-by-Design Methodology course on the platform as a blueprint for the organization and availability of the learning materials.
Remember that any subsequent changes to the GitBook will automatically reflect on the learning platform via the provided links. However, if you make changes to the assessment questions or slide deck, you will need to manually update the content on the learning platform as well.
Finally, keep an eye on the upcoming deliverable from T2.5 that will focus on certification and recognition frameworks and provide more details on Digital Open Badges.